No edit summary |
m (→Current records: clean up) |
||
| (24 intermediate revisions by 9 users not shown) | |||
| Line 1: | Line 1: | ||
| ⚫ | |||
{{map|slot=MAP31}} |
{{map|slot=MAP31}} |
||
| − | '''MAP31: Technology Base''' is the |
+ | '''MAP31: Technology Base''' is the secret map of [[Memento Mori]] and can be accessed from [[MAP15: Karmacoma (Memento Mori)|MAP15: Karmacoma]]. It was designed by Denis Möller and uses the music track "Slipper" by [[Mark Klem]]. |
| − | The level is designed to place Players 1 and 3, and 2 and 4 on separate halves of the level in cooperative [[multiplayer]], with both teams meeting only after a certain wall is lowered at a rendezvous point, rendering half of the level normally inaccessible in single-player gameplay. |
+ | The level is designed to place Players 1 and 3, and 2 and 4 on separate halves of the level in cooperative [[multiplayer]], with both teams meeting only after a certain wall is lowered at a rendezvous point, rendering half of the level normally inaccessible in single-player gameplay. However, due to a design flaw, the player can enter the "inaccessible" half of the level in single-player, and consequently, Players 1 and 3 can cross over into Players 2 and 4's side early (see [[#Routes and tricks|Routes and tricks]].) |
| − | == |
+ | == Walkthrough == |
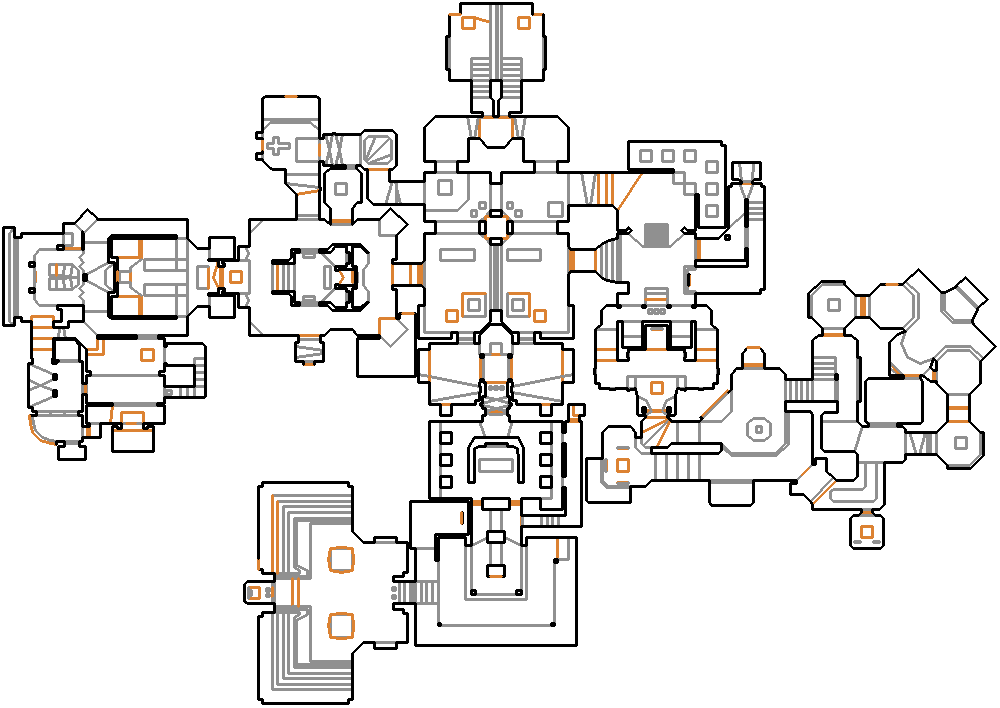
| + | [[file:MM_MAP31_map.png|thumb|300px|Map of MAP31]] |
||
| + | : Letters in ''italics'' refer to marked spots on the map. [[Sector]] numbers in '''boldface''' are [[secrets]] which count toward the [[Intermission screen|end-of-level tally]]. |
||
| − | === |
+ | ====Official==== |
| ⚫ | # In the hallways after the room accessed by the yellow [[key|keycard]], press upon the wall with triangles upon it in the east to reveal a stairway into a hallway behind one of the platforms in the previous room, where you find five [[armor bonus]]es and three [[stimpack]]s. There, press on the wall at the north to reveal a teleporter, leading to a platform ('''sector 23''') at the beginning of the level with a [[soul sphere]]. Walk off the platform to teleport back to the hallway. |
||
| ⚫ | The following secrets are on Players 2 and 4's side of the level. Thus, those cannot be accessed by Players 1 and 3 in [[Multiplayer#Cooperative|coop]] until the rendezvous wall is lowered, and those cannot be accessed in single-player unless one exploits a design flaw (see [[#Routes and tricks|Routes and tricks]]). |
||
| ⚫ | # Beside the switch that raises the bridge in the lava passageway is a portion of the wall with faded coloring. Pressing on this wall will allow you to access the [[chaingunner]]s' cage ('''sector 289'''), containing a [[medikit]], a [[box of bullets]], a [[bulk cell]], a [[chaingun]] and a [[super shotgun]]. |
||
| ⚫ | |||
| − | === |
+ | ====Non-official==== |
| ⚫ | # '''Secret Level Exit:''' In the lava passageway, there is an inset in the southern wall that can be opened to reveal a teleporter leading to the second ''secret level'', [[MAP32: The Hidden Slime Factory (Memento Mori)|The Hidden Slime Factory]]. This is only accessible on Players 2 and 4's side, rendering MAP32 inaccessible in single-player gameplay unless one exploits a design flaw (see [[#Routes and tricks|Routes and tricks]]). |
||
| ⚫ | #In the hallways after the room accessed by the yellow keycard, press upon the wall with triangles upon it in the east to reveal a stairway into a hallway behind one of the platforms in the previous room |
||
| ⚫ | |||
| ⚫ | |||
| − | |||
| ⚫ | |||
| ⚫ | |||
| − | |||
| − | The following is not marked as a secret, and does not count in your Secrets tally at the end of the level: |
||
| ⚫ | #In the lava passageway, there is an inset in the wall that can be opened to reveal a teleporter leading to the second secret level, [[MAP32: The Hidden Slime Factory (Memento Mori)|The Hidden Slime Factory]]. |
||
| − | |||
| ⚫ | |||
===Routes and tricks=== |
===Routes and tricks=== |
||
| − | + | At the rendezvous point, right after collecting the yellow [[key]], drop off to the western part of the room, from where you can open the door. Enter the white teleporter in the southwest to land on top of a raised teleporter platform, facing northwest. Walk straight ahead through the window in front of you. This will allow you to access the part of the level normally inaccessible in single-player gameplay. This can only be attempted once, however, and if unsuccessful, you will be unable to try again until you restart the level (or restore a saved game prior to attempting it,) as you must permanently lower the platform to the ground to get back onto the telepoter again. This is the only way to access the secret exit in this level in single-player besides [[Doom_cheat_codes|cheat]]ing. (See [[#Secrets|Secrets]].) |
|
| − | |||
| − | ===Records=== |
||
| + | ===Current records=== |
||
The [[Compet-N]] records for the map are: |
The [[Compet-N]] records for the map are: |
||
| + | |||
| − | {| {{prettytable}} |
||
| + | {| class="WikiaTable" |
||
!Run||Time||Player||Date||File||Notes |
!Run||Time||Player||Date||File||Notes |
||
|- |
|- |
||
| − | |[[UV speed]]||03:16||[[Oyvind Stenhaug]]||2003-03-21||{{competnftp|pwads/mm/speed/mm31-316.zip}}|| |
+ | |[[UV speed]] (normal exit)||03:16||[[Oyvind Stenhaug]]||2003-03-21||{{External Link|site=competnftp|file_path=pwads/mm/speed/mm31-316.zip|text=mm31-316.zip}}|| |
|- |
|- |
||
| + | |[[UV speed]] (secret exit)||05:52||[[Casey Alvis]]||2002-09-12||{{External Link|site=competnftp|file_path=pwads/mm/speed/mm31-552.zip|text=mm31-552.zip}}|| |
||
| ⚫ | |||
|- |
|- |
||
| ⚫ | |||
| ⚫ | |||
| + | |- |
||
| + | |[[NM speed]] (secret exit)|| || || || || |
||
| + | |- |
||
| ⚫ | |||
|- |
|- |
||
|[[NM100S]]|| || || || || |
|[[NM100S]]|| || || || || |
||
| Line 48: | Line 49: | ||
|} |
|} |
||
| + | ===Miscellaneous demos=== |
||
| − | ==Deathmatch== |
||
| + | {| class="WikiaTable" |
||
| + | !Run||Time||Player||Date||File||Notes |
||
| + | |- |
||
| + | | || || || ||[ftp://.zip .zip]|| |
||
| + | |} |
||
| − | ==Statistics== |
+ | == Statistics == |
===Map data=== |
===Map data=== |
||
| + | {| class="WikiaTable" |
||
| − | {| {{prettytable}} |
||
|[[Things]]||704 |
|[[Things]]||704 |
||
|- |
|- |
||
| − | |[[ |
+ | |[[Vertex]]es||2210 |
|- |
|- |
||
|[[Linedefs]]||2732 |
|[[Linedefs]]||2732 |
||
| Line 63: | Line 69: | ||
|[[Sectors]]||510 |
|[[Sectors]]||510 |
||
|} |
|} |
||
| + | |||
===Things=== |
===Things=== |
||
| + | {| class="WikiaTable" |
||
| + | ![[Monsters]]||[[ITYTD]] and [[HNTR]]||[[HMP]]||[[UV]] and [[NM]] |
||
| + | |- |
||
| + | |[[Baron of hell|Barons of hell]]||0||2||3 |
||
| + | |- |
||
| + | |[[Cacodemon]]s||6||7||10 |
||
| + | |- |
||
| + | |[[Demon]]s||26||35||44 |
||
| + | |- |
||
| + | |[[Heavy weapon dude]]s||25||36||49 |
||
| + | |- |
||
| + | |[[Hell knight]]s||6||6||10 |
||
| + | |- |
||
| + | |[[Imp]]s||50||72||94 |
||
| + | |- |
||
| + | |[[Mancubi]]||1||2||4 |
||
| + | |- |
||
| + | |[[Revenant]]s||2||2||2 |
||
| + | |- |
||
| + | |[[Shotgun guy]]s||35||57||84 |
||
| + | |- |
||
| + | |[[Spectre]]s||2||4||5 |
||
| + | |- |
||
| + | |[[Zombiemen]]||26||38||46 |
||
| + | |- |
||
| + | ![[Powerup]]s||ITYTD and HNTR||HMP||UV and NM |
||
| + | |- |
||
| + | |[[Armor bonus]]es||36||36||36 |
||
| + | |- |
||
| + | |[[Berserk pack]]s||2||2||2 |
||
| + | |- |
||
| + | |[[Health bonus]]es||12||12||12 |
||
| + | |- |
||
| + | |[[Medikit]]s||9||9||9 |
||
| + | |- |
||
| + | |[[Soul Sphere]]s||1||1||1 |
||
| + | |- |
||
| + | |[[Stimpack]]s||94||94||94 |
||
| + | |- |
||
| + | ![[Weapons]]||ITYTD and HNTR||HMP||UV and NM |
||
| + | |- |
||
| + | |[[Chainsaw]]s||1||1||1 |
||
| + | |- |
||
| + | |[[Shotgun]]s||2||2||2 |
||
| + | |- |
||
| + | |[[Super shotgun]]s||2||2||2 |
||
| + | |- |
||
| + | |[[Chaingun]]s||3||3||3 |
||
| + | |- |
||
| + | |[[Rocket launcher]]s||2||2||2 |
||
| + | |- |
||
| + | ![[Ammunition]]||ITYTD and HNTR||HMP||UV and NM |
||
| + | |- |
||
| + | |[[Clip]]s||42||42||42 |
||
| + | |- |
||
| + | |[[Box of bullets|Bullet boxes]]||13||13||13 |
||
| + | |- |
||
| + | |[[4 shotgun shells]]||60||60||60 |
||
| + | |- |
||
| + | |[[Box of shells|Shell boxes]]||4||4||4 |
||
| + | |- |
||
| + | |[[Energy cell]]s||1||1||1 |
||
| + | |- |
||
| + | |[[Energy cell pack]]s||2||2||2 |
||
| + | |- |
||
| + | ![[Keys]]||ITYTD and HNTR||HMP||UV and NM |
||
| + | |- |
||
| + | |Red cards||1||1||1 |
||
| + | |- |
||
| + | |Yellow cards||1||1||1 |
||
| + | |} |
||
| − | ==External links== |
+ | == External links == |
* [http://www.doom2.net/~compet-n/index.cgi?action=pwads&page=mm Memento Mori demos from the Compet-N database] |
* [http://www.doom2.net/~compet-n/index.cgi?action=pwads&page=mm Memento Mori demos from the Compet-N database] |
||
| + | |||
| ⚫ | |||
| ⚫ | |||
| + | |||
| + | [[es:MAP31: Technology Base (Memento Mori)]] |
||
| + | [[Category:Levels by name|Technology Base (Memento Mori)]] |
||
| + | [[Category:Denis Möller levels]] |
||
| ⚫ | |||
Latest revision as of 04:38, 23 March 2020
- This level occupies the map slot MAP31. For other maps which occupy this slot, see Category:MAP31.
MAP31: Technology Base is the secret map of Memento Mori and can be accessed from MAP15: Karmacoma. It was designed by Denis Möller and uses the music track "Slipper" by Mark Klem.
The level is designed to place Players 1 and 3, and 2 and 4 on separate halves of the level in cooperative multiplayer, with both teams meeting only after a certain wall is lowered at a rendezvous point, rendering half of the level normally inaccessible in single-player gameplay. However, due to a design flaw, the player can enter the "inaccessible" half of the level in single-player, and consequently, Players 1 and 3 can cross over into Players 2 and 4's side early (see Routes and tricks.)
Walkthrough
Map of MAP31
- Letters in italics refer to marked spots on the map. Sector numbers in boldface are secrets which count toward the end-of-level tally.
Official
- In the hallways after the room accessed by the yellow keycard, press upon the wall with triangles upon it in the east to reveal a stairway into a hallway behind one of the platforms in the previous room, where you find five armor bonuses and three stimpacks. There, press on the wall at the north to reveal a teleporter, leading to a platform (sector 23) at the beginning of the level with a soul sphere. Walk off the platform to teleport back to the hallway.
The following secrets are on Players 2 and 4's side of the level. Thus, those cannot be accessed by Players 1 and 3 in coop until the rendezvous wall is lowered, and those cannot be accessed in single-player unless one exploits a design flaw (see Routes and tricks).
- Beside the switch that raises the bridge in the lava passageway is a portion of the wall with faded coloring. Pressing on this wall will allow you to access the chaingunners' cage (sector 289), containing a medikit, a box of bullets, a bulk cell, a chaingun and a super shotgun.
- In the hallway with stairs leading up to the switch that lowers the bars, press on the northern wall the light is shining on to reveal a compartment (sector 306) containing four stimpacks, an armor bonus, three clips and three sets of shells.
Non-official
- Secret Level Exit: In the lava passageway, there is an inset in the southern wall that can be opened to reveal a teleporter leading to the second secret level, The Hidden Slime Factory. This is only accessible on Players 2 and 4's side, rendering MAP32 inaccessible in single-player gameplay unless one exploits a design flaw (see Routes and tricks).
Speedrunning
Routes and tricks
At the rendezvous point, right after collecting the yellow key, drop off to the western part of the room, from where you can open the door. Enter the white teleporter in the southwest to land on top of a raised teleporter platform, facing northwest. Walk straight ahead through the window in front of you. This will allow you to access the part of the level normally inaccessible in single-player gameplay. This can only be attempted once, however, and if unsuccessful, you will be unable to try again until you restart the level (or restore a saved game prior to attempting it,) as you must permanently lower the platform to the ground to get back onto the telepoter again. This is the only way to access the secret exit in this level in single-player besides cheating. (See Secrets.)
Current records
The Compet-N records for the map are:
| Run | Time | Player | Date | File | Notes |
|---|---|---|---|---|---|
| UV speed (normal exit) | 03:16 | Oyvind Stenhaug | 2003-03-21 | mm31-316.zip | |
| UV speed (secret exit) | 05:52 | Casey Alvis | 2002-09-12 | mm31-552.zip | |
| NM speed (normal exit) | |||||
| NM speed (secret exit) | |||||
| UV max | 09:58 | Anthony "Swedish Fish" Soto | 2002-05-04 | mm31-958.zip | |
| NM100S | |||||
| UV -fast | |||||
| UV -respawn | |||||
| UV Tyson | |||||
| UV pacifist |
Miscellaneous demos
| Run | Time | Player | Date | File | Notes |
|---|---|---|---|---|---|
| .zip |
Statistics
Map data
| Things | 704 |
| Vertexes | 2210 |
| Linedefs | 2732 |
| Sidedefs | 3874 |
| Sectors | 510 |
Things
| Monsters | ITYTD and HNTR | HMP | UV and NM |
|---|---|---|---|
| Barons of hell | 0 | 2 | 3 |
| Cacodemons | 6 | 7 | 10 |
| Demons | 26 | 35 | 44 |
| Heavy weapon dudes | 25 | 36 | 49 |
| Hell knights | 6 | 6 | 10 |
| Imps | 50 | 72 | 94 |
| Mancubi | 1 | 2 | 4 |
| Revenants | 2 | 2 | 2 |
| Shotgun guys | 35 | 57 | 84 |
| Spectres | 2 | 4 | 5 |
| Zombiemen | 26 | 38 | 46 |
| Powerups | ITYTD and HNTR | HMP | UV and NM |
| Armor bonuses | 36 | 36 | 36 |
| Berserk packs | 2 | 2 | 2 |
| Health bonuses | 12 | 12 | 12 |
| Medikits | 9 | 9 | 9 |
| Soul Spheres | 1 | 1 | 1 |
| Stimpacks | 94 | 94 | 94 |
| Weapons | ITYTD and HNTR | HMP | UV and NM |
| Chainsaws | 1 | 1 | 1 |
| Shotguns | 2 | 2 | 2 |
| Super shotguns | 2 | 2 | 2 |
| Chainguns | 3 | 3 | 3 |
| Rocket launchers | 2 | 2 | 2 |
| Ammunition | ITYTD and HNTR | HMP | UV and NM |
| Clips | 42 | 42 | 42 |
| Bullet boxes | 13 | 13 | 13 |
| 4 shotgun shells | 60 | 60 | 60 |
| Shell boxes | 4 | 4 | 4 |
| Energy cells | 1 | 1 | 1 |
| Energy cell packs | 2 | 2 | 2 |
| Keys | ITYTD and HNTR | HMP | UV and NM |
| Red cards | 1 | 1 | 1 |
| Yellow cards | 1 | 1 | 1 |