No edit summary |
No edit summary |
||
| Line 25: | Line 25: | ||
====Non-official==== |
====Non-official==== |
||
| − | The western part of the building to the north of the walkway (C) contains the corridor that leads to a [[teleporter]]. Drop down and enter |
+ | The western part of the building to the north of the walkway (C) contains the corridor that leads to a [[teleporter]]. Drop down to the blood pit and enter through the opening at the building's base. The teleporter at the end of it warps you into that caged chamber containing some [[heavy weapon dude]]s and a [[plasma gun]]. Turn around and enter the same teleporter through which you came here. You will find yourself in the otherwise inaccessible area in the southwest corner of the map with four [[energy cell pack]]s. |
==Speedrunning== |
==Speedrunning== |
||
Revision as of 17:26, 24 April 2010
- This level occupies the map slot MAP29. For other maps which occupy this slot, see Category:MAP29.
Template:Doom II 21-30 MAP29: The Living End is the twenty-ninth map of Doom II. It was designed by John Romero and uses the music track "Shawn's Got The Shotgun". The level is named after a music group called The Living End which formed earlier in 1994, the year Doom II was released.
Strategy
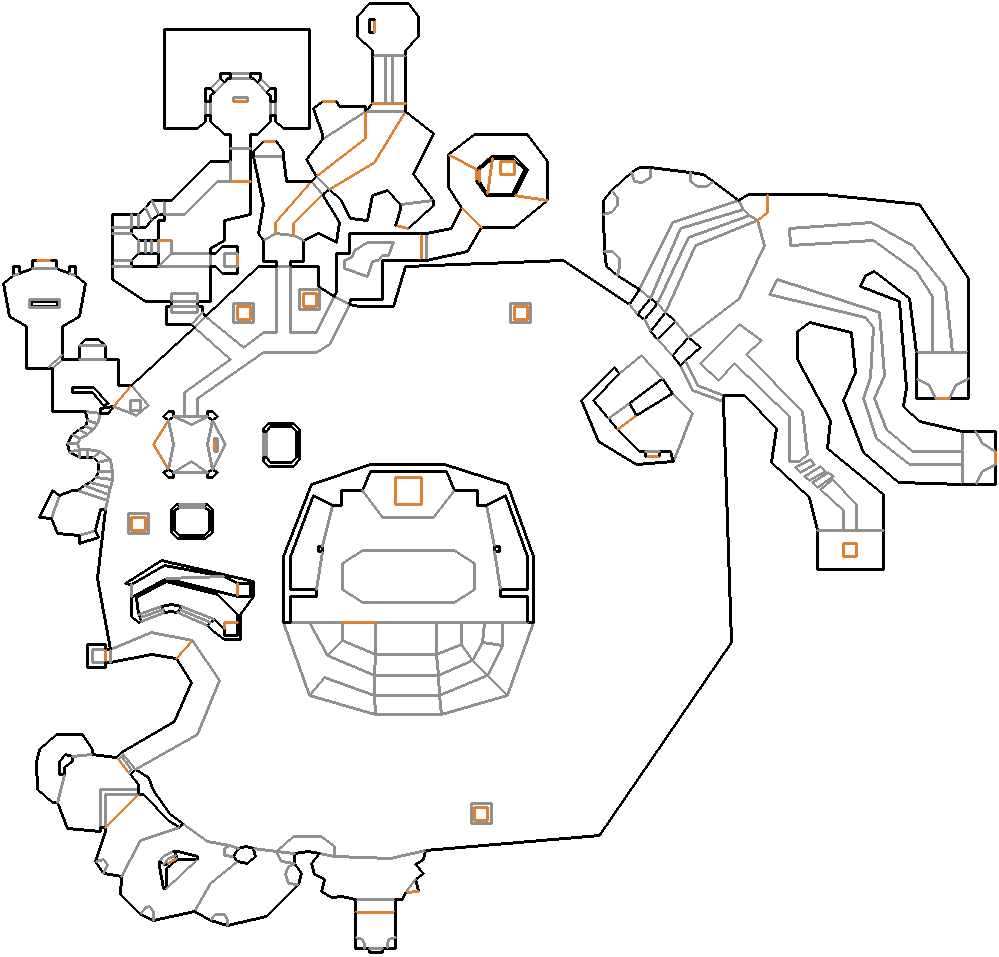
Map of MAP29
Walkthrough
Start by walking forward between the two torches. A platform (A) should lower down to a larger ledge. Turn right, and press a switch on the wall. Now turn around. A walkway should be rising up, giving access to another ledge. Walk across to this. Go past the round structure in the middle of this platform into the corner at the end. Turn around. A door will have opened in the round structure (B), revealing a skull switch. Press it. The wall at the end of the platform will lower. Go into this area, and then turn right. You will now be on a walkway (C) that leads to a teleporter.
At the other end of the teleporter, you will be in a small room with an open front (D). Walk out. You will now be on a very narrow ledge. Walk up it, being very careful not to fall off. Once at the top, go around the corner. Walk up to the square block on the precipice. Turn around. A door will have opened in the corner of the room. Walk into this new room. Go around the central wall and press the switch in the back. Now go back outside. The block will now have lowered. Make a run out onto the tower. Press the switch. A walkway (E) will slowly rise. Also be aware that two doors containing cacodemons (F, G) will open in the other two towers around you.
Once the ledge has risen fully, go to the middle door (H). You will now be looking across a pit of acid. Walk across the pit of acid to a skull switch. Hit the switch, then run backwards a bit. If done right, you will be on a new walkway (I). Go across the walkway and into a new acid pit. Go around the corner to your right and press the skull switch there. It will raise a narrow walkway across a third acid pit (J). Then go back to your left and press the other skull switch. Run back a little. You will now be on a new walkway. Go to the end of it, then walk across the narrow walk to a room with a switch. Hit the switch.
Now go back out to the walkway in the main room. Go to the door closest to the tower with the switch (K). Staying on the same floor, walk to the end of the room. Turn around. There will be a skull switch on the wall. Press it. Now turn around again. A platform will be rising. Now you may either go around the corner and take the stairs up into the room above, or simply lower the raised platform (L) by pressing on it. It is a lift. In any case, you can now press the switch inside. Go halfway down the stairs, then turn left. Go across the new walkway into a small chamber. Press the switch in there.
Go out to the walkway in the main room again. Walk to the third door at the end of the walkway. Once inside, open another door. There will be a round wooden structure (M) in the middle of the outdoor area of this level. Go left. There will be one side of this structure with scratches on it. This is a door. Go in and take the teleporter. You will now be in a relatively large room with a set of wide, shallow steps in front of you (N). Go up. There are three ledges on a pool of lava. Run onto the one farthest to your right. Rather than going down it, turn right. You will see another platform with a skull switch (O). Run onto it and press the switch. Now turn right. There is a lift. Go up to the next floor. Run back into the room with the platforms.
This next routine works for both the far left and the middle platform, and the order does not matter here. Run onto the end of the platform, being careful not to miss. Go to the other end. Press the switch that is there. Now go back to the start of the platform. Drop into the lava, and quickly go take the lift at the right corner (ie, the corner away from the main room, P).
Once both platforms have been done, go back onto the one on the far right. Run across the gap near the end, and take the teleporter. You will now be at the base of a winding stairway (Q). Go up, being careful not to fall off into the blood lake. Once at the top, run quickly past the pit at the center of a platform (R). It will rise, revealing a monster. (It may be a mancubus or a cyberdemon, depending on your difficulty level.) Instead of killing it, run to a square pit at the far end of the platform, exiting the level.
Secrets
Official
There are no official secrets in this level.
Non-official
The western part of the building to the north of the walkway (C) contains the corridor that leads to a teleporter. Drop down to the blood pit and enter through the opening at the building's base. The teleporter at the end of it warps you into that caged chamber containing some heavy weapon dudes and a plasma gun. Turn around and enter the same teleporter through which you came here. You will find yourself in the otherwise inaccessible area in the southwest corner of the map with four energy cell packs.
Speedrunning
Routes and tricks
Records
The Compet-N records for the map are:
| Run | Time | Player | Date | File | Notes |
|---|---|---|---|---|---|
| UV speed | 01:46 | Vaclav "Bolton" Kunes | 2000-12-06 | Template:Competnftp | |
| NM speed | 01:57 | Drew "stx-Vile" DeVore | 2002-07-25 | Template:Competnftp | |
| UV max | 04:05 | Drew "stx-Vile" DeVore | 2003-05-15 | Template:Competnftp | |
| NM100S | |||||
| UV -fast | 05:25 | Radek Pecka | 2002-09-02 | Template:Competnftp | |
| UV -respawn | 02:56 | Ian Sutton | 1999-10-24 | Template:Competnftp | |
| UV Tyson | 18:54 | Xit Vono | 2003-02-01 | Template:Competnftp | |
| UV pacifist | 02:21 | Drew "stx-Vile" DeVore | 2003-04-30 | Template:Competnftp |
Statistics
Map data
| Things | 276 |
| Vertices | 1180 |
| Linedefs | 1152 |
| Sidedefs | 1653 |
| Sectors | 205 |
Things
| Monsters | ITYTD and HNTR | HMP | UV and NM |
|---|---|---|---|
| Sergeants | 5 | 16 | 21 |
| Cyberdemons | 0 | 1 | 1 |
| Spectres | 0 | 0 | 1 |
| Imps | 13 | 22 | 22 |
| Barons of Hell | 2 | 3 | 3 |
| Troopers | 3 | 7 | 13 |
| Cacodemons | 7 | 13 | 15 |
| Arch-Viles | 1 | 1 | 1 |
| Pain Elementals | 1 | 3 | 4 |
| Chaingunners | 1 | 9 | 11 |
| Revenants | 3 | 5 | 6 |
| Mancubi | 3 | 2 | 4 |
| Hell Knights | 2 | 4 | 5 |
| Powerups | ITYTD and HNTR | HMP | UV and NM |
| Backpacks | 2 | 2 | 2 |
| Stim packs | 9 | 9 | 9 |
| Medikits | 14 | 14 | 14 |
| Soul spheres | 1 | 1 | 1 |
| Health bonuses | 13 | 13 | 13 |
| Armor bonuses | 9 | 9 | 9 |
| Green armors | 1 | 1 | 1 |
| Blue armors | 1 | 1 | 1 |
| Berserks | 2 | 2 | 2 |
| Radiation suits | 4 | 2 | 2 |
| Weapons | ITYTD and HNTR | HMP | UV and NM |
| Chainguns | 1 | 1 | 1 |
| Plasma guns | 1 | 1 | 1 |
| Super shotguns | 1 | 1 | 1 |
| Ammunition | ITYTD and HNTR | HMP | UV and NM |
| Bulk Cells | 7 | 7 | 7 |
| Ammo clips | 0 | 0 | 2 |
| Shells | 5 | 5 | 5 |
| Rocket boxes | 1 | 1 | 1 |
| Energy cells | 0 | 0 | 2 |
| Ammo boxes | 5 | 5 | 5 |
| Shell boxes | 8 | 8 | 8 |