- This level occupies the map slot MAP29. For other maps which occupy this slot, see Category:MAP29.
Template:Memento Mori II 21-30 MAP29: Kings of Metal is the twenty-ninth level of Memento Mori II. It was designed by Jens Nielsen and uses the music track "Junkie Smack" by Mark Klem.
"Kings of Metal" is also the name of an album and song by the heavy metal band Manowar.
Mission briefing
According to both the text file and the Infopack:
- Hmm. We seem to be quite near something REAL big, so watch out. 28 sectors are ours, let's bring this to an end. Obviously one of your last missions on IO - enjoy the violence!
Walkthrough
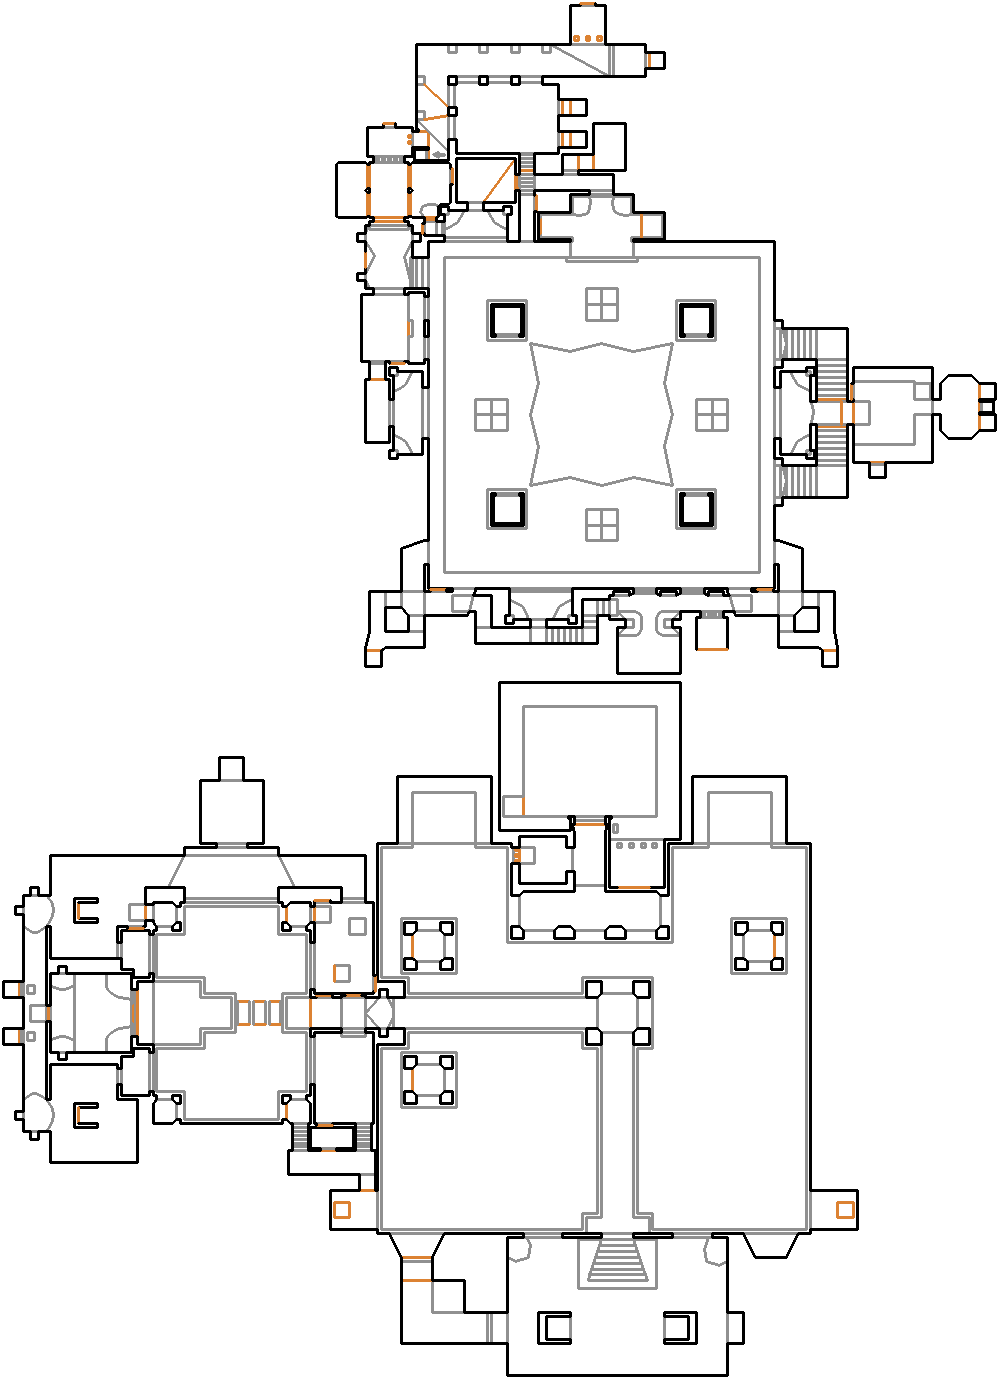
Map of MAP29
- Letters in italics refer to marked spots on the map. Sector numbers in boldface are secrets which count toward the end-of-level tally.
Essentials
Take the shotgun at the start and turn right. Fall into the pit. Take either stairway at the east. When you reach the top, behind the door there is a small compartment to the west with a super shotgun, two rockets and two sets of shells. To the east there is a lift. Pick up the super shotgun if you don't have one, take the lift up, head east, kill two spectres and enter either teleporter. You arrive in the middle of a long corridor, which is the most westward part of the map. Go south, find a U-shaped compartment with a skull switch inside and flip it. It will open a portion of wall at your 4 o'clock, as well as two wall segments in the long corridor, revealing two teleporters, which you may use anytime to return to the area where the spectres were in case you need supplies. Go to the northern end of the corridor, kill the enemies and press another skull switch in an identical U-shaped compartment. Collect the red keycard from the room located nearby to the northeast. If you are playing on Hurt Me Plenty or higher difficulty level, it is strongly recommended to follow the corridor to its eastern end and kill the arch-vile through the window before progressing further.
Now look for a lion switch and a square on the floor which is textured differently from the rest. It is a lift platform and the purpose of the switch is to lower it. Stand on the square, press the swich, collect the rocket launcher, jump off the platform and cross the room diagonally in the southeast direction. Press the satyr switch lowering the southeastern lift, ride it up, use two sets of stairs to go up. If your health is low, press the lion switch to the south, ride down the lift, grab the berserk pack and quickly return to the lift before it raises. Go north, jump down and look for a gargoyle switch on your left. Each time you flip the switch, the pillars will raise from the nukage pool by 24 units. On Hey, Not Too Rough or lower it is sufficient to press the switch five times to be able to cross the gap; kill the mancubus and pick up the blue keycard. On Hurt Me Plenty or higher a different strategy is recommended: flip the switch seven times, to make the pillars higher than the ledge you are standing on. They will form a barrier against cyberdemon's rockets. Walk west to the edge of the ledge, after which the door behind the pillars will open. The cyberdemon guarding the blue keycard can be disposed of from the ledge using any weapon, while his rockets will not hit you as long as you stay on the ledge. When it is dead, fall into the nukage pool, press on the northern or southern side of the pillars to lower them all like a lift, stand on the westernmost pillar and when it is raised again, jump off the pillar to the west and collect the blue keycard.
To get the yellow keycard you must find the way back to the pair of teleporters first. Press the lion switch lowering the northeastern platform. Ride the lift up, do the same with another lion switch, go north through a newly opened passage, head west, then south and enter either teleporter.
From the room into which you have been teleported head west and go to nortwestern part of the big room with the irregularly shaped toxic pool. There are three steps here and the red key door. Open the door, shoot the lion switch in front of you (the silver bars should open), press 'use' on the blue bars to open them as well and fall down into an L-shaped corridor with brick walls and torches. Follow the corridor to the end, open another set of blue bars, take the yellow keycard and press the lion switch.
Return to the pair of teleporters. Enter either teleporter, then go to north, to the lift activated with the lion switch, onto the bridge and then east. When you get past two guard towers with chaingunners, jump off the ledge to your left (north), open the blue bars at your right and press the satyr switch behind the bars, which lowers another lift. After taking the lift up turn left (north), open the yellow key door, use the lift situated on your left (lion switch) to go up the ledge surrounding the room and press the skull switch which ends the level.
Secrets
- The wall between the two teleporters in the northeast of the map can be opened to reveal security armor. (sector 240)
- In the room with the combat armor and soul sphere on stone platforms, the west side of the soul sphere platform does not have a stone texture. Press on it, and then return to the south of the map; the western side of the room has opened to reveal large hallway leading to a set of shells and a cell. (sector 411) Approach them, and the wall will open in front of you, allowing you to obtain two rockets.
- When you take the southeast elevator in the western portion of the map and head up the stairs, a portion of the northern wall is scratched. Open it to find two medikits, security armor, three rockets, a cell, and a backpack. (sector 152)
- In the room with the combat armor and soul sphere on stone platforms, there is a switch in the southeast. Trigger it, and then take the southeast elevator. Run up the stairs, and then do a running jump toward the switch opposite the window. Press it, and head to the red key door at the northwest of the map. There, a switch rests on the eastern wall. Flip it, and head to the easternmost room (west of the two teleporters.) Press the switch, and a section of the walkway to the east will lower. Ride it up like an elevator, jump across the gap, and enter the newly revealed teleporter. Look to the west to find that a portion of the grey stone wall does not have a stone texture. Press it, and an elevator will lower to the north. Take it up, drop into the wooden hallway, and look to the north to find a compartment leading to two boxes of ammo, two boxes of shells, four boxes of rockets (two on Ultra-Violence or higher,) a bulk cell, a rocket launcher, and a backpack. (sector 343)
Other points of interest
Entering secret #4 closes access to both BFG9000 and megasphere and unless you have already picked up these items, makes 100% kills impossible on Hurt Me Plenty or higher, as the second cyberdemon will stay forever in his closed compartment.
The easiest way to collect the BFG9000 (and megasphere) from the starting point is as follows:
- Head to the red door at the northwest of the map. Flip the nearby switch on the western wall and head to the easternmost room. Press the gargoyle switch and a section of the walkway to the east will lower. Ride it up like an elevator, jump across the gap and enter the newly revealed teleporter. Look to the west to find that a portion of the grey stone wall does not have a stone texture. Press it, and an elevator will lower to the north. Take it up, drop into the wooden hallway and press the skull switch at its end. Fall down into the newly created pit with a stairway and go down (north) to arrive in the room with the BFG9000 and megasphere. Both lion switches in front of them lower the corresponding lifts allowing to pick the items up.
- (Edit 6/23/11: Even following these instructions, it is still Impossible to get in the room with the bfg and megasphere. After flipping the switches and getting to the mancubus platform, hitting the gray panel to reveal the lift... and flipping the skull switch at the end of the hall... the pit does not appear.)
The procedure to collect the BFG9000, megasphere and register secret #4 is the following:
- Follow the steps from secret #4 description until you fall into the wooden hallway. Do not enter the northern compartment, press the skull switch at the west instead. Fall down into the newly created pit with a stairway and go down (north) to arrive in the room with the BFG9000 and megasphere. Grab them both. Return to the easternmost room, take the lift up, enter the teleporter again, take the lift up to the wooden hallway again. Enter the secret compartment.
Picking up the BFG9000 opens a tiny compartment with a cyberdemon inside (present on Hurt Me Plenty or higher), next to the yellow keycard. In case you have not picked it up, there is a level design trick to get rid of the cyberdemon and take the key. Open the red key door, shoot the lion switch to open the silver bars, press 'use' on the blue bars and fall down into the L-shaped corridor with brick walls and torches. Destroy the barrels. Next to the lift behind blue bars there is an alcove with a cell inside. Open the western wall in the southern end of the corridor to reveal it (if you have picked up the megasphere, the entrance is marked with a glowing arrow on the floor and ceiling). Provoke the cyberdemon to follow you. When it reaches the corner where the barrels were, hide into the alcove. Instead of killing you, the cyberdemon will teleport itself to the toxic lake room. You can now take the yellow keycard and either skip the cyberdemon or kill it in the open space.
The gargoyle switch in the easternmost room not only lowers the walkway for reaching secret #4, but also lowers a small part of the corridor that you are teleported to by the two teleports nearby. So, use the switch, teleport, fall into the hole next to you, there is a switch below floor-level that can now be used and lets you pass through to the plasma rifle board, right in the back of the cyberdemon guarding the blue keycard. The switch is located beneath the scratched wall part. You have to be very fast to reach it before the hole closes.
Behind the red door, you can enter the compartment to the right, switch the gargoyle switch, then quickly open the wall with the flickering light, behind is a lift. If you previously flipped the gargoyle switch on the corridor between main hall and BFG9000 room, you can now enter the arch-vile room to the east. You can even open a wall section to reach the wooden hallway leading to secret #4. If you have not opened the BFG9000 room yet, please note that this is done by a skull switch on the other side of the opened wall section, you may have to use it blindly now.
Bugs
Demo files
- Non-monster demo (file info) showing how to collect the BFG9000, megasphere and enter sector 343, registering secret #4.
Areas / screenshots
Speedrunning
Routes and tricks
On Ultra-Violence or higher there is an arch-vile in the final room. Instead of taking the lift up to the ledge there is a possibility to make a relatively easy arch-vile jump to save a few seconds.
The soul sphere and combat armor standing on the stone pillars can be grabbed without lowering the pillars, by straferunning against them.
Current records
The Compet-N records for the map are:
| Run | Time | Player | Date | File | Notes |
|---|---|---|---|---|---|
| UV speed | |||||
| NM speed | |||||
| UV max | 11:45 | Jonas Feragen | 1998-06-13 | Template:Competnftp | |
| NM100S | |||||
| UV -fast | |||||
| UV -respawn | |||||
| UV Tyson | |||||
| UV pacifist |
Miscellaneous demos
| Run | Time | Player | Date | File | Notes |
|---|---|---|---|---|---|
| .zip |
Deathmatch
Statistics
Map data
| Things | 427 |
| Vertexes | 1845 |
| Linedefs | 2315 |
| Sidedefs | 3331 |
| Sectors | 452 |
Things
| Monsters | ITYTD and HNTR | HMP | UV and NM |
|---|---|---|---|
| Arch-Viles | 0 | 6 | 9 |
| Barons of Hell | 0 | 10 | 15 |
| Cacodemons | 2 | 4 | 6 |
| Chaingunners | 6 | 8 | 8 |
| Cyberdemons | 0 | 2 | 2 |
| Hell Knights | 4 | 6 | 7 |
| Imps | 27 | 15 | 15 |
| Mancubi | 4 | 4 | 4 |
| Revenants | 4 | 10 | 10 |
| Sergeants | 17 | 16 | 14 |
| Spectres | 9 | 12 | 16 |
| Powerups | ITYTD and HNTR | HMP | UV and NM |
| Backpacks | 2 | 2 | 2 |
| Berserk packs | 2 | 2 | 2 |
| Blue armors | 1 | 1 | 1 |
| Computer maps | 1 | 1 | 0 |
| Green armors | 5 | 5 | 5 |
| Medikits | 24 | 24 | 24 |
| Megaspheres | 1 | 1 | 1 |
| Radiation suits | 6 | 6 | 6 |
| Soul Spheres | 1 | 1 | 1 |
| Stimpacks | 14 | 14 | 14 |
| Weapons | ITYTD and HNTR | HMP | UV and NM |
| Chainsaws | 1 | 1 | 1 |
| Shotguns | 2 | 2 | 2 |
| Super shotguns | 2 | 2 | 2 |
| Chainguns | 1 | 1 | 1 |
| Rocket launchers | 2 | 2 | 2 |
| Plasma rifles | 1 | 1 | 1 |
| BFG 9000s | 1 | 1 | 1 |
| Ammunition | ITYTD and HNTR | HMP | UV and NM |
| Bullet boxes | 25 | 25 | 25 |
| Shells | 39 | 39 | 39 |
| Shell boxes | 24 | 26 | 26 |
| Rockets | 28 | 29 | 29 |
| Rocket boxes | 9 | 9 | 7 |
| Cells | 7 | 7 | 7 |
| Bulk cells | 1 | 1 | 1 |
| Keys | ITYTD and HNTR | HMP | UV and NM |
| Blue cards | 1 | 1 | 1 |
| Red cards | 1 | 1 | 1 |
| Yellow cards | 1 | 1 | 1 |