(→Walkthrough: walkthrough) |
m (→Records: clean up) |
||
| (22 intermediate revisions by 11 users not shown) | |||
| Line 1: | Line 1: | ||
{{map|slot=MAP24}} |
{{map|slot=MAP24}} |
||
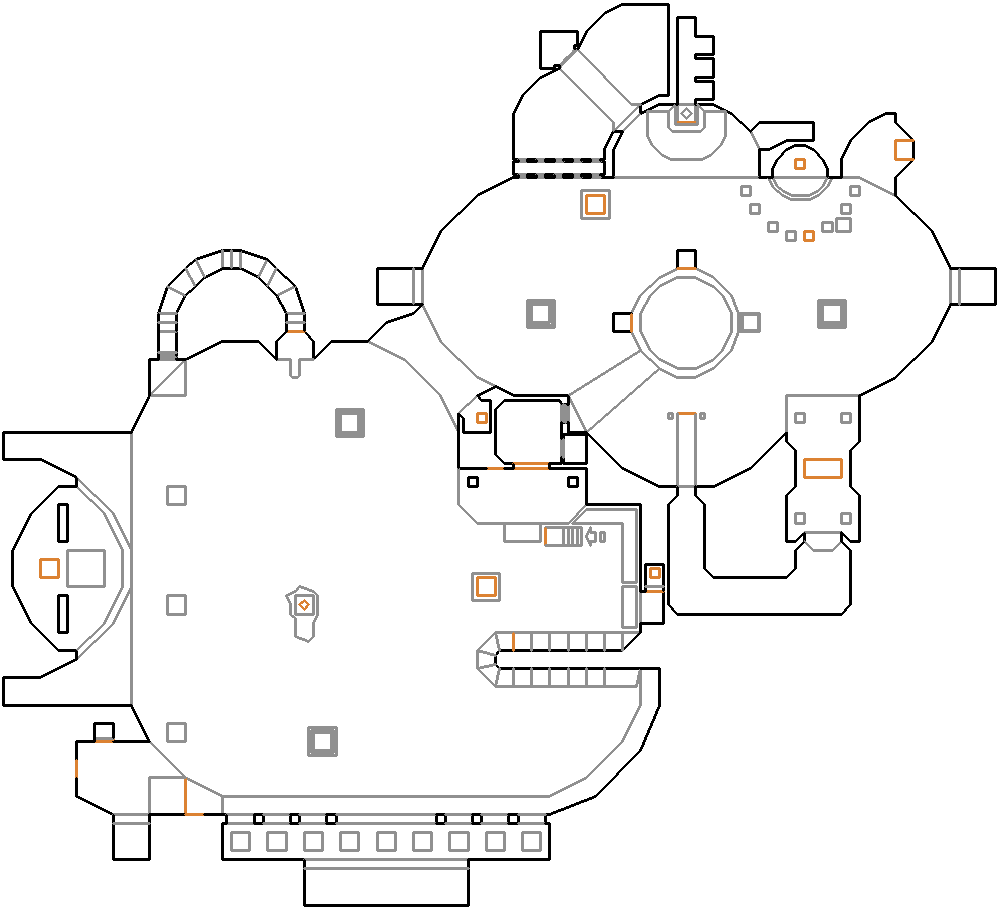
| − | '''MAP24: The Final Frontier''' is the twenty-fourth map of [[Plutonia]]. |
+ | '''MAP24: The Final Frontier''' is the twenty-fourth map of [[The Plutonia Experiment]]. It uses the music track "In the Dark" from [[Doom II]] (the same as Doom II's [[MAP24: The Chasm (Doom II)|MAP24: The Chasm]]). The level's texture and architecture theme shows similarities to [[MAP29: The Living End (Doom II)|MAP29: The Living End]] from [[Doom II]]. Its name is is a reference to the opening line in various older "[[Wikipedia:Star Trek|Star Trek]]" television shows. |
| ⚫ | |||
| ⚫ | |||
| − | ==Overview== |
||
| ⚫ | |||
| + | Activate the switch in front of you at the start and you will be lowered into the northern end of a large room. Walk on top of the set of pillars and enter the teleport at the top. Travel along the walkway and make a jump towards a large circular platform. |
||
| + | Activate both switches and wait for a long walkway to rise to the southwest. Be careful for the Pain Elementals, Cacodemons and Arch-Vile. |
||
| ⚫ | |||
| ⚫ | |||
| + | When the walkway has risen, walk towards a small room and you will be in the northern end of another very large room. Activate a switch that is located at the entrance and collect some rocket boxes which will be useful in fighting the Cyberdemon located far away on a platform on the western end as well as other enemies. |
||
| − | ==Strategy== |
||
| + | After run along the way until you are arriving at a lift on the southern end of the room. You will be in a small room with a blue door and a switch. |
||
| ⚫ | |||
| + | Activate the switch and a door will open on the northwest corner of the large room. Go inside the room, climb the steps, get the blue key and return to the blue door platform. Enter the blue door and you will be transported to the Cyberdemon platform. Re-enter the teleport and exit the level. |
||
| ⚫ | |||
| − | Activate the switch in front of you at the start and you will be lowered into the northern end of a large room. Walk on top of the set of pillars and enter the teleport at the top. Travel along the walkway and make a jump towards a large circular platform. Activate both switches and wait for a long walkway to rise to the southwest. Be careful for the Pain Elementals, Cacodemons and Arch-Vile. When the walkway is rose, walk towards a small room and you will be in the northern end of another very large room. Activate a switch that is located at the entrance and collect some rocket boxes which will be useful in fighting the Cyberdemon located far away on a platform on the western end as well as other enemies. After run along the way until you are arriving at a lift on the southern end of the room. You will be in a small room with a blue door and a switch. Activate the switch and a door will open on the northwest corner of the large room. Go inside the room, climb the steps, get the blue key and return to the blue door platform. Enter the blue door and you will be transported to the Cyberdemon platform. Re-enter the teleport and exit the level. |
||
===Secrets=== |
===Secrets=== |
||
| − | # At the very start of the level, |
+ | # At the very start of the level, before flipping the switch in front of you, turn around and walk through the false wall to get some ammo and a megasphere. The secret becomes inaccessible once you flip the initial switch to lower the floor. |
# Just left of the start point is a stairway of thin grey pillars leading upwards. Drop down between the pillars and get as close to the brown wall as you can, and you should land in a gate secret area with several powerups and a teleporter out. |
# Just left of the start point is a stairway of thin grey pillars leading upwards. Drop down between the pillars and get as close to the brown wall as you can, and you should land in a gate secret area with several powerups and a teleporter out. |
||
# After you reach the second large cavern area, drop into the blood below. At the east side of the pit is a radiation suit with a sunken staircase nearby (there is a green arrow pointing toward it). Flip the gargoyle switch at the bottom of this stairwell to lower a nearby section of the ledge above. Behind it is a secret room with a soul sphere and some ammo. |
# After you reach the second large cavern area, drop into the blood below. At the east side of the pit is a radiation suit with a sunken staircase nearby (there is a green arrow pointing toward it). Flip the gargoyle switch at the bottom of this stairwell to lower a nearby section of the ledge above. Behind it is a secret room with a soul sphere and some ammo. |
||
| Line 23: | Line 22: | ||
# After picking up the blue keycard, two secrets will open. The first is in the same room as the blue door... |
# After picking up the blue keycard, two secrets will open. The first is in the same room as the blue door... |
||
# ...and the second is located in the high fiery hallway at the southern end of the second large cavern area. |
# ...and the second is located in the high fiery hallway at the southern end of the second large cavern area. |
||
| + | |||
| + | ===Screenshots=== |
||
| + | <gallery> |
||
| ⚫ | |||
| ⚫ | |||
| + | </gallery> |
||
==Speedrunning== |
==Speedrunning== |
||
| − | |||
| − | ===Routes and tricks=== |
||
| − | |||
===Records=== |
===Records=== |
||
The [[Compet-N]] records for the map are: |
The [[Compet-N]] records for the map are: |
||
| + | {| class="WikiaTable" |
||
| − | {| {{prettytable}} |
||
!Run||Time||Player||Date||File||Notes |
!Run||Time||Player||Date||File||Notes |
||
|- |
|- |
||
| − | |[[UV speed]]||00:17||[[Marijo "Sedlo" Sedlic]]||2004-03-02||{{competnftp|plutonia/speed/pl24-017.zip|pl24-017.zip}}|| |
+ | |[[UV speed]]||00:17||[[Marijo "Sedlo" Sedlic]]||2004-03-02||{{External Link|site=competnftp|file_path=plutonia/speed/pl24-017.zip|text=pl24-017.zip}}|| |
|- |
|- |
||
| − | |[[NM speed]]||00:48||[[Xit Vono]]||2003-03-30||{{competnftp|plutonia/nmare/pn24-048.zip|pn24-048.zip}}|| |
+ | |[[NM speed]]||00:48||[[Xit Vono]]||2003-03-30||{{External Link|site=competnftp|file_path=plutonia/nmare/pn24-048.zip|text=pn24-048.zip}}|| |
|- |
|- |
||
| − | |[[UV max]]||03:35||[[Jakub "method_man" Razak]]||2003-10-14||{{competnftp|plutonia/max/pl24-335.zip|pl24-335.zip}}|| |
+ | |[[UV max]]||03:35||[[Jakub "method_man" Razak]]||2003-10-14||{{External Link|site=competnftp|file_path=plutonia/max/pl24-335.zip|text=pl24-335.zip}}|| |
|- |
|- |
||
| − | |[[NM100S]]||01:26||[[Jakub "method_man" Razak]]||2003-10-19||{{competnftp|plutonia/nm100s/ps24-126.zip|ps24-126.zip}}|| |
+ | |[[NM100S]]||01:26||[[Jakub "method_man" Razak]]||2003-10-19||{{External Link|site=competnftp|file_path=plutonia/nm100s/ps24-126.zip|text=ps24-126.zip}}|| |
|- |
|- |
||
| − | |[[UV -fast]]||07:59||[[Kai-Uwe Humpert]]||1996-12-29||{{competnftp|plutonia/fast/plt24-gm.zip|plt24-gm.zip}}|| |
+ | |[[UV -fast]]||07:59||[[Kai-Uwe Humpert]]||1996-12-29||{{External Link|site=competnftp|file_path=plutonia/fast/plt24-gm.zip|text=plt24-gm.zip}}|| |
|- |
|- |
||
| − | |[[UV -respawn]]||02:32||[[Jakub "method_man" Razak]]||2003-10-14||{{competnftp|plutonia/respawn/pr24-232.zip|pr24-232.zip}}|| |
+ | |[[UV -respawn]]||02:32||[[Jakub "method_man" Razak]]||2003-10-14||{{External Link|site=competnftp|file_path=plutonia/respawn/pr24-232.zip|text=pr24-232.zip}}|| |
|- |
|- |
||
|[[UV Tyson]]|| || || || || |
|[[UV Tyson]]|| || || || || |
||
|- |
|- |
||
| − | |[[UV pacifist]]||00:51||[[Adam Williamson]]||2002-02-19||{{competnftp|plutonia/pacifist/pp24-051.zip|pp24-051.zip}}|| |
+ | |[[UV pacifist]]||00:51||[[Adam Williamson]]||2002-02-19||{{External Link|site=competnftp|file_path=plutonia/pacifist/pp24-051.zip|text=pp24-051.zip}}|| |
|} |
|} |
||
==Statistics== |
==Statistics== |
||
===Map data=== |
===Map data=== |
||
| + | {| class="WikiaTable" |
||
| − | {| {{prettytable}} |
||
|[[Things]]||294 |
|[[Things]]||294 |
||
|- |
|- |
||
| Line 65: | Line 67: | ||
===Things=== |
===Things=== |
||
| + | {| class="WikiaTable" |
||
| − | {| {{prettytable}} |
||
!Monsters||[[I'm Too Young To Die|ITYTD]] and [[Hey, Not Too Rough|HNTR]]||[[Hurt Me Plenty|HMP]]||[[Ultra-Violence|UV]] and [[Nightmare!|NM]] |
!Monsters||[[I'm Too Young To Die|ITYTD]] and [[Hey, Not Too Rough|HNTR]]||[[Hurt Me Plenty|HMP]]||[[Ultra-Violence|UV]] and [[Nightmare!|NM]] |
||
|- |
|- |
||
| Line 79: | Line 81: | ||
|- |
|- |
||
|[[Arch-Vile]]s||5||5||5 |
|[[Arch-Vile]]s||5||5||5 |
||
| ⚫ | |||
| + | |[[Pain Elemental]]s||4||5||6 |
||
|- |
|- |
||
|[[Chaingunner]]s||15||18||25 |
|[[Chaingunner]]s||15||18||25 |
||
| Line 131: | Line 135: | ||
|- |
|- |
||
|[[Blue card]]s||1||1||1 |
|[[Blue card]]s||1||1||1 |
||
| ⚫ | |||
|} |
|} |
||
| Line 137: | Line 140: | ||
* [http://www.doom2.net/~compet-n/database/cn.cgi?map:plut:24 MAP24 demos from the Compet-N database] |
* [http://www.doom2.net/~compet-n/database/cn.cgi?map:plut:24 MAP24 demos from the Compet-N database] |
||
| ⚫ | |||
| + | |||
| + | [[es:MAP24: The Final Frontier (FD-P)]] |
||
[[Category:Levels by name|Final Frontier (The Plutonia Experiment)]] |
[[Category:Levels by name|Final Frontier (The Plutonia Experiment)]] |
||
Revision as of 04:36, 23 March 2020
- This level occupies the map slot MAP24. For other maps which occupy this slot, see Category:MAP24.
MAP24: The Final Frontier is the twenty-fourth map of The Plutonia Experiment. It uses the music track "In the Dark" from Doom II (the same as Doom II's MAP24: The Chasm). The level's texture and architecture theme shows similarities to MAP29: The Living End from Doom II. Its name is is a reference to the opening line in various older "Star Trek" television shows.
Map of MAP24
Walkthrough
Activate the switch in front of you at the start and you will be lowered into the northern end of a large room. Walk on top of the set of pillars and enter the teleport at the top. Travel along the walkway and make a jump towards a large circular platform.
Activate both switches and wait for a long walkway to rise to the southwest. Be careful for the Pain Elementals, Cacodemons and Arch-Vile.
When the walkway has risen, walk towards a small room and you will be in the northern end of another very large room. Activate a switch that is located at the entrance and collect some rocket boxes which will be useful in fighting the Cyberdemon located far away on a platform on the western end as well as other enemies.
After run along the way until you are arriving at a lift on the southern end of the room. You will be in a small room with a blue door and a switch.
Activate the switch and a door will open on the northwest corner of the large room. Go inside the room, climb the steps, get the blue key and return to the blue door platform. Enter the blue door and you will be transported to the Cyberdemon platform. Re-enter the teleport and exit the level.
Secrets
- At the very start of the level, before flipping the switch in front of you, turn around and walk through the false wall to get some ammo and a megasphere. The secret becomes inaccessible once you flip the initial switch to lower the floor.
- Just left of the start point is a stairway of thin grey pillars leading upwards. Drop down between the pillars and get as close to the brown wall as you can, and you should land in a gate secret area with several powerups and a teleporter out.
- After you reach the second large cavern area, drop into the blood below. At the east side of the pit is a radiation suit with a sunken staircase nearby (there is a green arrow pointing toward it). Flip the gargoyle switch at the bottom of this stairwell to lower a nearby section of the ledge above. Behind it is a secret room with a soul sphere and some ammo.
- Inside secret #3, open the left wall to reveal a teleporter to a secret area.
- After taking the teleporter in secret #4, continue forward and pick up the various goodies to register another secret.
- After picking up the blue keycard, two secrets will open. The first is in the same room as the blue door...
- ...and the second is located in the high fiery hallway at the southern end of the second large cavern area.
Screenshots
")
")
Speedrunning
Records
The Compet-N records for the map are:
| Run | Time | Player | Date | File | Notes |
|---|---|---|---|---|---|
| UV speed | 00:17 | Marijo "Sedlo" Sedlic | 2004-03-02 | pl24-017.zip | |
| NM speed | 00:48 | Xit Vono | 2003-03-30 | pn24-048.zip | |
| UV max | 03:35 | Jakub "method_man" Razak | 2003-10-14 | pl24-335.zip | |
| NM100S | 01:26 | Jakub "method_man" Razak | 2003-10-19 | ps24-126.zip | |
| UV -fast | 07:59 | Kai-Uwe Humpert | 1996-12-29 | plt24-gm.zip | |
| UV -respawn | 02:32 | Jakub "method_man" Razak | 2003-10-14 | pr24-232.zip | |
| UV Tyson | |||||
| UV pacifist | 00:51 | Adam Williamson | 2002-02-19 | pp24-051.zip |
Statistics
Map data
| Things | 294 |
| Vertices | 951 |
| Linedefs | 998 |
| Sidedefs | 1576 |
| Sectors | 149 |
Things
| Monsters | ITYTD and HNTR | HMP | UV and NM |
|---|---|---|---|
| Sergeants | 1 | 3 | 5 |
| Cyberdemons | 1 | 1 | 1 |
| Imps | 1 | 1 | 2 |
| Barons of Hell | 0 | 1 | 1 |
| Cacodemons | 8 | 8 | 10 |
| Arch-Viles | 5 | 5 | 5 |
| Pain Elementals | 4 | 5 | 6 |
| Chaingunners | 15 | 18 | 25 |
| Revenants | 7 | 8 | 9 |
| Mancubi | 1 | 1 | 2 |
| Powerups | ITYTD and HNTR | HMP | UV and NM |
| Backpacks | 3 | 3 | 3 |
| Medikits | 26 | 26 | 26 |
| Soul spheres | 4 | 4 | 4 |
| Health bonuses | 8 | 8 | 8 |
| Green armors | 1 | 1 | 1 |
| Blue armors | 1 | 1 | 1 |
| Invulnerabilities | 1 | 1 | 1 |
| Invisibilities | 1 | 1 | 1 |
| Radiation suits | 5 | 5 | 5 |
| Megasphere | 2 | 1 | 1 |
| Weapons | ITYTD and HNTR | HMP | UV and NM |
| Shotguns | 1 | 1 | 1 |
| Rocket launchers | 1 | 1 | 1 |
| Plasma guns | 1 | 1 | 1 |
| Super shotguns | 1 | 1 | 1 |
| Ammunition | ITYTD and HNTR | HMP | UV and NM |
| Bulk Cells | 3 | 3 | 3 |
| Rocket boxes | 40 | 40 | 40 |
| Energy cells | 24 | 24 | 24 |
| Shell boxes | 17 | 17 | 17 |
| Keys | ITYTD and HNTR | HMP | UV and NM |
| Blue cards | 1 | 1 | 1 |