| Line 156: | Line 156: | ||
* [http://www.doom2.net/~compet-n/database/cn.cgi?map:doom2:24 MAP24 demos from the Compet-n database] |
* [http://www.doom2.net/~compet-n/database/cn.cgi?map:doom2:24 MAP24 demos from the Compet-n database] |
||
* [http://ian-albert.com/misc/doom2maps.php Top-down perspective view of all Doom II levels] by Ian Albert |
* [http://ian-albert.com/misc/doom2maps.php Top-down perspective view of all Doom II levels] by Ian Albert |
||
| + | |||
| + | [[es:MAP24: The Chasm (Doom II)]] |
||
[[Category:Levels by name|Chasm (Doom II)]] |
[[Category:Levels by name|Chasm (Doom II)]] |
||
[[Category:Sandy Petersen levels]] |
[[Category:Sandy Petersen levels]] |
||
Revision as of 21:38, 2 November 2014
- This level occupies the map slot MAP24. For other maps which occupy this slot, see Category:MAP24.
Template:Doom II 21-30 MAP24: The Chasm is the twenty-fourth map of Doom II. It was designed by Sandy Petersen and uses the music track "In The Dark". The map gets its name from the design of the level; a series of deep chasms with thin walkways to move about.
Strategy
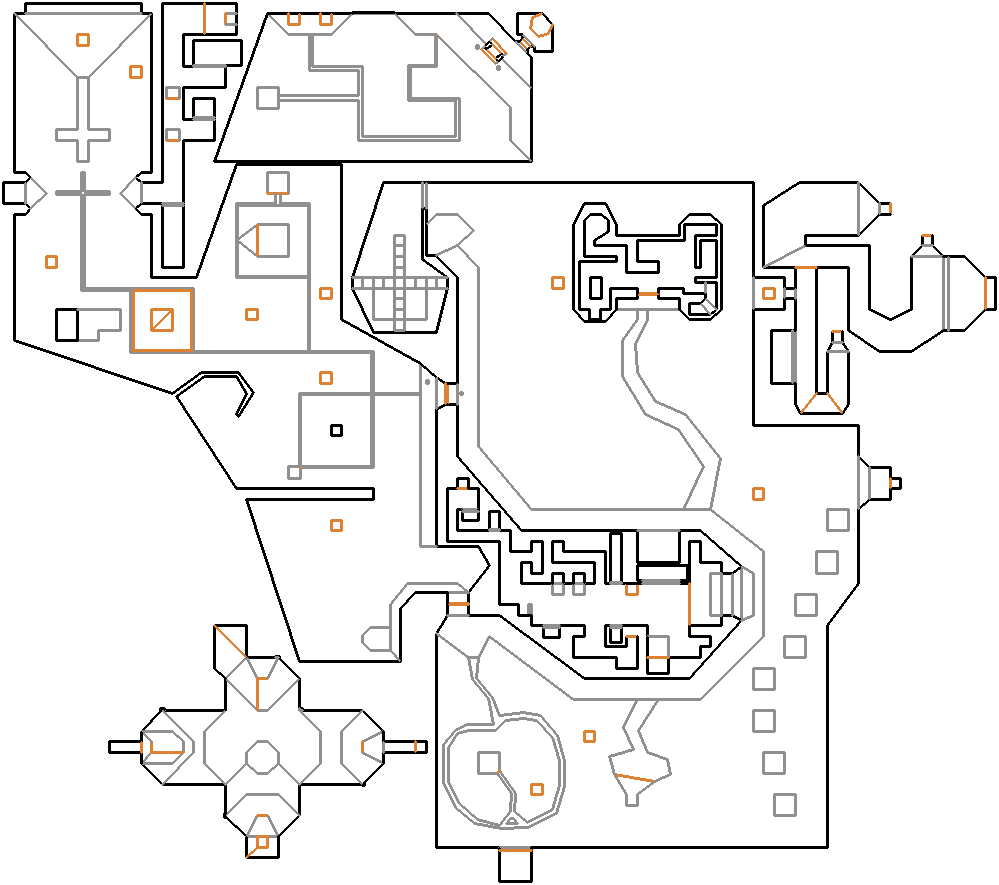

Map of MAP24
Walkthrough
Carefully walk across the winding walkway (A) sprawling in front of you at the beginning of the level. Enter the building at the end (B). Inside, explore the maze-like interior, killing enemies along the way to clear your path. Once you pick up the blue keycard in the northwest corner of the building (C), return to the starting point.
Continue to follow the ledge around to the west, towards the blue door (D). Behind it are a series of extremely thin ledges (E). Walk straight ahead through the intersection and around to the plasma rifle. Upon picking it up, the floor inside the square will rise. After killing the cacodemons there, continue along the narrow ledge back to the first intersection and proceed north, then west to the next intersection. Go north at this intersection and take the first left (west). Walking on this ledge will awaken the cacodemon. Walk around to the central platform (F), picking up the items there. This causes the floor to raise again. Once the floor has risen, head north towards the platform with the hanging corpse dangling above it (G), and you'll be teleported to a new area, where you will be attacked by several lost souls.
Proceed along the path and take a left at the branch. You'll arrive at two teleporters. Take the right (H) one to be transported to a pulsating blue room. In this next room, kill the demons lurking about. Drop down into the center of this room and flip the skull switch to the east (I). This causes a platform in the west to lower, so run over, ride it back up, and flip the second skull switch (J). This one lowers a platform in the north, so once again run onto it before it raises and flip the skull switch (K). This will lower the red keycard directly in front of you (L). Pick it up and exit this area by flipping the switch in the south and walking through the teleporter.
Once you're back in the previous area, walk along the ledge towards the red door. Be careful, as there's no way to escape the slime pit here. Go through the red door and the door directly behind it (M), through the exit door and into the exit teleport (N).
Secrets
- From the start, continue right along the ledge until you reach the far side of the building. At the very end, there is a very thin, circular walkway that eventually leads to a shotgun. Upon picking up the shotgun, a hole in the wall behind you opens up, unleashing some Cacodemons (O). You can fall into this hole from the platform you're on (which will gradually rise) and get the secret items there.
- Drop into the slime in the main area and take any of the teleporters down there (P). You will be taken to the top of a tall red pillar, with several more beneath you. Run along down the pillars until you reach a platform with a teleporter on it (Q). Go through to be taken to an otherwise unreachable area. Follow the hall to the right around a bend and flip the switch there. Return the way you came and take the first right at the end of the hall. Follow the path to another switch and press that one. Follow the remaining hall to a third switch (R). Press it to open a teleporter taking you back to the main area (S). Drop back down into the slime and take the teleporter back up to the first red pillar. This time, run across the next three and back onto the ledge you started the level on. The switches you pushed in the hidden area have caused a set of stairs to raise, allowing you to enter the previously unaccessible central building (T).
- Inside the central building (secret #2), there is a raised computer on the right wall near the entrance. Press the use key against it to lower an elevator behind you that will take you to a secret ammo stash (U).
- After passing through the blue door, you'll be faced with a series of extremely thin walkways across a slime pit (V). From the blue door, go straight, take a right at the intersection, and after turning left continue straight until you reach the area where the walkway forms a square. Inside this square is a raised platform with an invulnerability sphere (W). Drop onto this platform. To escape safely, stand at one of the edges of the platform and press the use key (X). This causes the platform to raise a little. You can do this as many times as you need to get out. If you fall into the area between the platform and the thin walkway, you can press the use key against the outer walls to raise that floor as well.
Bugs
If you time it right when you raise both the middle and the outer platforms, the floor in the middle of the loop where the invulnerability sphere is will go down forever, forming an inescapable pit. The only way to get out is to use the no clip cheat on the pc. On the other platforms, you can't noclip, so you will get stuck, though the lowering floor will eventually cause a crash.
Screenshots
")
")
")
")
")
")
")
Speedrunning
Routes and tricks
There is a possible way of completing this level without the blue key. The way to do so is by going around to the other door that leads into the area on the other side of the wall that contains the door with the blue coded door, go towards the far area that is near the alcove that holds a radiation suit and look for a teleporter that is nearby, enter one of the teleports and be teleported onto the alcove, then you can run and leap onto one of the pathways, but this can be quite challenging since the paths are fairly thin. Now, carefully walk across the path and look for the teleporter with the hanging corpse and then you can be teleported to the area that contains the exit, but you will need to have the red key to exit, regardless.
Records
The Compet-N records for the map are:
| Run | Time | Player | Date | File | Notes |
|---|---|---|---|---|---|
| UV speed | 00:33 | Marijo "Sedlo" Sedlic | 2004-01-23 | Template:Competnftp | |
| NM speed | 00:53 | Xit Vono | 2002-07-28 | Template:Competnftp | |
| UV max | 05:14 | Radek Pecka | 2002-06-27 | Template:Competnftp | |
| NM100S | 02:17 | Radek Pecka | 2004-03-31 | Template:Competnftp | |
| UV -fast | 05:34 | Radek Pecka | 2002-09-14 | Template:Competnftp | |
| UV -respawn | 05:07 | Henning Skogsto | 1998-09-24 | Template:Competnftp | |
| UV Tyson | 08:54 | Radek Pecka | 2004-02-03 | Template:Competnftp | |
| UV pacifist | 00:33 | Marijo "Sedlo" Sedlic | 2004-01-23 | Template:Competnftp |
Statistics
Map data
| Things | 364 |
| Vertices | 1174 |
| Linedefs | 1109 |
| Sidedefs | 1701 |
| Sectors | 181 |
Things
| Monsters | ITYTD and HNTR | HMP | UV and NM |
|---|---|---|---|
| Spectres | 0 | 2 | 8 |
| Imps | 15 | 29 | 46 |
| Demons | 16 | 37 | 56 |
| Cacodemons | 2 | 5 | 8 |
| Lost Souls | 3 | 8 | 16 |
| Chaingunners | 11 | 19 | 25 |
| Mancubi | 1 | 2 | 2 |
| Hell Knights | 3 | 6 | 6 |
| Powerups | ITYTD and HNTR | HMP | UV and NM |
| Backpacks | 1 | 1 | 1 |
| Stim packs | 19 | 19 | 19 |
| Medikits | 11 | 11 | 11 |
| Health bonuses | 26 | 26 | 26 |
| Armor bonuses | 18 | 18 | 18 |
| Green armors | 1 | 1 | 1 |
| Invulnerabilities | 1 | 1 | 1 |
| Berserks | 2 | 2 | 2 |
| Radiation suits | 7 | 7 | 7 |
| Megasphere | 2 | 2 | 2 |
| Weapons | ITYTD and HNTR | HMP | UV and NM |
| Shotguns | 1 | 1 | 1 |
| Rocket launchers | 1 | 1 | 1 |
| Plasma guns | 1 | 1 | 1 |
| BFG 9000s | 1 | 1 | 1 |
| Super shotguns | 1 | 1 | 1 |
| Ammunition | ITYTD and HNTR | HMP | UV and NM |
| Ammo clips | 10 | 10 | 10 |
| Shells | 15 | 15 | 15 |
| Rockets | 27 | 28 | 28 |
| Rocket boxes | 9 | 9 | 9 |
| Energy cells | 3 | 3 | 3 |
| Ammo boxes | 5 | 5 | 5 |
| Shell boxes | 4 | 5 | 5 |
| Keys | ITYTD and HNTR | HMP | UV and NM |
| Blue cards | 1 | 1 | 1 |
| Red cards | 1 | 1 | 1 |