- This level occupies the map slot MAP23. For other maps which occupy this slot, see Category:MAP23.
Template:Plutonia 2 21-30 MAP23: Aztecorum is the twenty-third map of Plutonia 2. It was designed by Joe Pallai, and uses the music track "I Sawed the Demons" by Robert Prince.
Walkthrough
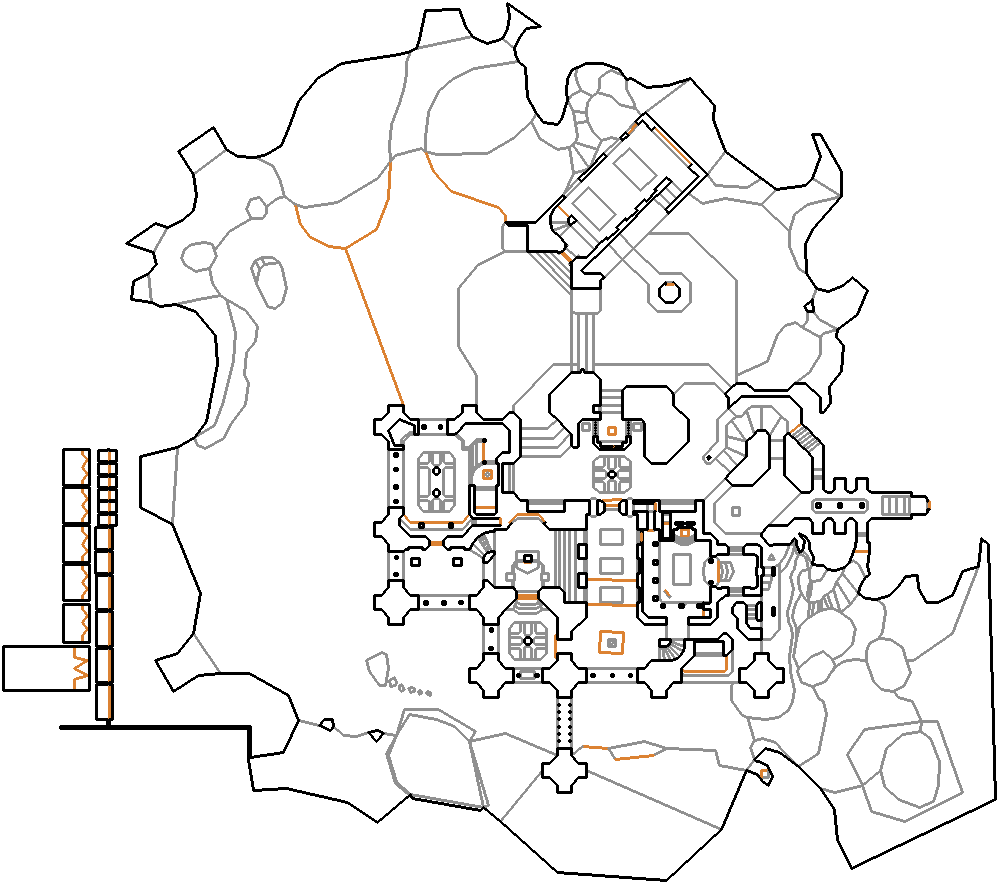
Map of MAP23
- Letters in italics refer to marked spots on the map. Sector numbers in boldface are secrets which count toward the end-of-level tally.
Official
- From the start, go up the stairs at your right, you will find a fence to a patio, in the right corner (close to the room with the chaingunners) there is a light, press it and take a teleporter to go down to the patio.
- In the patio mentioned in #1, press the switch to raise stairs to a teleporter that leads again upwards. At the northern end of the walkway you will get to a place with a skull switch that counts as a secret (and you will find a megasphere and a place to kill the monsters that are behind a door downstairs).
- After the skull door, turn right, go down the stairs. You will see a blue armor standing on a column to your right. If you go left, you will see a corridor with wooden columns. The first left of the alcoves of this corridor has a blinking light, press the wall, go upstairs and collect the 20 health bonuses. You will see a small switch in the support beam at the end, press it to lower the column temporarily and run to get the blue armor.
- In the courtyard with the blue switch there is a teleporter with a library behind. The library contains a very small switch in the middle, pressing it will open a door in the stairs containing a computer area map.
- At the end of the blood lake past the blue door there is an island with a berserk pack and a BFG9000 that can be reached using the rock steps.
Non-official
- After picking up the blue skull key walk to the corner between the southern railing and the eastern wall. Look to the west, where you see an easy-to-get soul sphere down in the blood pool and an apparently inaccessible higher walkway (with - on medium and hard skill levels only - an invulnerability sphere on it) west of it. Get back outside and follow the blood river to the south. On the southern end of the blood fall leading down into the pool is a dead tree. From the northern shore you have to straferun over the blood river and the corner west of the dead tree to jump over the blood pool. On this plateau you can walk westwards around the wall, make some attack noise to attract the monsters down in the blood lake and enjoy watching them infighting. Even better, you can drop down to the aforementioned walkway (and pick up the invulnerability sphere). From here (or on easy skills: from the plateau) drop either down to the safe eastern blood pool or dare jumping into the western bloody lake to pick up the yellow skull key, register secret #5 and run for your life to the north to take a big shortcut through the map.
Bugs
- The area West from the starting location with the yellow key door includes faulty linedefs, which in turn produce the Medusa effect. The effect is not noticeable in most engines, but Chocolate Doom tends to crash in the area. However, several workarounds exist which can be used to make the level playable with the port.
- Medium and hard skill levels only:
- Pushing the switch (linedef 423) in the southwestern corner of the patio (see secret #2) before killing the two revenants (things 63 and 64) next to the teleporter (sector 37) will probably prevent the arch-vile (thing 88) from teleporting in since its teleporting linedef (756) is a type 39 -W1 Teleport.
- Or, less techie talk:
- This means that once the switch is pushed, the arch-vile can cross the triggerline to teleport in but the teleport trigger only works when crossing it for the very first time. As the revenants still are alive, they keep dithering around and occupy the arch-vile's teleport destination at the only moment he is able to teleport, thus keeping him trapped (and alive) forever (unless cheats are used).
Statistics
Things
Trivia
Originally this map was slotted for level 27.