No edit summary |
No edit summary |
||
| (22 intermediate revisions by 13 users not shown) | |||
| Line 1: | Line 1: | ||
{{map|slot=MAP20}} |
{{map|slot=MAP20}} |
||
| − | {{ |
+ | {{map|slot=MAP21}} |
| + | {{Infobox_Map|title = MAP20: Gotcha! |game = [[Doom II]]|map_number = 20|entry_from = [[MAP19: The Citadel (Doom II)|The Citadel]]|exits_to = [[MAP21: Nirvana (Doom II)|Nirvana]]}} |
||
| − | '''MAP20: Gotcha!''' is the twentieth map of [[Doom II]]. It was designed by [[John Romero]] and uses the [[Doom II music|music]] track "Message For The Archvile". It is notable for including a possibility of [[monster infighting]] between a [[ |
+ | '''MAP20: Gotcha! (MAP21 in [[Game Boy Advance|GBA]])''' is the twentieth map of [[Doom II]]. It was designed by [[John Romero]] and uses the [[Doom II music|music]] track "Message For The Archvile". It is notable for including a possibility of [[monster infighting]] between a [[cyberdemon]] and a [[spider Mastermind]]. |
| ⚫ | |||
| − | ==Strategy== |
||
| − | [[ |
+ | [[file:CyberdemonxSpidermastermind.png|thumb|The Cyberdemon and Spider Mastermind face each other in MAP20.]] |
| ⚫ | |||
| ⚫ | |||
| ⚫ | Go through the door at the start and clear the opposition there. While moving into a larger room, platforms will lower in the center of it revealing the [[Spider Mastermind]] and [[Cyberdemon]] (A). Try to lure them into a fight (moving in the west of the room behind a raised wall in the western platform). Defeat the remaining enemy using the platform as cover (B). |
||
| ⚫ | |||
| − | Hit the switch in the western platform and immediately eliminate the [[Arch-Vile]] and [[Baron of Hell]] that will come through the door (C). Afterwards, take the lift to go around the walkway and go through the door. Follow a winding stairway (D) down towards the [[teleporter]]. Go down another stairway and jump into the dark opening (E). Follow the corridor to the end and hop in the teleporter (F). |
||
| ⚫ | Go through the door at the start and clear the opposition there. While moving into a larger room, platforms will lower in the center of it revealing the [[Spider Mastermind]] and [[Cyberdemon]] (A). Try to lure them into a fight (moving in the west of the room behind a raised wall in the western platform). Defeat the remaining enemy (usually the cyberdemon) using the platform as cover (B). |
||
| − | + | Hit the switch in the western platform and immediately eliminate the [[Arch-Vile]] and [[baron of hell]] that will come through the door (C). Afterwards, take the lift to go around the walkway and go through the door. Follow a winding stairway (D) down towards the [[teleporter]]. Go down another stairway and jump into the dark opening (E). Follow the corridor to the end and hop in the teleporter (F). |
|
| + | |||
| + | You will slowly go down into a small room with [[zombie]]s and [[imp]]s (G). Through the opening you will see a section of wall lowering across the lava pool (H). Wait for it to lower completely and jump through the opening. Follow the corridor, climb up the stairs and snatch the [[plasma rifle]] (I). Watch out for enemies popping out and run down the stairs towards the walkway and walk through the teleporter (J). In the last room, walking through the narrow walkway until the end and jump in the hole (K). Watch out for [[commando]]s and [[cacodemon]]s. |
||
===Secrets=== |
===Secrets=== |
||
| Line 21: | Line 22: | ||
# On the east side of the map is a square building in a sunken pit of lava. Enter this building via the lift in the southwest corner and follow the winding path all the way to the teleporter at the top, but do not go through it (U). Instead, open the wall immediately to its left to reveal a secret path leading to another teleporter (V). |
# On the east side of the map is a square building in a sunken pit of lava. Enter this building via the lift in the southwest corner and follow the winding path all the way to the teleporter at the top, but do not go through it (U). Instead, open the wall immediately to its left to reveal a secret path leading to another teleporter (V). |
||
# Take the demon-faced teleporter in the area with the circular walkway (after the room with the battling [[Cyberdemon]] and [[Spider Mastermind]]). Follow the white walkway in front of you and run through the dark hole in the wall (W). Hug the left wall in this dark area and you'll go through a narrow tunnel with a teleport at the end. Go through to be taken to a tall pillar with a [[megasphere]] (X). |
# Take the demon-faced teleporter in the area with the circular walkway (after the room with the battling [[Cyberdemon]] and [[Spider Mastermind]]). Follow the white walkway in front of you and run through the dark hole in the wall (W). Hug the left wall in this dark area and you'll go through a narrow tunnel with a teleport at the end. Go through to be taken to a tall pillar with a [[megasphere]] (X). |
||
| − | # Return to the dark area containing the passage to secret #6, but take the non-secret teleporter on the opposite end of the room (Y). Once the floor lowers, drop off the ledge straight ahead to lower the wall in front of you. |
+ | # Return to the dark area containing the passage to secret #6, but take the non-secret teleporter on the opposite end of the room (Y). Once the floor lowers, drop off the ledge straight ahead to lower the wall in front of you. Go through the newly opened hallway until you reach the dark room with a lit staircase in the center. The wall with the lightning symbol on the south end of this room can be opened, and contains a soul sphere (Z). |
====Non-official==== |
====Non-official==== |
||
# Shooting the left side of the structure above the demon-faced teleporter (this can be done either from the room containing secret #2 or from secret #6) opens a small alcove just to the left of where you find secret #2. It contains a [[BFG9000]] and two [[energy cell]]s. |
# Shooting the left side of the structure above the demon-faced teleporter (this can be done either from the room containing secret #2 or from secret #6) opens a small alcove just to the left of where you find secret #2. It contains a [[BFG9000]] and two [[energy cell]]s. |
||
| + | == End of Level Message == |
||
| ⚫ | |||
| − | ===Routes and tricks=== |
||
| + | You are at the corrupt heart of the city, surrounded by the corpses of your enemies. You see no way to destroy the creatures' entryway through this side, so you clench your teeth and plunge through it. |
||
| + | |||
| + | There must be a way to close it on the other side. What do you care if you've got to go through hell to get to it? |
||
| + | |||
| ⚫ | |||
===Records=== |
===Records=== |
||
The [[Compet-N]] records for the map are: |
The [[Compet-N]] records for the map are: |
||
| + | {| class="WikiaTable" |
||
| − | {| {{prettytable}} |
||
!Run||Time||Player||Date||File||Notes |
!Run||Time||Player||Date||File||Notes |
||
|- |
|- |
||
| − | |[[UV speed]]||00:34||[[Ian Sabourin]]||2002-01-07||{{competnftp|doom2/speed/lv20-034.zip|lv20-034.zip}}|| |
+ | |[[UV speed]]||00:34||[[Ian Sabourin]]||2002-01-07||{{External Link|site=competnftp|file_path=doom2/speed/lv20-034.zip|text=lv20-034.zip}}|| |
|- |
|- |
||
| − | |[[NM speed]]||00:43||[[Thomas "Panter" Pilger]]||1998-07-23||{{competnftp|doom2/nmare/nm20-043.zip|nm20-043.zip}}|| |
+ | |[[NM speed]]||00:43||[[Thomas "Panter" Pilger]]||1998-07-23||{{External Link|site=competnftp|file_path=doom2/nmare/nm20-043.zip|text=nm20-043.zip}}|| |
|- |
|- |
||
| − | |[[UV max]]||03:14||[[Radek Pecka]]||2002-03-30||{{competnftp|doom2/max/lv20-314.zip|lv20-314.zip}}|| |
+ | |[[UV max]]||03:14||[[Radek Pecka]]||2002-03-30||{{External Link|site=competnftp|file_path=doom2/max/lv20-314.zip|text=lv20-314.zip}}|| |
|- |
|- |
||
| − | |[[NM100S]]||01:26||[[Radek Pecka]]||2004-03-29||{{competnftp|doom2/nm100s/ns20-126.zip|ns20-126.zip}}|| |
+ | |[[NM100S]]||01:26||[[Radek Pecka]]||2004-03-29||{{External Link|site=competnftp|file_path=doom2/nm100s/ns20-126.zip|text=ns20-126.zip}}|| |
|- |
|- |
||
| − | |[[UV -fast]]||04:01||[[Jakub "method_man" Razak]]||2003-12-21||{{competnftp|doom2/fast/fa20-401.zip|fa20-401.zip}}|| |
+ | |[[UV -fast]]||04:01||[[Jakub "method_man" Razak]]||2003-12-21||{{External Link|site=competnftp|file_path=doom2/fast/fa20-401.zip|text=fa20-401.zip}}|| |
|- |
|- |
||
| − | |[[UV -respawn]]||02:47||[[Jakub "method_man" Razak]]||2003-12-20||{{competnftp|doom2/respawn/re20-247.zip|re20-247.zip}}|| |
+ | |[[UV -respawn]]||02:47||[[Jakub "method_man" Razak]]||2003-12-20||{{External Link|site=competnftp|file_path=doom2/respawn/re20-247.zip|text=re20-247.zip}}|| |
|- |
|- |
||
| − | |[[UV Tyson]]||08:35||[[Jakub "method_man" Razak]]||2003-12-22||{{competnftp|doom2/tyson/ty20-835.zip|ty20-835.zip}}|| |
+ | |[[UV Tyson]]||08:35||[[Jakub "method_man" Razak]]||2003-12-22||{{External Link|site=competnftp|file_path=doom2/tyson/ty20-835.zip|text=ty20-835.zip}}|| |
|- |
|- |
||
| − | |[[UV pacifist]]||00:36||[[Adam Williamson]]||2003-03-04||{{competnftp|doom2/pacifist/pa20-036.zip|pa20-036.zip}}|| |
+ | |[[UV pacifist]]||00:36||[[Adam Williamson]]||2003-03-04||{{External Link|site=competnftp|file_path=doom2/pacifist/pa20-036.zip|text=pa20-036.zip}}|| |
|} |
|} |
||
==Statistics== |
==Statistics== |
||
===Map data=== |
===Map data=== |
||
| + | {| class="WikiaTable" |
||
| − | {| {{prettytable}} |
||
|[[Things]]||256 |
|[[Things]]||256 |
||
|- |
|- |
||
| Line 66: | Line 71: | ||
===Things=== |
===Things=== |
||
| + | {| class="WikiaTable" |
||
| − | {| {{prettytable}} |
||
!Monsters||[[I'm Too Young To Die|ITYTD]] and [[Hey, Not Too Rough|HNTR]]||[[Hurt Me Plenty|HMP]]||[[Ultra-Violence|UV]] and [[Nightmare!|NM]] |
!Monsters||[[I'm Too Young To Die|ITYTD]] and [[Hey, Not Too Rough|HNTR]]||[[Hurt Me Plenty|HMP]]||[[Ultra-Violence|UV]] and [[Nightmare!|NM]] |
||
|- |
|- |
||
|[[Spider Mastermind]]s||1||1||1 |
|[[Spider Mastermind]]s||1||1||1 |
||
|- |
|- |
||
| − | |[[ |
+ | |[[Shotgun guy]]s||3||9||13 |
|- |
|- |
||
|[[Cyberdemon]]s||1||1||1 |
|[[Cyberdemon]]s||1||1||1 |
||
| Line 87: | Line 92: | ||
|[[Pain Elemental]]s||3||5||5 |
|[[Pain Elemental]]s||3||5||5 |
||
|- |
|- |
||
| − | |[[ |
+ | |[[Heavy Weapon Dude]]s||4||9||12 |
|- |
|- |
||
|[[Revenant]]s||0||1||2 |
|[[Revenant]]s||0||1||2 |
||
| Line 140: | Line 145: | ||
|- |
|- |
||
!Keys||ITYTD and HNTR||HMP||UV and NM |
!Keys||ITYTD and HNTR||HMP||UV and NM |
||
| − | |- |
||
|} |
|} |
||
| + | |||
| + | ==Video== |
||
| + | <gallery widths="500" position="center" hideaddbutton="true" spacing="small" bordersize="medium" captionalign="center"> |
||
| + | File:Doom II (1994) - MAP20 Gotcha! 4K 60FPS |
||
| + | </gallery> |
||
| + | |||
| + | [[es:MAP20: Gotcha! (Doom II)]] |
||
==External links== |
==External links== |
||
# [http://www.doom2.net/~compet-n/database/cn.cgi?map:doom2:20 MAP20 demos from the Compet-n database] |
# [http://www.doom2.net/~compet-n/database/cn.cgi?map:doom2:20 MAP20 demos from the Compet-n database] |
||
# [http://ian-albert.com/misc/doom2maps.php Top-down perspective view of all Doom II levels] by Ian Albert |
# [http://ian-albert.com/misc/doom2maps.php Top-down perspective view of all Doom II levels] by Ian Albert |
||
| + | |||
| + | {{S-start}} |
||
| + | {{L-bef|before=[[MAP19: The Citadel (Doom II)|The Citadel]]}} |
||
| + | {{S-ttl|title=[[Doom II]] Level}} |
||
| + | {{L-aft|after=[[MAP21: Nirvana (Doom II)|Nirvana]]}} |
||
| + | {{S-end}} |
||
| + | |||
| + | {{Doom II maps}} |
||
[[Category:Levels by name|Gotcha! (Doom II)]] |
[[Category:Levels by name|Gotcha! (Doom II)]] |
||
[[Category:John Romero levels]] |
[[Category:John Romero levels]] |
||
| + | [[Category:Doom II levels]] |
||
Revision as of 08:21, 4 July 2020
- This level occupies the map slot MAP20. For other maps which occupy this slot, see Category:MAP20.
- This level occupies the map slot MAP21. For other maps which occupy this slot, see Category:MAP21.
MAP20: Gotcha! (MAP21 in GBA) is the twentieth map of Doom II. It was designed by John Romero and uses the music track "Message For The Archvile". It is notable for including a possibility of monster infighting between a cyberdemon and a spider Mastermind.
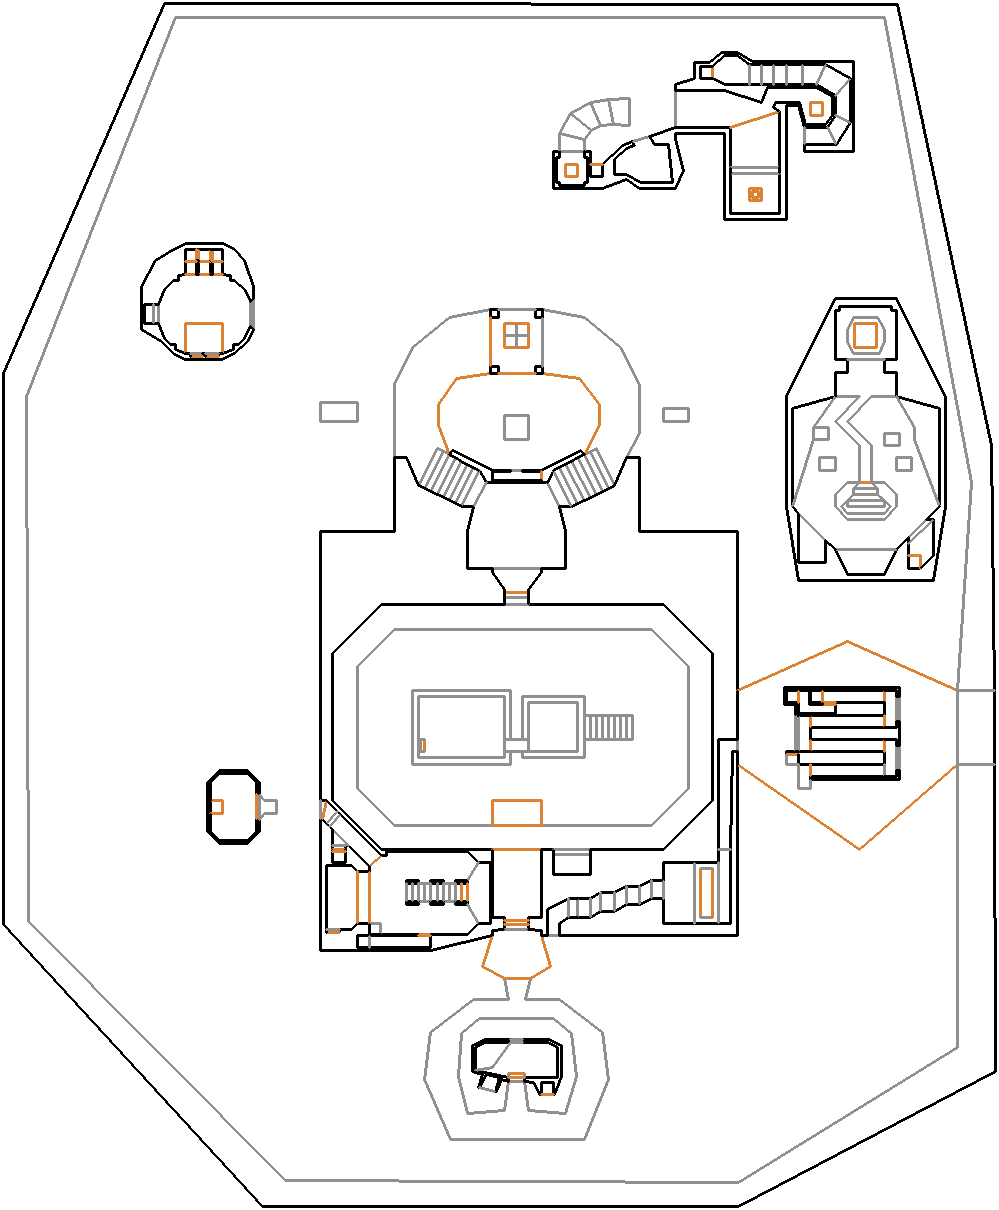
Map of MAP20

The Cyberdemon and Spider Mastermind face each other in MAP20.
Walkthrough
Go through the door at the start and clear the opposition there. While moving into a larger room, platforms will lower in the center of it revealing the Spider Mastermind and Cyberdemon (A). Try to lure them into a fight (moving in the west of the room behind a raised wall in the western platform). Defeat the remaining enemy (usually the cyberdemon) using the platform as cover (B).
Hit the switch in the western platform and immediately eliminate the Arch-Vile and baron of hell that will come through the door (C). Afterwards, take the lift to go around the walkway and go through the door. Follow a winding stairway (D) down towards the teleporter. Go down another stairway and jump into the dark opening (E). Follow the corridor to the end and hop in the teleporter (F).
You will slowly go down into a small room with zombies and imps (G). Through the opening you will see a section of wall lowering across the lava pool (H). Wait for it to lower completely and jump through the opening. Follow the corridor, climb up the stairs and snatch the plasma rifle (I). Watch out for enemies popping out and run down the stairs towards the walkway and walk through the teleporter (J). In the last room, walking through the narrow walkway until the end and jump in the hole (K). Watch out for commandos and cacodemons.
Secrets
Official
- At the very beginning of the level, turn around and face the structure behind you. Walk off the ledge you're on to cause a walkway to rise below you (L). Follow this walkway around to the back of the structure to access its inside. Once you're done exploring, drop into the pit of blood between the walkway and the structure. At either end of the semicircular pit are alcoves. The western alcove contains a radiation suit and a bulk cell and is considered a secret (M). The east alcove teleports you back to the starting point.
- In the northeast corner of the level is a large structure (N). Walk around the far side and you'll see a narrow "alley" with a glowing skull decoration at its end (O). Enter this alley to find a passageway leading up to a teleporter (P). Go through to be taken to a circular structure in the northwest of the map (Q). After raising the floor in this building, flip the switch to lower a teleport, but do not go through it yet. The walls immediately to the left and right of the teleporter can be opened as well (R). Both count as individual secrets.
- See secret #2.
- At the end of either secret #2 or #3, open the wall leading to the area behind the teleporter (S; the right wall in the left alcove; the left wall in the right alcove). This also counts as a secret and contains a soul sphere (T).
- On the east side of the map is a square building in a sunken pit of lava. Enter this building via the lift in the southwest corner and follow the winding path all the way to the teleporter at the top, but do not go through it (U). Instead, open the wall immediately to its left to reveal a secret path leading to another teleporter (V).
- Take the demon-faced teleporter in the area with the circular walkway (after the room with the battling Cyberdemon and Spider Mastermind). Follow the white walkway in front of you and run through the dark hole in the wall (W). Hug the left wall in this dark area and you'll go through a narrow tunnel with a teleport at the end. Go through to be taken to a tall pillar with a megasphere (X).
- Return to the dark area containing the passage to secret #6, but take the non-secret teleporter on the opposite end of the room (Y). Once the floor lowers, drop off the ledge straight ahead to lower the wall in front of you. Go through the newly opened hallway until you reach the dark room with a lit staircase in the center. The wall with the lightning symbol on the south end of this room can be opened, and contains a soul sphere (Z).
Non-official
- Shooting the left side of the structure above the demon-faced teleporter (this can be done either from the room containing secret #2 or from secret #6) opens a small alcove just to the left of where you find secret #2. It contains a BFG9000 and two energy cells.
End of Level Message
You are at the corrupt heart of the city, surrounded by the corpses of your enemies. You see no way to destroy the creatures' entryway through this side, so you clench your teeth and plunge through it.
There must be a way to close it on the other side. What do you care if you've got to go through hell to get to it?
Speedrunning
Records
The Compet-N records for the map are:
| Run | Time | Player | Date | File | Notes |
|---|---|---|---|---|---|
| UV speed | 00:34 | Ian Sabourin | 2002-01-07 | lv20-034.zip | |
| NM speed | 00:43 | Thomas "Panter" Pilger | 1998-07-23 | nm20-043.zip | |
| UV max | 03:14 | Radek Pecka | 2002-03-30 | lv20-314.zip | |
| NM100S | 01:26 | Radek Pecka | 2004-03-29 | ns20-126.zip | |
| UV -fast | 04:01 | Jakub "method_man" Razak | 2003-12-21 | fa20-401.zip | |
| UV -respawn | 02:47 | Jakub "method_man" Razak | 2003-12-20 | re20-247.zip | |
| UV Tyson | 08:35 | Jakub "method_man" Razak | 2003-12-22 | ty20-835.zip | |
| UV pacifist | 00:36 | Adam Williamson | 2003-03-04 | pa20-036.zip |
Statistics
Map data
| Things | 256 |
| Vertices | 1024 |
| Linedefs | 1015 |
| Sidedefs | 1448 |
| Sectors | 191 |
Things
| Monsters | ITYTD and HNTR | HMP | UV and NM |
|---|---|---|---|
| Spider Masterminds | 1 | 1 | 1 |
| Shotgun guys | 3 | 9 | 13 |
| Cyberdemons | 1 | 1 | 1 |
| Imps | 2 | 14 | 22 |
| Barons of Hell | 1 | 1 | 1 |
| Cacodemons | 3 | 7 | 11 |
| Lost Souls | 0 | 2 | 9 |
| Arch-Viles | 2 | 2 | 2 |
| Pain Elementals | 3 | 5 | 5 |
| Heavy Weapon Dudes | 4 | 9 | 12 |
| Revenants | 0 | 1 | 2 |
| Hell Knights | 0 | 1 | 1 |
| Powerups | ITYTD and HNTR | HMP | UV and NM |
| Stim packs | 7 | 7 | 6 |
| Medikits | 9 | 9 | 9 |
| Soul spheres | 4 | 4 | 4 |
| Health bonuses | 19 | 19 | 16 |
| Armor bonuses | 26 | 26 | 23 |
| Green armors | 2 | 2 | 2 |
| Blue armors | 2 | 2 | 2 |
| Berserks | 1 | 1 | 1 |
| Radiation suits | 2 | 2 | 2 |
| Megasphere | 1 | 1 | 1 |
| Weapons | ITYTD and HNTR | HMP | UV and NM |
| Rocket launchers | 1 | 1 | 1 |
| Plasma guns | 1 | 1 | 1 |
| BFG 9000s | 1 | 1 | 1 |
| Super shotguns | 1 | 1 | 1 |
| Ammunition | ITYTD and HNTR | HMP | UV and NM |
| Bulk Cells | 2 | 2 | 2 |
| Shells | 13 | 13 | 13 |
| Rockets | 1 | 1 | 1 |
| Rocket boxes | 11 | 11 | 11 |
| Energy cells | 6 | 6 | 5 |
| Ammo boxes | 5 | 5 | 5 |
| Keys | ITYTD and HNTR | HMP | UV and NM |
Video
 - MAP20 Gotcha! 4K 60FPS (14 KB)")
External links
- MAP20 demos from the Compet-n database
- Top-down perspective view of all Doom II levels by Ian Albert
| Entry from The Citadel |
Doom II Level | Exit to Nirvana |