- This level occupies the map slot MAP19. For other maps which occupy this slot, see Category:MAP19.
Template:Doom II 11-20 MAP19: The Citadel is the nineteenth map of Doom II. It was designed by Sandy Petersen and uses the music track "Shawn's Got The Shotgun".
Strategy
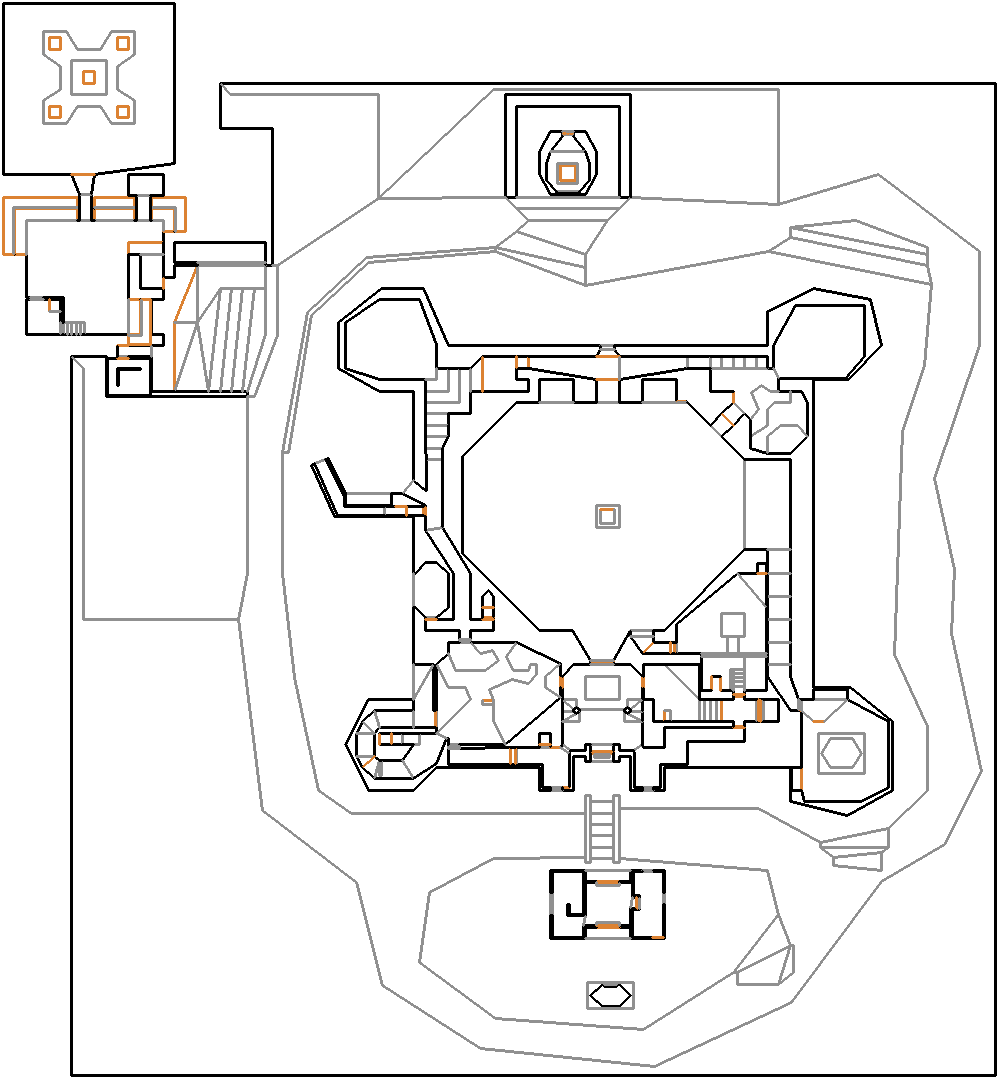
Map of MAP19
Walkthrough
At the start, open the door in front of you (1). In here, kill the Shotgun Guys, and hit the switch (2) to the right (it is a door). In here, kill the Imps, and hit the switch in this room. Now leave this room, and in here, open the door to the right (3). Out here, go straight and open the door across from you (4).
In here, kill the Lost Souls, get the armor and ammo here, and from where you entered this room, head up the staircase (5) to the left. Up here, open the door to your left. In here, go straight and hit the switch on the pedestal (6) across from you. When you hit the switch, a door across from you will open. Go through.
In here, walk up to the door across from you (touch it). When you touch it, you should hear another door (7) open. Turn around and leave this room (if the door closes on you, turn around and open the door we walked up to, kill the Imps in here, and hit the switch to the right, the door will open again). Back in here, go through the new opening (8) to the left (if this one shuts, walk up to the same door again).
Kill the Imps in this hall. Now follow this hallway to a wall (9). It will lower. Kill the Imps and Spectres in front of you, and when they're dead, go through the only other opening in here. Follow it to the Yellow Key (10). When you pick it up, turn around, go straight, and drop down to the floor (11) below you.
Down here again, hit the switch on the pedestal, and turn around (it opens up another door too). Now go through the new opening. In this room, go through the opening to the right, and open the door. In this room, walk up to the Soulsphere (12). When you walk up to it, you will teleport.
When you teleport, there will be an Imp cage to the left and right of you. Shoot the Imp cage (13) to the left of you (kill the Imps too, and do this with the other Imp cage). Once you shoot the Imp cage to the left, a platform (14) will rise to the door across from you in this room (you can see it when you first teleport here).
Once the platform is finished rising to the door, cross the platform and open the door. In here, follow this hallway to another room (15), killing any Cacodemons in your way. Down here in this room, kill the Arachnotron, and grab the Red Key (16). Once you have the key, drop down into the floor below you (17), and down here, go all the way left and open the only door (18) in this room.
Back in here, open the door to the right. In this same room, hit the switch on the pedestal. Now, the two doors will open again. Go through the opening behind you again. In here, go straight until you see an opening to the left (skip the first one that's right next to you when you enter this room). Facing the opening, check the walls to the left of it until a hidden door (19) opens.
When you find the hidden door, go in the room, and pick up the Armor. When you get the armor, check the wall in front of you (20). It should lower (it's a lift). When it's done lowering, get on it. Now ride it to the top. Up here, follow this hallway to an opening (21).
Before you go through it, get in center with it, back up, and then *run* straight. Hopefully when you land, you should land on the ledge (22) a little higher than the floor you just ran over. If you land on the ledge, drop down into the water not the floor. Down in the water, head up the stairs. Up here, there are two openings. Take the one on the corner (23).
In here, follow this hallway to a bigger room (24), and watch out for the crushing ceiling (25) you'll pass. In this bigger room, head up the only staircase in this room. At the top, hit the switch on the pedestal (26), then leave this room, going back down the stairs. Down here again, go left, through the opening.
In this hall, go straight, and drop down to the floor below you. You can see five teleporters. Take the one in the northeast part (27) of this room. When you teleport, go straight, and drop down into the room below you (28). Down here, use a BFG or a Super Shotgun to kill all of the Demons in this room. When all of the Demons are dead, go through the opening to the left of the staircase in this room, and drop down to a lower floor (29).
Down here, pick up the Blue Key (30). Once you pick it up, drop down to the floor below you, and go all the way straight, and open the door (31) over here. In here, go straight, and open the door. Out here, go left, and follow this pathway to a staircase leading to the building (32 [you'll see it to the right of the staircase]) killing any Spectres in your way.
Once you get to the stairs leading to a building, cross the stairs to the building. Over here, take either opening (33,34) to the other side of this room. Over here is an opening (35) blocked by a Red Bar, a Yellow Bar, and a Blue Bar. Press the Spacebar on each of them to remove them, go through the opening, and step on the exit teleporter (36).
Secrets
- After entering the citadel, climb the stairs and enter the lion-faced door on the right. Flip the switch in the next room to raise a staircase. Proceed up them and open the grey brick wall between the two satyr faces on the left wall (A). Go up the stairs in the next room and walk up to the switch on the wall to your left (not the one in the adjacent alcove). Pressing this switch causes a platform in the pit ahead to rise gradually. Flip this switch 2-7 times and jump onto the platform. Straight ahead will be a glowing triangular platform in the corner of the pit. Drop down onto this platform and go through the teleporter. On the other side is a soul sphere (B).
- Upon retrieving the soul sphere in secret #1, walk towards the door in front of you, but instead of going through, start walking backwards. You will be teleported onto a platform surrounded by an inescapable pit (C). There are two nooks in the wall containing enemies. Shoot the back wall of the smaller of the two nooks to raise a platform leading to the red skull key (D).
- Return to the first room in the citadel. Instead of going through the lion-faced door on the right, go through the left one (E). Flip the switch in the center of the next room to open two doors in the same room. Go through the southern one and continue along the hall until you hear the noise of a door opening behind. Quickly run back through the door you came through before it shuts and go through the newly opened wall before it closes too. Follow the spiraling stairway upward to the yellow skull key (F).
- Return to the room with the switch in the center and press it again. This time, go through the northern door. There will be a three-way fork in the path almost immediately (G). Go left and through the door at the end to get a not-so-secret blur sphere (H).
- Go back to the previous fork in the path and go straight. Follow the corridor until you reach a branch in the path that leads outside to the left. Do not drop outside yet. Instead, open the grey brick wall (the one that isn't tinted green) between the two silver strips on the wall that is immediately left of this pathway. This reveals a secret area with a security armor vest inside (I).
- Press the use key on the back wall of secret #5 to lower a lift (J). Ride it up to another secret area leading outside (K).
- In secret #6, face the hole leading outside and run out as fast as you can. You should land on the "fence" lining the moat (L). Drop into the moat to gain access to the otherwise unreachable red brick building.
- There are two doorways leading into the red brick building from secret #6 (M). Take the doorway on the left. Flip the switch at the end of the hall and go through the door. Pick up the ammo in this next room and then return outside (N). A new area will have opened, releasing some enemies. Pick up the computer map inside (O).
- Now take the doorway on the right side of the red brick building (P). Once inside, go up into the small wooden watchtower in the corner and flip the switch there (Q). This opens another secret passage at the north end of this room, revealing a set of five teleporters which take you to corresponding parts of the citadel (R). Take the northeast teleport to reach an otherwise unreachable secret area in the northeast "turret" of the fortress (S).
Bugs
- There is a switch near the blue key to lower a lift, but the height of sector associated with this switch is already the same as the lowest adjacent sector.
Speedrunning
Routes and tricks
You do not have to obtain all three keys to finish this level. Opening the blue and red bars in front of the exit portal (or the red and yellow bars) will provide enough space to enter the exit room.
Records
The Compet-N records for the map are:
| Run | Time | Player | Date | File | Notes |
|---|---|---|---|---|---|
| UV speed | 00:36 | Marijo "Sedlo" Sedlic | 2002-07-18 | Template:Competnftp | |
| NM speed | 00:50 | Ilya Britvich | 2003-02-03 | Template:Competnftp | |
| UV max | 05:09 | Radek Pecka | 2004-02-16 | Template:Competnftp | |
| NM100S | 01:34 | Marijo "Sedlo" Sedlic | 1999-09-13 | Template:Competnftp | |
| UV -fast | 07:24 | Henning Skogsto | 1999-04-03 | Template:Competnftp | |
| UV -respawn | 04:32 | Jakub "method_man" Razak | 2003-12-06 | Template:Competnftp | |
| UV Tyson | 09:59 | Radek Pecka | 2002-11-28 | Template:Competnftp | |
| UV pacifist | 00:41 | Adam Williamson | 2000-02-18 | Template:Competnftp |
Statistics
Map data
| Things | 437 |
| Vertices | 1252 |
| Linedefs | 1255 |
| Sidedefs | 1821 |
| Sectors | 251 |
Things
| Monsters | ITYTD and HNTR | HMP | UV and NM |
|---|---|---|---|
| Sergeants | 6 | 10 | 10 |
| Spectres | 6 | 14 | 27 |
| Imps | 53 | 93 | 101 |
| Demons | 17 | 29 | 36 |
| Troopers | 16 | 16 | 16 |
| Cacodemons | 0 | 1 | 6 |
| Lost Souls | 4 | 10 | 10 |
| Arachnotrons | 1 | 1 | 2 |
| Powerups | ITYTD and HNTR | HMP | UV and NM |
| Backpacks | 1 | 1 | 1 |
| Stim packs | 31 | 34 | 34 |
| Medikits | 11 | 13 | 13 |
| Soul spheres | 1 | 1 | 1 |
| Health bonuses | 43 | 43 | 43 |
| Armor bonuses | 10 | 10 | 10 |
| Green armors | 2 | 2 | 2 |
| Blue armors | 1 | 1 | 1 |
| Invulnerabilities | 0 | 1 | 1 |
| Berserks | 1 | 1 | 1 |
| Invisibilities | 1 | 1 | 1 |
| Automaps | 1 | 1 | 1 |
| Weapons | ITYTD and HNTR | HMP | UV and NM |
| Chainguns | 1 | 1 | 1 |
| Rocket launchers | 1 | 1 | 1 |
| Super shotguns | 1 | 1 | 1 |
| Ammunition | ITYTD and HNTR | HMP | UV and NM |
| Ammo clips | 12 | 15 | 15 |
| Shells | 14 | 15 | 16 |
| Rockets | 3 | 5 | 5 |
| Rocket boxes | 2 | 2 | 2 |
| Ammo boxes | 7 | 7 | 7 |
| Shell boxes | 4 | 5 | 5 |
| Keys | ITYTD and HNTR | HMP | UV and NM |
| Red skulls | 1 | 1 | 1 |
| Yellow skulls | 1 | 1 | 1 |
| Blue skulls | 1 | 1 | 1 |