(→Things) |
m (→Current records: clean up) |
||
| (9 intermediate revisions by 2 users not shown) | |||
| Line 1: | Line 1: | ||
| ⚫ | |||
{{map|slot=MAP18}} |
{{map|slot=MAP18}} |
||
| − | '''MAP18: Base of Thorn''' is the eighteenth map of [[Requiem]]. |
+ | '''MAP18: Base of Thorn''' is the eighteenth map of [[Requiem]]. It was designed by Eric Sambach, and uses the music track "Dry Rot" by [[Mark Klem]]. |
== Description == |
== Description == |
||
According to both the text file and the Requiem info pack: |
According to both the text file and the Requiem info pack: |
||
| − | :''Hint: |
+ | :''Hint: When you get the red key, it's best to run really fast to the exit.'' |
== Walkthrough == |
== Walkthrough == |
||
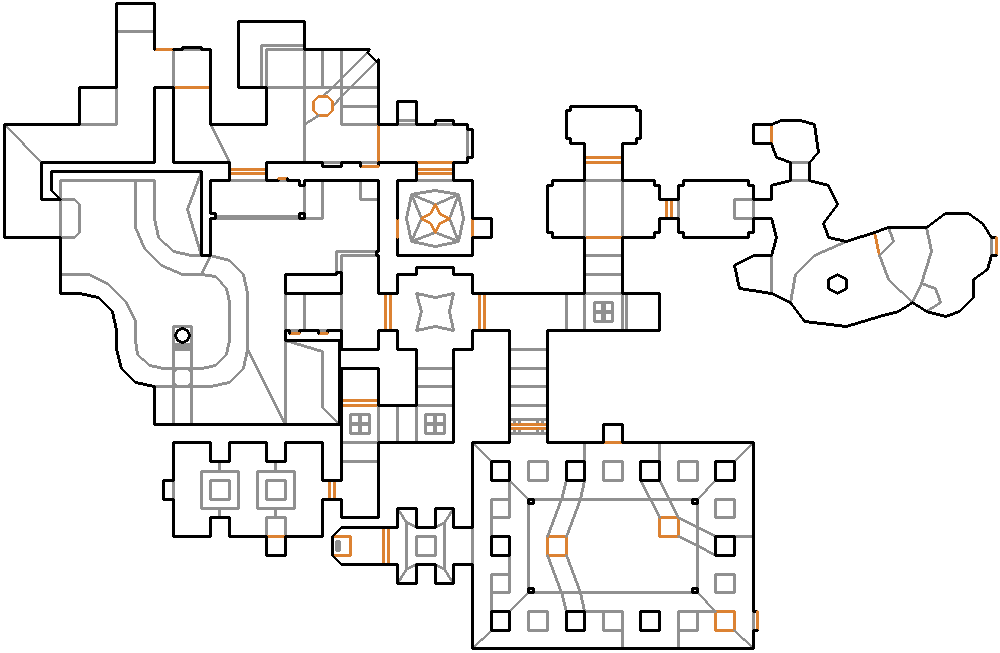
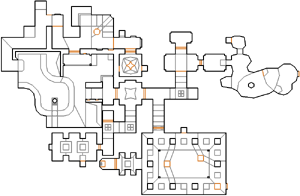
| − | [[ |
+ | [[file:Requiem_MAP18.png|thumb|300px|Map of MAP18]] |
| − | : Letters in ''italics'' refer to marked spots on the map. |
+ | : Letters in ''italics'' refer to marked spots on the map. [[Sector]] numbers in '''boldface''' are [[secrets]] which count toward the [[Intermission screen|end-of-level tally]]. |
| − | |||
| − | ===Essentials=== |
||
| − | |||
| − | ===Other points of interest=== |
||
===Secrets=== |
===Secrets=== |
||
# Once you go through the first door, open the wall immediately north of you to find a [[chaingun]] and a [[backpack]]. ('''sector 26''') |
# Once you go through the first door, open the wall immediately north of you to find a [[chaingun]] and a [[backpack]]. ('''sector 26''') |
||
| − | # In the red rock cavern where the blue keycard is found, [[Revenant]]s will come out of the west wall, as will multiple smaller monsters when you climb up the first step. |
+ | # In the red rock cavern where the blue keycard is found, [[Revenant]]s will come out of the west wall, as will multiple smaller monsters when you climb up the first step. Walk through this wall yourself to find a [[rocket launcher]] and a [[medikit]]. ('''sector 130''') |
| − | # In the room where you find the yellow keycard, the western pair of skull panels has two [[health bonus]]es in front of it. |
+ | # In the room where you find the yellow keycard, the western pair of skull panels has two [[health bonus]]es in front of it. Push it, and return to the hallway you got there from to find that the wall has lowered below one of the northern monitors. Stand on it before it rises again, and walk through the monitors to obtain a [[soul sphere]]. ('''sector 202''') |
| − | # In the same hallway, one of the southern monitors is flickering. |
+ | # In the same hallway, one of the southern monitors is flickering. Shoot it, and then use the teleporter inside the yellow keycard room. Backtrack to the start of the level to find that one of the skull pillars has risen to reveal a teleporter. ('''sector 198''') Enter it to be brought in front of the yellow key-locked door that the floor lowered in front of, and open it to find [[combat armor]], a soul sphere, a [[megasphere]], a [[BFG 9000]], and some [[Arch-Vile]]s (two on [[skill level|Hurt Me Plenty]] or lower, and three on [[skill level|Ultra-Violence]] or higher. |
| − | # In the stone room where the red key is found, part of the northern wall is covered in far more green moss than the others. |
+ | # In the stone room where the red key is found, part of the northern wall is covered in far more green moss than the others. Push on it, and it will temporarily lower, carrying a [[berserk pack]]. ('''sector 200''') |
===Bugs=== |
===Bugs=== |
||
| − | The back side of linedef 950 (the wall you push on to access secret #5) is untextured. |
+ | The back side of linedef 950 (the wall you push on to access secret #5) is untextured. As the ceiling of sector 200 is 32 units higher than the sector on the linedef's front side (sector 156,) if you stand on the lift and face outward as it rises, a [[Hall of Mirrors effect]] can briefly be seen before you are lowered again. |
| − | |||
| − | ===Demo files=== |
||
| − | * |
||
== Areas / screenshots == |
== Areas / screenshots == |
||
<gallery> |
<gallery> |
||
| + | Image:Requiem-map18-cacos.png|[[Cacodemon]]s in the blue key zone |
||
| − | Image: | |
||
| + | Image:Requiem-map18-acid.png|Before the acid tunnel |
||
| + | Image:Requiem-map18-plasma.png|The trapped plasma gun |
||
| + | Image:Requiem-map18-BFG.png|The [[BFG9000]] guarded by three [[archvile]]s |
||
| + | Image:Requiem-map18-end.png|The end |
||
</gallery> |
</gallery> |
||
== Speedrunning == |
== Speedrunning == |
||
| − | |||
| − | ===Routes and tricks=== |
||
| − | |||
===Current records=== |
===Current records=== |
||
The [[Compet-N]] records for the map are: |
The [[Compet-N]] records for the map are: |
||
| + | {| class="WikiaTable" |
||
| − | {| {{prettytable}} |
||
!Run||Time||Player||Date||File||Notes |
!Run||Time||Player||Date||File||Notes |
||
|- |
|- |
||
| − | |[[UV speed]]||02:52||[[Jim "Xit Vono" Leonard|Xit Vono]]||2004-06-19||{{competnftp|pwads/requiem/speed/rq18-252.zip|rq18-252.zip}}|| |
+ | |[[UV speed]]||02:52||[[Jim "Xit Vono" Leonard|Xit Vono]]||2004-06-19||{{External Link|site=competnftp|file_path=pwads/requiem/speed/rq18-252.zip|text=rq18-252.zip}}|| |
|- |
|- |
||
|[[NM speed]]|| || || || || |
|[[NM speed]]|| || || || || |
||
|- |
|- |
||
| − | |[[UV max]]||04:53||[[Jim "Xit Vono" Leonard|Xit Vono]]||2004-06-19||{{competnftp|pwads/requiem/max/rq18-453.zip|rq18-453.zip}}|| |
+ | |[[UV max]]||04:53||[[Jim "Xit Vono" Leonard|Xit Vono]]||2004-06-19||{{External Link|site=competnftp|file_path=pwads/requiem/max/rq18-453.zip|text=rq18-453.zip}}|| |
|- |
|- |
||
|[[NM100S]]|| || || || || |
|[[NM100S]]|| || || || || |
||
| Line 64: | Line 57: | ||
===Miscellaneous demos=== |
===Miscellaneous demos=== |
||
| + | {| class="WikiaTable" |
||
| − | {| {{prettytable}} |
||
!Run||Time||Player||Date||File||Notes |
!Run||Time||Player||Date||File||Notes |
||
|- |
|- |
||
| || || || ||[ftp://.zip .zip]|| |
| || || || ||[ftp://.zip .zip]|| |
||
|} |
|} |
||
| − | |||
| − | == Deathmatch == |
||
== Statistics == |
== Statistics == |
||
| − | |||
===Map data=== |
===Map data=== |
||
| + | {| class="WikiaTable" |
||
| − | {| {{prettytable}} |
||
|[[Things]]||351 |
|[[Things]]||351 |
||
|- |
|- |
||
| Line 88: | Line 78: | ||
===Things=== |
===Things=== |
||
| + | {| class="WikiaTable" |
||
| − | {| {{prettytable}} |
||
!Monsters||[[I'm Too Young To Die|ITYTD]] and [[Hey, Not Too Rough|HNTR]]||[[Hurt Me Plenty|HMP]]||[[Ultra-Violence|UV]] and [[Nightmare!|NM]] |
!Monsters||[[I'm Too Young To Die|ITYTD]] and [[Hey, Not Too Rough|HNTR]]||[[Hurt Me Plenty|HMP]]||[[Ultra-Violence|UV]] and [[Nightmare!|NM]] |
||
|- |
|- |
||
| Line 182: | Line 172: | ||
|- |
|- |
||
|[[Keys|Yellow keycards]]|| colspan="3" align="center"|1 |
|[[Keys|Yellow keycards]]|| colspan="3" align="center"|1 |
||
| − | |- |
||
|} |
|} |
||
| − | |||
| − | == Technical information == |
||
| − | |||
| − | == Inspiration and development == |
||
| − | |||
| − | == Trivia == |
||
| − | |||
| − | == See also == |
||
| − | |||
| − | * |
||
| − | |||
| − | == Sources == |
||
| − | |||
| − | * |
||
== External links == |
== External links == |
||
| ⚫ | |||
| ⚫ | |||
| ⚫ | |||
[[Category:Levels by name|Base of Thorn (Requiem)]] |
[[Category:Levels by name|Base of Thorn (Requiem)]] |
||
Latest revision as of 04:40, 23 March 2020
- This level occupies the map slot MAP18. For other maps which occupy this slot, see Category:MAP18.
MAP18: Base of Thorn is the eighteenth map of Requiem. It was designed by Eric Sambach, and uses the music track "Dry Rot" by Mark Klem.
Description
According to both the text file and the Requiem info pack:
- Hint: When you get the red key, it's best to run really fast to the exit.
Walkthrough
Map of MAP18
- Letters in italics refer to marked spots on the map. Sector numbers in boldface are secrets which count toward the end-of-level tally.
Secrets
- Once you go through the first door, open the wall immediately north of you to find a chaingun and a backpack. (sector 26)
- In the red rock cavern where the blue keycard is found, Revenants will come out of the west wall, as will multiple smaller monsters when you climb up the first step. Walk through this wall yourself to find a rocket launcher and a medikit. (sector 130)
- In the room where you find the yellow keycard, the western pair of skull panels has two health bonuses in front of it. Push it, and return to the hallway you got there from to find that the wall has lowered below one of the northern monitors. Stand on it before it rises again, and walk through the monitors to obtain a soul sphere. (sector 202)
- In the same hallway, one of the southern monitors is flickering. Shoot it, and then use the teleporter inside the yellow keycard room. Backtrack to the start of the level to find that one of the skull pillars has risen to reveal a teleporter. (sector 198) Enter it to be brought in front of the yellow key-locked door that the floor lowered in front of, and open it to find combat armor, a soul sphere, a megasphere, a BFG 9000, and some Arch-Viles (two on Hurt Me Plenty or lower, and three on Ultra-Violence or higher.
- In the stone room where the red key is found, part of the northern wall is covered in far more green moss than the others. Push on it, and it will temporarily lower, carrying a berserk pack. (sector 200)
Bugs
The back side of linedef 950 (the wall you push on to access secret #5) is untextured. As the ceiling of sector 200 is 32 units higher than the sector on the linedef's front side (sector 156,) if you stand on the lift and face outward as it rises, a Hall of Mirrors effect can briefly be seen before you are lowered again.
Areas / screenshots
")
")
")
")
")
Speedrunning
Current records
The Compet-N records for the map are:
| Run | Time | Player | Date | File | Notes |
|---|---|---|---|---|---|
| UV speed | 02:52 | Xit Vono | 2004-06-19 | rq18-252.zip | |
| NM speed | |||||
| UV max | 04:53 | Xit Vono | 2004-06-19 | rq18-453.zip | |
| NM100S | |||||
| UV -fast | |||||
| UV -respawn | |||||
| UV Tyson | |||||
| UV pacifist |
Miscellaneous demos
| Run | Time | Player | Date | File | Notes |
|---|---|---|---|---|---|
| .zip |
Statistics
Map data
| Things | 351 |
| Vertexes | 809 |
| Linedefs | 1025 |
| Sidedefs | 1525 |
| Sectors | 217 |
Things
| Monsters | ITYTD and HNTR | HMP | UV and NM |
|---|---|---|---|
| Arachnotrons | 2 | 3 | |
| Arch-viles | 3 | 4 | |
| Barons of hell | 0 | 5 | |
| Cacodemons | 2 | 3 | |
| Chaingunners | 6 | 15 | 25 |
| Demons | 4 | 3 | |
| Hell knights | 6 | 1 | |
| Imps | 11 | 13 | 15 |
| Mancubi | 1 | ||
| Pain elementals | 1 | 2 | |
| Revenants | 3 | 4 | |
| Sergeants | 19 | 35 | 38 |
| Spectres | 6 | 8 | 10 |
| Troopers | 42 | 29 | 28 |
| Weapons | ITYTD and HNTR | HMP | UV and NM |
| BFG 9000s | 1 | ||
| Chainguns | 3 | ||
| Chainsaws | 1 | ||
| Plasma guns | 2 | ||
| Rocket launchers | 2 | ||
| Shotguns | 3 | ||
| Super shotguns | 2 | ||
| Powerups | ITYTD and HNTR | HMP | UV and NM |
| Armor bonuses | 6 | ||
| Backpacks | 1 | ||
| Berserks | 1 | ||
| Blue armors | 1 | ||
| Green armors | 1 | ||
| Health bonuses | 9 | 11 | 14 |
| Medikits | 13 | 6 | |
| Radiation suits | 1 | ||
| Soul spheres | 2 | ||
| Stim packs | 19 | 17 | 19 |
| Ammunition | ITYTD and HNTR | HMP | UV and NM |
| Ammo boxes | 2 | 1 | 0 |
| Ammo clips | 2 | 8 | |
| Bulk cells | 6 | 5 | 2 |
| Energy cells | 2 | 4 | 7 |
| Rocket boxes | 1 | ||
| Rockets | 6 | 5 | |
| Shell boxes | 3 | 5 | |
| Shells | 8 | 6 | |
| Keys | ITYTD and HNTR | HMP | UV and NM |
| Blue keycards | 1 | ||
| Red keycards | 1 | ||
| Yellow keycards | 1 | ||