- This level occupies the map slot MAP15. For other maps which occupy this slot, see Category:MAP15.
MAP15: The Devil's Coterie is the fifteenth level of Memento Mori II. It was designed by Adam Windsor and uses the music track "Frivolous Encounter" (now called "Shades of Life") by Mark Klem. It contains a separate area for multiplayer competition.
Mission briefing[]
According to both the text file and the Infopack:
- One of the first areas to be overrun by the Demons in this latest infestation was an old UAC industrial and storage facility. We managed to have some reconnaissance pictures taken of the exterior, the clearest of which has been provided for this briefing. Although at that time the Demons were keeping out of sight, and we were unable to get any hard data on their numbers or strength, recent long range scans suggest significant infestation, and energy discharges matching those of teleport units in action have been detected. We anticipate a very hot reception for you. Watch your six, and don't be caught napping - there's no telling what traps the Demons have in store.
Walkthrough[]
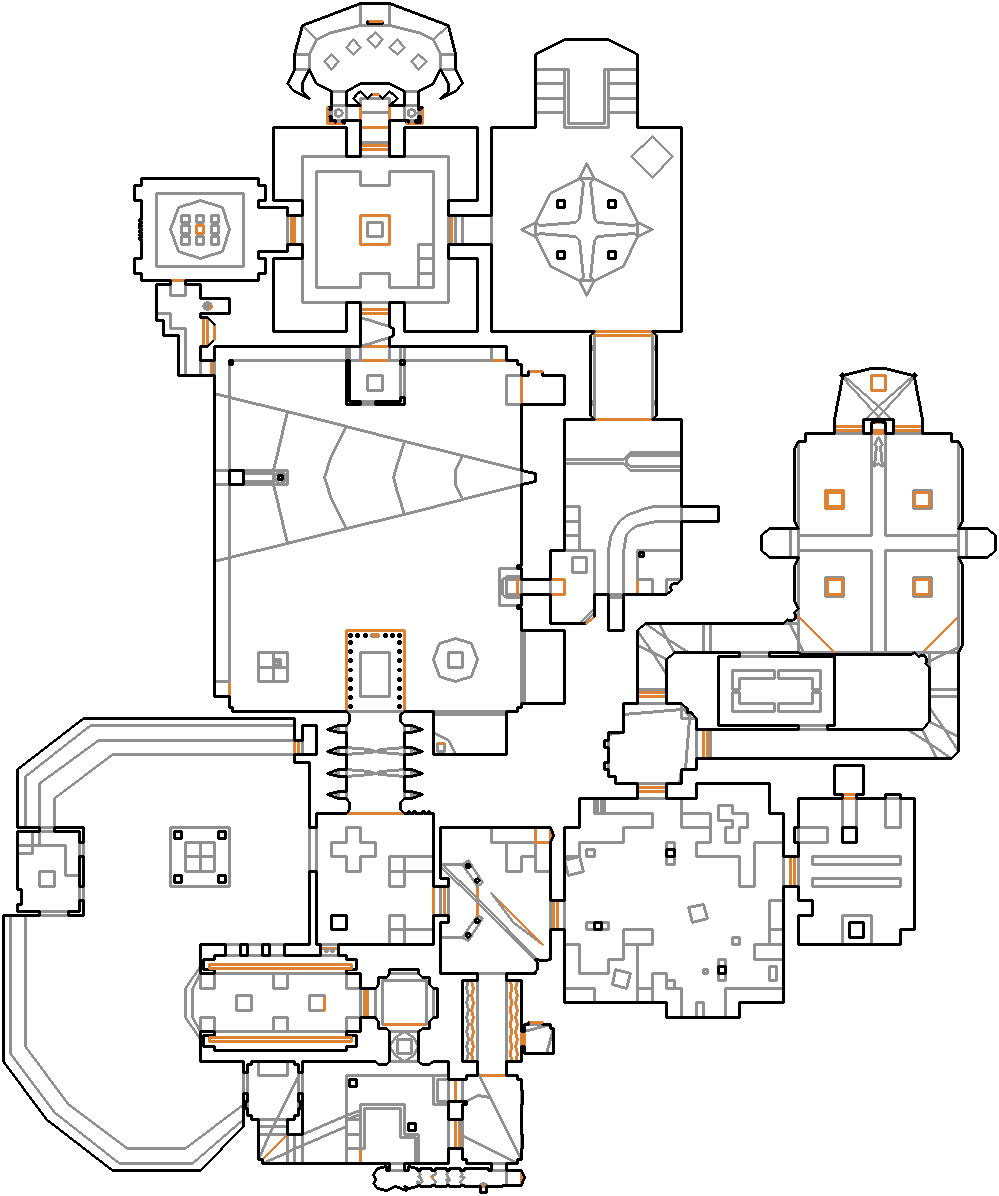
Map of MAP15
- Letters in italics refer to marked spots on the map. Sector numbers in boldface are secrets which count toward the end-of-level tally.
Secrets[]
Official[]
- On the walkway north of the area where you obtain the blue keycard, the wall at the eastern end bears a yellow stripe. Open it to discover a set of shells and a box of bullets (sector 457).
- After returning from the blue key area to the room east of the one you started the map in, enter the eastern door. In the narrow hallway to the south, there is a candle set in the southern wall. Press on it to lower an elevator (sector 312) nearby with two (four on easy skills) rockets. Note that it looks like there is only one, since all of the rockets occupy the same space.
- When you enter the hallway with the scrolling UAC walls, they will open to reveal red walls covered in anguished faces. There is a portion of the eastern wall that is not; open it to find two (four on easy skill levels) sets of shells and two (one on hard skills) rockets (sector 436). Flip the switch to exit the room if the walls close before you leave.
- In the northeastern corner of the room with the blue and yellow keycard doors, the northeasternmost computer tower (sector 170) is silver. Press on it and it will lower to reveal a box of bullets.
- In the computer room immediately following the blue keycard door, there is a set of bars (sector 464) in the southwestern corner. They can be opened to reveal a strip containing two rockets and a stimpack.
- From secret #6 proceed northwards. Using the gargoyle switch lowers you into a dark brick room. There are flickering lights in the northeastern corner. Press on the wall here, and you will be lowered into a small compartment (sector 86) containing two chaingunners, two energy cells, a stimpack and a computer map.
- From the dark brick room proceed northwards. In the square room with the nukage pit, enter the western door to find a room with nine metal poles in a toxic pool. Ride up the elevator to the south. There is a wooden portion of the wall (sector 486) to the east, in contrast to the stone covering the other walls. Open this to find a switch. Flip it to lower the light pole to the north, allowing you to access the megasphere (soul sphere on hard).
- In the room east of the yellow door, enter the eastern room. A broken panel can be found on a portion of the northern wall (sector 381) underneath flickering lights. Open it to obtain four rockets.
- Although it is not required to access this secret: If you run off the elevator onto the metal poles mentioned in secret #7 and grab the armor bonus, a switch will appear in the yellow keycard room beside the elevator back to the dark brick room. If you flip it, in the final area of the level, there will be a bright arrow pointing to the section of wall with the exit sign. This wall (sector 371) can be opened to reveal an exit switch leading to the secret level, MAP31: DejaVu.
Non-official[]
- The northwestern of the four pillars with scrolling textures in the map's final area is different from the others. Push it to reveal a soul sphere.
Bugs[]
- A chainsaw, four shotguns, two super shotguns, four chainguns, two rocket launchers, the BFG9000 and a clip on easy skills are placed in the deathmatch arena that cannot be reached in single-player or coop game mode, but are not flagged as multiplayer only.
Speedrunning[]
Current records[]
The Compet-N records for the map are:
| Run | Time | Player | Date | File | Notes |
|---|---|---|---|---|---|
| UV speed | |||||
| NM speed | |||||
| UV max | 10:23 | Eugene Kapustin | 2004-03-24 | m2151023.zip | |
| NM100S | |||||
| UV -fast | |||||
| UV -respawn | |||||
| UV Tyson | |||||
| UV pacifist |
Miscellaneous demos[]
| Run | Time | Player | Date | File | Notes |
|---|---|---|---|---|---|
| .zip |
Statistics[]
Map data[]
| Things | 794 |
| Vertexes | 2670 |
| Linedefs | 3217 |
| Sidedefs | 4646 |
| Sectors | 514 |