m (clean up) |
|||
| (16 intermediate revisions by 8 users not shown) | |||
| Line 1: | Line 1: | ||
{{map|slot=MAP15}} |
{{map|slot=MAP15}} |
||
| ⚫ | |||
'''MAP15: Dead Zone''' is the fifteenth map of [[TNT: Evilution]]. It was designed by William Whitaker and uses the music track "Smells Like Burning Corpse". |
'''MAP15: Dead Zone''' is the fifteenth map of [[TNT: Evilution]]. It was designed by William Whitaker and uses the music track "Smells Like Burning Corpse". |
||
| − | == |
+ | ==Walkthrough== |
| ⚫ | |||
| − | |||
| − | ===Walkthrough=== |
||
| ⚫ | |||
There are three required steps in the map: |
There are three required steps in the map: |
||
# Enter the central room. |
# Enter the central room. |
||
| Line 34: | Line 31: | ||
===Secrets=== |
===Secrets=== |
||
# At the southwest corner of the main building is a large open white room with a pool of water in the center. There is a doorway to the northeast. There is a misaligned wall just left of the doorway; open it to access a secret passage containing blur and invulnerability spheres. |
# At the southwest corner of the main building is a large open white room with a pool of water in the center. There is a doorway to the northeast. There is a misaligned wall just left of the doorway; open it to access a secret passage containing blur and invulnerability spheres. |
||
| − | # Go through the silver door just north of the circular room in the center of the main building. You will be in a roughly "Y"-shaped hallway. Open the wall in the bend on the left side of this hallway. You'll be in a tiny room with a window overlooking the outside. Open one of the grey hexagonal-tiled walls in this room to reveal a secret alcove with a |
+ | # Go through the silver door just north of the circular room in the center of the main building. You will be in a roughly "Y"-shaped hallway. Open the wall in the bend on the left side of this hallway. You'll be in a tiny room with a window overlooking the outside. Open one of the grey hexagonal-tiled walls in this room to reveal a secret alcove with a couple of medikits. |
# Return to the Y-shaped hall again. Directly across from the opening to secret #2 is another secret door. Behind it is another tiny room with a window overlooking the outside. Again, open one of the grey tiled walls to reveal some armor bonuses. |
# Return to the Y-shaped hall again. Directly across from the opening to secret #2 is another secret door. Behind it is another tiny room with a window overlooking the outside. Again, open one of the grey tiled walls to reveal some armor bonuses. |
||
# Return to the Y-shaped hallway once more. Just north of the entrance to secret #3 is another secret door, and the only one in this room to have a misaligned texture. There is a long narrow corridor behind it. Before reaching the area of the corridor with oscillating lights, open the wall to the left to get a rocket launcher. Continue along the corridor until you reach the first switch, on the right-hand wall. Backtrack through the corridor a ways and you'll see that a red glowing alcove has appeared. Step into it to be teleported to a raised platform in the outdoor area surrounding the main building. Don't drop off this platform yet; instead, make your way around it to the other side, where you'll see a switch. Press it to lower the tall pillar in the center of the platform, making the blur sphere atop it accessible. |
# Return to the Y-shaped hallway once more. Just north of the entrance to secret #3 is another secret door, and the only one in this room to have a misaligned texture. There is a long narrow corridor behind it. Before reaching the area of the corridor with oscillating lights, open the wall to the left to get a rocket launcher. Continue along the corridor until you reach the first switch, on the right-hand wall. Backtrack through the corridor a ways and you'll see that a red glowing alcove has appeared. Step into it to be teleported to a raised platform in the outdoor area surrounding the main building. Don't drop off this platform yet; instead, make your way around it to the other side, where you'll see a switch. Press it to lower the tall pillar in the center of the platform, making the blur sphere atop it accessible. |
||
| Line 43: | Line 40: | ||
* ('''Secret Exit''') Inside secret #6, open the southwestern wall to reveal a teleporter. Step in and you will be teleported to a hidden raised alcove in the side of the main building. Rather than dropping down from here, turn around and flip the switch, which takes you to the secret map [[MAP31: Pharaoh]]. |
* ('''Secret Exit''') Inside secret #6, open the southwestern wall to reveal a teleporter. Step in and you will be teleported to a hidden raised alcove in the side of the main building. Rather than dropping down from here, turn around and flip the switch, which takes you to the secret map [[MAP31: Pharaoh]]. |
||
* The southern corridor leading to the circular section has a switch on the left-hand side. Press it, and run directly to the north-west balcony and jump down. Run to the BFG before it raises back up. |
* The southern corridor leading to the circular section has a switch on the left-hand side. Press it, and run directly to the north-west balcony and jump down. Run to the BFG before it raises back up. |
||
| − | * |
+ | * Southeast and on the opposite wall of the switch that lowers the bfg on the left side on the black hexagonal tiled wall is a secret door that leads down some steps to the outdoor area. There is an imp inside here so if you want 100 percent kills you will have to open this door. |
| + | * In the northern part of the building, you should see a switch on the left staircase. This opens a door in the regular exit room, which reveals teleporters between the north, east, south and west tips of the map as well as the only green armor in this map. It seems to be only useful in co-op play (in single player, the door will probably shut before the player is able to reach it without cheating). |
||
| − | * Just ahead of the switch that lowers the bfg on the left side on the black hexagonal tiled wall is a secret door that leads down some steps to the outdoor area there is an imp inside here so if you want 100 percent kills you will have to open this door. |
||
===Screenshots=== |
===Screenshots=== |
||
| − | <gallery> |
||
| − | [[Image:Evilution-map15.png|thumb|right|256px|A [[Baron of Hell|baron]] messin’ with [[demon]]s |
||
| − | </gallery> |
||
| − | Bugs: |
+ | ===Bugs:=== |
| + | #The sunk sector #330 near the eastern edge contains deaf monsters (four sergeants on ITYTD/HNTR, a cacodemon on HMP, a cacodemon and a pain elemental on UV/NM), and the only way to kill them is to push a Cacodemon to that wall and use the infinite splash height to damage them and wake them up. |
||
| − | |||
| + | #The spectres in secret 2 and 3 are stuck and can't attack the player. |
||
| − | On the map there are 5 cacodemons and 2 pain elementals (on Ultra-Violence and Nightmare!). One cacodemon and one pain elemental are in a sector that should raise, but there are two linedefs on the north end of the building that trigger the sector west of the manucubus to raise, thus those northeast of the super shotgun won't come after the player. One of these two linedefs should have been for the one that doesn't raise at all. On lower difficulties, shotgun guys appear here. |
||
| − | |||
| − | Also, there is a spectre in a secret room that is stuck. |
||
==Statistics== |
==Statistics== |
||
===Map data=== |
===Map data=== |
||
| + | {| class="WikiaTable" |
||
| − | {| {{prettytable}} |
||
|[[Things]]||364 |
|[[Things]]||364 |
||
|- |
|- |
||
| Line 72: | Line 64: | ||
===Things=== |
===Things=== |
||
| + | {| class="WikiaTable" |
||
| − | {| {{prettytable}} |
||
!Monsters||[[I'm Too Young To Die|ITYTD]] and [[Hey, Not Too Rough|HNTR]]||[[Hurt Me Plenty|HMP]]||[[Ultra-Violence|UV]] and [[Nightmare!|NM]] |
!Monsters||[[I'm Too Young To Die|ITYTD]] and [[Hey, Not Too Rough|HNTR]]||[[Hurt Me Plenty|HMP]]||[[Ultra-Violence|UV]] and [[Nightmare!|NM]] |
||
|- |
|- |
||
| Line 154: | Line 146: | ||
|- |
|- |
||
|[[Exploding barrel]]s||22||22||23 |
|[[Exploding barrel]]s||22||22||23 |
||
| − | |- |
||
|} |
|} |
||
| + | == End of Level Message (Secret Exit) == |
||
| + | |||
| + | What now? Looks totally different. Kind of like king Tut's condo. Well, whatever's here can't be any worse than usual. Can it? Or maybe it's best to let sleeping gods lie... |
||
==Speedrunning== |
==Speedrunning== |
||
| − | |||
| − | ===Routes and tricks=== |
||
===Records=== |
===Records=== |
||
The [[Compet-N]] records for the map are: |
The [[Compet-N]] records for the map are: |
||
| + | {| class="WikiaTable" |
||
| − | {| {{prettytable}} |
||
!Run||Time||Player||Date||File||Notes |
!Run||Time||Player||Date||File||Notes |
||
|- |
|- |
||
| Line 186: | Line 178: | ||
==External links== |
==External links== |
||
* [http://www.doom2.net/~compet-n/database/cn.cgi?map:tnt:15 MAP15 demos from the Compet-N database] |
* [http://www.doom2.net/~compet-n/database/cn.cgi?map:tnt:15 MAP15 demos from the Compet-N database] |
||
| + | |||
| ⚫ | |||
| + | |||
[[Category:Levels by name|Dead Zone (TNT: Evilution)]] |
[[Category:Levels by name|Dead Zone (TNT: Evilution)]] |
||
[[Category:William Whitaker levels]] |
[[Category:William Whitaker levels]] |
||
Revision as of 02:02, 15 December 2019
- This level occupies the map slot MAP15. For other maps which occupy this slot, see Category:MAP15.
MAP15: Dead Zone is the fifteenth map of TNT: Evilution. It was designed by William Whitaker and uses the music track "Smells Like Burning Corpse".
Walkthrough
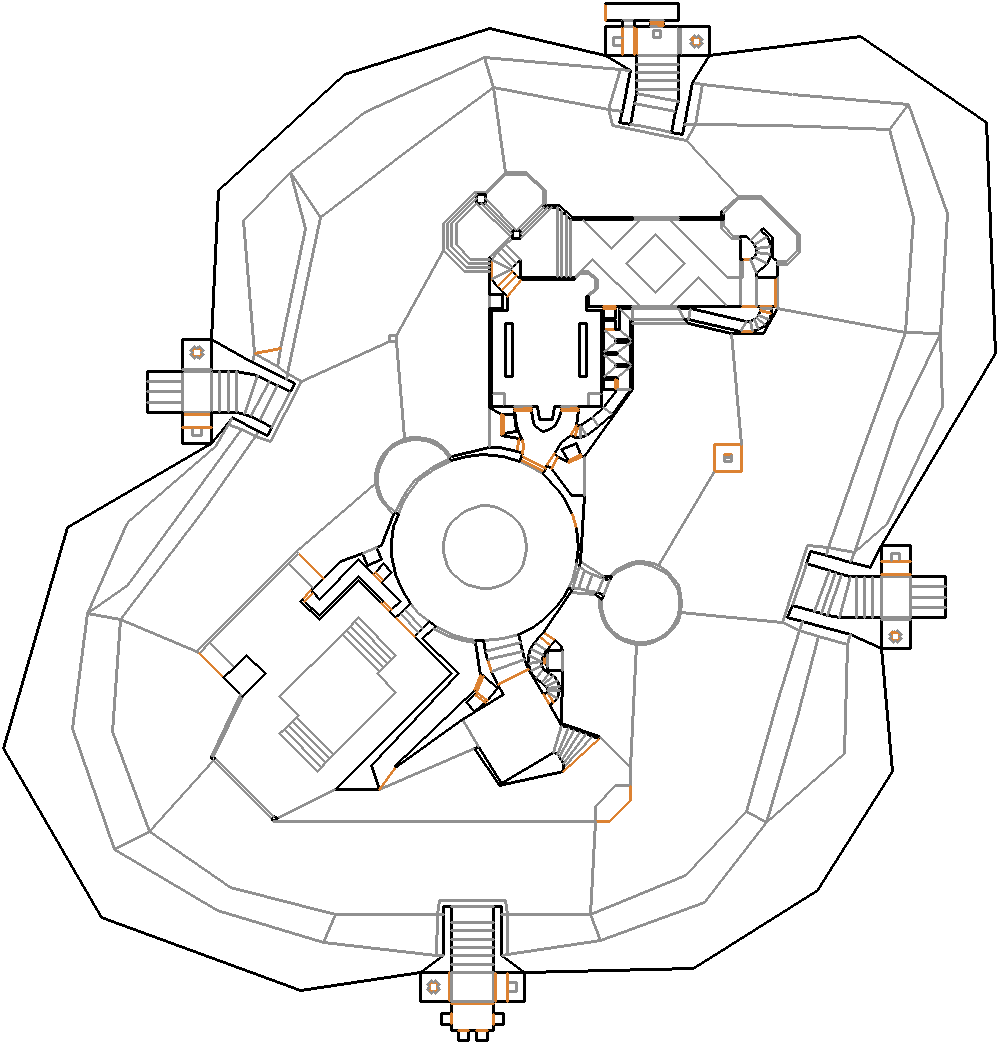
Map of MAP15
There are three required steps in the map:
- Enter the central room.
- Press the switch on the right-hand wall.
- Proceed to the exit in the north of the map.
The rest of the map is technically optional, but there is plenty of things to look for as well.
This map is one large building with open terrain surrounding it. The central building may be accessed by various lifts in the corners, as well as a main entrance in the north west corner.
There are two alcoves on the left and right of the map. They are guarded by monsters, but contain additional ammo. More ammo is available depending on the number of players in the map.
The south part of the building has a lift in the south-east corner. You can get a super-shotgun here. When you advance, you may take the left side corridor to reach a plasma gun. There is also a side passage on the right wall leading outside but is otherwise unmarked.
You may head north to the central room. In this room, you need to press the switch on the east wall. This unblocks the exit, but you will have to fight enemies that teleport into the center of the room.
In the southwest corner, you will see a small pool, with some monsters (including a Baron of Hell.) There is also a balcony to the northwest, and a tower to the southeast.
North of the circular room is a junction. It splits in two, but ultimatly leads to the same room. In addition, going through the room will likely cause enemies to follow from behind.
The north room, is slightly dark but mainly contains demons and imps. Proceed further north, and you will enter the slime-pit area.
The northern-most tip of the map is the exit. It is unblocked if you pressed the switch in the middle circular area, and is only guarded by a few monsters.
Secrets
- At the southwest corner of the main building is a large open white room with a pool of water in the center. There is a doorway to the northeast. There is a misaligned wall just left of the doorway; open it to access a secret passage containing blur and invulnerability spheres.
- Go through the silver door just north of the circular room in the center of the main building. You will be in a roughly "Y"-shaped hallway. Open the wall in the bend on the left side of this hallway. You'll be in a tiny room with a window overlooking the outside. Open one of the grey hexagonal-tiled walls in this room to reveal a secret alcove with a couple of medikits.
- Return to the Y-shaped hall again. Directly across from the opening to secret #2 is another secret door. Behind it is another tiny room with a window overlooking the outside. Again, open one of the grey tiled walls to reveal some armor bonuses.
- Return to the Y-shaped hallway once more. Just north of the entrance to secret #3 is another secret door, and the only one in this room to have a misaligned texture. There is a long narrow corridor behind it. Before reaching the area of the corridor with oscillating lights, open the wall to the left to get a rocket launcher. Continue along the corridor until you reach the first switch, on the right-hand wall. Backtrack through the corridor a ways and you'll see that a red glowing alcove has appeared. Step into it to be teleported to a raised platform in the outdoor area surrounding the main building. Don't drop off this platform yet; instead, make your way around it to the other side, where you'll see a switch. Press it to lower the tall pillar in the center of the platform, making the blur sphere atop it accessible.
- At the north end of the main building is a room with a diamond-shaped bridge crossing a nukage pool. There is a "poison" sign in the southwest corner of the room; open it to get a backpack.
- Ride the lift in the southeast corner of the main building. Go up the stairs and continue along the path to the left. At the end of this narrow passage is a plasma rifle. There is a nearby wall (just southeast) with a misaligned texture; open it to reveal a berserk pack.
While not marked as secrets, there is the following places of interest:
- (Secret Exit) Inside secret #6, open the southwestern wall to reveal a teleporter. Step in and you will be teleported to a hidden raised alcove in the side of the main building. Rather than dropping down from here, turn around and flip the switch, which takes you to the secret map MAP31: Pharaoh.
- The southern corridor leading to the circular section has a switch on the left-hand side. Press it, and run directly to the north-west balcony and jump down. Run to the BFG before it raises back up.
- Southeast and on the opposite wall of the switch that lowers the bfg on the left side on the black hexagonal tiled wall is a secret door that leads down some steps to the outdoor area. There is an imp inside here so if you want 100 percent kills you will have to open this door.
- In the northern part of the building, you should see a switch on the left staircase. This opens a door in the regular exit room, which reveals teleporters between the north, east, south and west tips of the map as well as the only green armor in this map. It seems to be only useful in co-op play (in single player, the door will probably shut before the player is able to reach it without cheating).
Screenshots
Bugs:
- The sunk sector #330 near the eastern edge contains deaf monsters (four sergeants on ITYTD/HNTR, a cacodemon on HMP, a cacodemon and a pain elemental on UV/NM), and the only way to kill them is to push a Cacodemon to that wall and use the infinite splash height to damage them and wake them up.
- The spectres in secret 2 and 3 are stuck and can't attack the player.
Statistics
Map data
| Things | 364 |
| Vertices | 1310 |
| Linedefs | 1421 |
| Sidedefs | 1409 |
| Sectors | 336 |
Things
| Monsters | ITYTD and HNTR | HMP | UV and NM |
|---|---|---|---|
| Sergeants | 16 | 9 | 5 |
| Spectres | 4 | 9 | 13 |
| Imps | 13 | 31 | 41 |
| Demons | 8 | 11 | 10 |
| Barons of Hell | 0 | 1 | 1 |
| Troopers | 2 | 3 | 3 |
| Cacodemons | 0 | 1 | 5 |
| Lost Souls | 3 | 3 | 4 |
| Arch-Viles | 0 | 0 | 2 |
| Pain Elementals | 0 | 0 | 2 |
| Chaingunners | 1 | 3 | 10 |
| Revenants | 1 | 3 | 3 |
| Mancubi | 0 | 1 | 1 |
| Powerups | ITYTD and HNTR | HMP | UV and NM |
| Backpacks | 1 | 1 | 1 |
| Stim packs | 7 | 7 | 7 |
| Medikits | 5 | 5 | 5 |
| Health bonuses | 8 | 8 | 8 |
| Armor bonuses | 31 | 31 | 31 |
| Green armors | 1 | 1 | 1 |
| Invulnerabilities | 1 | 1 | 1 |
| Berserks | 1 | 1 | 1 |
| Invisibilities | 1 | 2 | 2 |
| Megasphere | 1 | 0 | 0 |
| Weapons | ITYTD and HNTR | HMP | UV and NM |
| Chainguns | 2 | 2 | 2 |
| Rocket launchers | 1 | 1 | 1 |
| Plasma guns | 1 | 1 | 1 |
| BFG 9000s | 1 | 1 | 1 |
| Super shotguns | 2 | 2 | 2 |
| Ammunition | ITYTD and HNTR | HMP | UV and NM |
| Bulk Cells | 4 | 2 | 2 |
| Shells | 2 | 2 | 1 |
| Rockets | 11 | 11 | 11 |
| Rocket boxes | 3 | 3 | 2 |
| Energy cells | 3 | 4 | 3 |
| Ammo boxes | 5 | 5 | 5 |
| Shell boxes | 10 | 9 | 9 |
| Barrels | ITYTD and HNTR | HMP | UV and NM |
| Exploding barrels | 22 | 22 | 23 |
End of Level Message (Secret Exit)
What now? Looks totally different. Kind of like king Tut's condo. Well, whatever's here can't be any worse than usual. Can it? Or maybe it's best to let sleeping gods lie...
Speedrunning
Records
The Compet-N records for the map are:
| Run | Time | Player | Date | File | Notes |
|---|---|---|---|---|---|
| UV speed | 00:12 | Xit Vono | 2002-11-17 | Template:Competnftp | |
| NM speed | 00:12 | Xit Vono | 2002-11-17 | Template:Competnftp | |
| UV max | 04:29 | John Keniry | 2000-01-30 | Template:Competnftp | |
| NM100S | 01:16 | Xit Vono | 2002-08-03 | Template:Competnftp | |
| UV -fast | 08:06 | Peo Sjoblom | 1997-01-16 | Template:Competnftp | |
| UV -respawn | 03:59 | Xit Vono | 2002-01-28 | Template:Competnftp | |
| UV Tyson | 12:17 | Xit Vono | 2002-01-18 | Template:Competnftp | |
| UV pacifist | 00:17 | Xit Vono | 2002-11-16 | Template:Competnftp |