(Replaced content with " Clash of Galaxies (Community Chest 3) Category:Eric Baker levels") |
m (clean up) |
||
| (6 intermediate revisions by 3 users not shown) | |||
| Line 1: | Line 1: | ||
| + | {{map|slot=MAP15}} |
||
| + | '''MAP15: Clash of Galaxies''' is the fifteenth map of [[Community Chest 3]]. It was designed by [[Eric Baker (The Green Herring)]], and was the author's second completed and published level. It uses the music track "Liberty Through Violence," composed by Baker specifically for the map; the only other level in the [[megawad]] with this distinction is [[MAP27: Ruby Abyss (Community Chest 3)|MAP27: Ruby Abyss]], by the same author. |
||
| + | |||
| + | The level itself is nonlinear, and is set in a white, cavernous section of Hell, littered with fragments of a [[UAC]] base literally torn out by an unknown force. The objective of the level is to find three keycards hidden throughout the level, return to the start of the level, and use the keycards to open barriers blocking access to an exit portal. The title of the level refers to the level's mixed hell / [[STAR|techbase]] theme. |
||
| + | |||
| + | This level contains a secret exit leading to [[MAP31: Disarming the Mechanism (Community Chest 3)|MAP31: Disarming the Mechanism]]. |
||
| + | |||
| + | == Walkthrough == |
||
| + | |||
| + | [[file:Cchest3_MAP15.png|thumb|300px|Map of MAP15]] |
||
| + | : Letters in ''italics'' refer to marked spots on the map. [[Sector]] numbers in '''boldface''' are [[secrets]] which count toward the [[Intermission screen|end-of-level tally]]. |
||
| + | |||
| + | ===Essentials=== |
||
| + | : ''Normal exit:'' |
||
| + | To obtain the red keycard, head to the end of the tunnel at the southwest of the map. There, you will find a touchplate on the floor. Step on it, and a button will reveal itself in the distant pillar. Shoot it with an [[impact weapon]], and quickly head through the teleporter that opens to the west before it closes. You will be warped to a cavernous platform at the northwest, with another touchplate. Step on this touchplate, and another button will appear on another side of the pillar. Shoot it, and the wall will lower nearby to reveal a path. Head across the path, and then head north across the circular walkway. Open the next door, climb the stairs, and step into the spaces at the south of the upper floor where the ammo boxes sit. Each time you do this, a door will open nearby to reveal a switch. Activate both switches to enable access to the touchplate at the north. Step on the touchplate, and quickly step on the rest of the touchplates on the lower floor, before their barriers close, in this order: southwest, northeast, northwest, southeast. After this, quickly make your way into the teleporter in the center before its barrier closes. Step off the teleporter, approach the metal structure in the center, and [[zombieman|zombiemen]] will begin to teleport in with you as the barriers in the structure lower. Once the barriers finish doing so, grab the red keycard inside, and leave the area through the southern teleporter. |
||
| + | |||
| + | To get the yellow keycard, enter the central base. In each of the computer rooms at the east and west of the base, there are holes blasted in one of the monitors, leading to a button. Shoot all four of these buttons with an impact weapon, and doors will open into the center of the base. Here, you will find the yellow keycard; when you grab it, the doors will close, and portals will open around you, letting [[imp]]s into the room. Use the teleporting switches behind each portal to evade the imps if you must, and hold them off for nine seconds. After that amount of time passes, the doors will open, and steps will raise, allowing you to climb up and escape. |
||
| + | |||
| + | To find the blue keycard, head to the computer room at the southeast of the level. At the north is a touchplate. Step on the touchplate, and computer panels at the south will briefly lower to show a button. Shoot this button to open the eastern door. The door will lead into a short maze of computer terminals. Head east, go south, move west, and activate the switch. Go east, run north, walk east, move south, walk east, and press the switch. Run west, head north, go west, move north, and trigger the switch. Head south, walk east, go south, move west, run south, go east, head through the southern passage, go west, and push the switch. Head back north, go east, run north, move east, dash south, go west, and hit the next switch. Move east, head through the northernmost passage at the east, go south, run east, run south, and activate the switch nearby. Go through the eastern passage, move north, and activate the last switch. Go south, head west, run south, and grab the blue key at the west. A path will light up in the floor, allowing you to find your way back. |
||
| + | |||
| + | Once you have all three keycards, backtrack to the start of the level. Activate all three switches at the south. Open the southern door and [[heavy weapon dude]]s will teleport in front of you. Carve your way through them into the portal. |
||
| + | : ''Secret exit:'' |
||
| + | |||
| + | Follow the procedure for the red and yellow keycards above. To get the blue keycard, head to the computer room at the southeast of the level. At the north is a touchplate. Step on the touchplate, and computer panels at the south will briefly lower to show a button. Shoot this button to open the eastern door. The door will lead into a short maze of computer terminals, which contains multiple secret compartments, each one of which is marked with a pair of two computer panels with hazard stripes. Head east, go south, open the secret compartment at the south, move west, and activate the switch. Go east, run north, head west, and open the secret compartment at the north. Go east, move south, open the secret compartment nearby, walk east, and press the switch. Run west, head north, go west, move north, and trigger the switch. Head south, walk east, open the secret compartment at the north, go south, move west, run south, go east, head through the southern passage, go west, and push the switch. Open the secret compartment to the south, and then head back north, go east, run north, and move east. There is a secret compartment to the north here, but it requires all three keys to open. Dash south, go west, and hit the next switch. Before or after you do so, open the secret compartment at the southermost passage to the east. Move east, head through the northernmost passage at the east, go south, run east, run south, and activate the switch nearby. Go through the eastern passage, move north, and activate the last switch. Go south, open the secret compartment, head west, and run south. Open the secret compartment in the south, grab the blue key at the west, and then open the secret compartment next to it. A path will light up in the floor, allowing you to find your way back. |
||
| + | |||
| + | Once you have all three keycards, backtrack to the secret compartment that was locked. Open it with the three keycards to find a tunnel of circuitry, at the end of which is a window looking into a [[demon]] scurrying around in a blood pool. Press the nearby button to allow it to use the teleporter nearby. Once it does so, it will warp through every secret compartment in the maze, teleport to where you found the blue keycard, and [[monsters open locked doors|open the red skull door]] at the end of the maze. Head through that door, run through the tunnel to the elevator, and take it down. Walk into the next room, and a teleportation machine will ready itself, showing a screenshot of the start of [[MAP31: Disarming the Mechanism (Community Chest 3)|MAP31]] on the monitor behind it. Step into the teleporter. |
||
| + | |||
| + | ===Other points of interest=== |
||
| + | |||
| + | In [[no monsters mode]], entering the circuitry tunnel where the demon can normally be seen instead yields a red skull key. This is to allow the player to reach the secret exit even without the demon around. |
||
| + | |||
| + | ===Secrets=== |
||
| + | # While traveling through the upper cave in the southwest of the level, there are "windows" from which you can see stone towers containing impaled bodies. In the northernmost one, the body is twitching. Shoot through the window of this tower with any [[impact weapon]]. Alternatively, in the central base, one of the terminals in the northernmost room at the west shows a different image than the rest. Press on the monitor, and the terminal will sink into the ground, revealing a switch; press the switch. Doing either of these will open a path between the lower tunnel at the west and the central base, leading into a hallway with five [[stimpack]]s. ('''sector 162''') |
||
| + | # Inside the flesh and metal room at the north of the level, the lion switch at the southwest has another lion switch on its back. Activating this will open access to a teleporter at the south of the circular walkway. Enter the teleporter, and you will be taken to a tunnel of circuitry, containing three [[medikit]]s. ('''sector 394''') Walk forward, and a path will open at the other end into the southeast computer room. |
||
| + | # At the easternmost room at the north of the central base, step onto the ledge at the north. On the northeast side of the building outside, there are pipes and bullet holes in one spot. Tread your way to this part of the wall, and press on it to find a teleporter. Use it, and you will be warped to the cavernous platform at the northeast, where you can recover two medikits and [[4 shotgun shells|24 shotgun shells]]. ('''sector 897''') |
||
| + | # In the northernmost room at the east of the central base, there are different images on the monitors in the back than the others in the base. Press on them, and they will rise to reveal a tunnel. Open the door at the opposite end to find an [[imp]] [[Wikipedia:Console emulator|emulating]] [[Wikipedia:Rocket Knight Adventures|Rocket Knight Adventures]] on a computer with a giant monitor in the wall. ('''sector 627''') On the terminals at the south side are 40 shotgun shells and ten [[clip]]s. Floating over the box that powers the monitor is a [[partial invisibility]]. Climb on top of the chair to reach the munitions, and jump from the terminals to get the partial invisibility. |
||
| + | # Near the blue keycard are eight computer panels with ridges on them. Press them, and they will rise to reveal a switch. Press the switch, and open the secret compartment to the north to find a teleporter. Use the teleporter to be taken to the island in the middle of the lava pool, where eight stimpacks can be obtained. ('''sector 667''') Press on the northeast side of the pillar at the west to find a portal leading back into the computer maze. |
||
| + | # The room in which the secret exit is found counts as a secret. ('''sector 495''') |
||
| + | |||
| + | == Speedrunning == |
||
| + | ===Current records=== |
||
| + | The records for the map at the [http://doomedsda.us Doomed Speed Demos Archive] are: |
||
| + | |||
| + | {| class="WikiaTable" |
||
| + | !Run||Time||Player||Date||File||Notes |
||
| + | |- |
||
| + | |[[UV speed]] (normal exit)||04:04||[[Eric "The Green Herring" Baker]]||2008-01-04||[http://doomedsda.us/lmps/959/2/c315-404.zip c315-404.zip]|| |
||
| + | |- |
||
| + | |[[UV speed]] (secret exit)||04:00||[[Eric "The Green Herring" Baker]]||2008-01-04||[http://doomedsda.us/lmps/959/2/c315s400.zip c315-400.zip] || |
||
| + | |- |
||
| + | |[[NM speed]] (normal exit)|| || || || || |
||
| + | |- |
||
| + | |[[NM speed]] (secret exit)|| || || || || |
||
| + | |- |
||
| + | |[[UV max]]||06:53||[[Eric "The Green Herring" Baker]]||2008-01-04||[http://doomedsda.us/lmps/959/1/c315-653.zip c315-653.zip]|| |
||
| + | |- |
||
| + | |[[NM100S]]|| || || || || |
||
| + | |- |
||
| + | |[[UV -fast]]|| || || || || |
||
| + | |- |
||
| + | |[[UV -respawn]]|| || || || || |
||
| + | |- |
||
| + | |[[UV Tyson]]|| || || || || |
||
| + | |- |
||
| + | |[[UV pacifist]]|| || || || || |
||
| + | |} |
||
| + | |||
| + | ===Miscellaneous demos=== |
||
| + | {| class="WikiaTable" |
||
| + | !Run||Time||Player||Date||File||Notes |
||
| + | |- |
||
| + | |[[UV speed]] [[no monsters mode|nomo]] (normal exit)||02:05||[[Eric "The Green Herring" Baker]]|| ||[http://doomedsda.us/lmps/959/10/c315o205.zip c315o205.zip]|| |
||
| + | |- |
||
| + | |[[UV speed]] [[no monsters mode|nomo]] (secret exit)||02:08||[[Eric "The Green Herring" Baker]]|| ||[http://doomedsda.us/lmps/959/10/c315o208.zip c315o208.zip]|| |
||
| + | |} |
||
| + | |||
| + | == Statistics == |
||
| + | |||
| + | ===Map data=== |
||
| + | {| class="WikiaTable" |
||
| + | |[[Things]]||874 |
||
| + | |- |
||
| + | |[[Vertex]]es||8663 |
||
| + | |- |
||
| + | |[[Linedefs]]||10080 |
||
| + | |- |
||
| + | |[[Sidedefs]]||16481 |
||
| + | |- |
||
| + | |[[Sectors]]||1083 |
||
| + | |} |
||
| + | |||
| + | ===Things=== |
||
| + | This level contains the following numbers of things per [[skill level]]: |
||
| + | |||
| + | {| class="WikiaTable" |
||
| + | ![[Monsters]]||1-2||3||4-5 |
||
| + | |- |
||
| + | |[[Zombieman]]||18||30||42 |
||
| + | |- |
||
| + | |[[Shotgun guy]]||76||99||107 |
||
| + | |- |
||
| + | |[[Heavy weapon dude]]||8||8||8 |
||
| + | |- |
||
| + | |[[Imp]]||105||111||115 |
||
| + | |- |
||
| + | |[[Demon]]||1||1||1 |
||
| + | |- |
||
| + | ![[Item|Powerups]]||1-2||3||4-5 |
||
| + | |- |
||
| + | |[[Armor bonus]]||38||38||38 |
||
| + | |- |
||
| + | |[[Medikit]]||12||12||12 |
||
| + | |- |
||
| + | |[[Stimpack]]||83||83||83 |
||
| + | |- |
||
| + | |[[Health bonus]]||42||38||24 |
||
| + | |- |
||
| + | |[[Berserk]]||1||1||1 |
||
| + | |- |
||
| + | |[[Partial invisibility]]||1||1||1 |
||
| + | |- |
||
| + | ![[Weapon]]s||1-2||3||4-5 |
||
| + | |- |
||
| + | |[[Super shotgun]]||1||1||1 |
||
| + | |- |
||
| + | |[[Chaingun]]||1||1||1 |
||
| + | |- |
||
| + | ![[Ammunition]]||1-2||3||4-5 |
||
| + | |- |
||
| + | |[[Clip]]||135||135||135 |
||
| + | |- |
||
| + | |[[Box of bullets]]||3||3||3 |
||
| + | |- |
||
| + | |[[4 shotgun shells]]||47||47||47 |
||
| + | |- |
||
| + | |[[Box of shotgun shells]]||2||2||2 |
||
| + | |- |
||
| + | ![[Keys]]||1-2||3||4-5 |
||
| + | |- |
||
| + | |Blue keycard||1||1||1 |
||
| + | |- |
||
| + | |Red keycard||1||1||1 |
||
| + | |- |
||
| + | |Red skull key||1||1||1 |
||
| + | |- |
||
| + | |Yellow keycard||1||1||1 |
||
| + | |} |
||
| + | |||
| + | == Technical information == |
||
| + | The secret exit exploits a bug in the [[Doom engine]], retained in all source ports, that allows monsters to [[monsters open locked doors|open locked doors]], if the other side of the door is not locked, the monster is fast enough, and the door is thin enough. This bug has been exploited by [[Compet-n]] [[speedrun]]ners on [[Doom II]] [[MAP27: Monster Condo (Doom II)|MAP27: Monster Condo]] to open the exit door early. |
||
| + | |||
| + | == Inspiration and development == |
||
| + | This level was started on July 10, 2007. At that point, [[Samuel Villarreal (Kaiser)]] held the MAP15 slot with a level called '''Spasmolytic''', but had not been heard from regarding his level for a long period of time. On the day the level was started, Baker posted to say he could "bang up" a MAP15 if nobody else wanted to do it, or Villarreal could not work on it for any reason. After five days of silence on the subject, Baker took the slot. A beta of the level was submitted to playtesters on August 26, 2007. On September 3, 2007, the level was submitted to Andy Leaver, alongside [[MAP27: Ruby Abyss (Community Chest 3)|MAP27]]. |
||
| + | |||
| + | The theme of the level and its title was decided on from the beginning. The central base was deliberately textured in the specific [[Knee-Deep in the Dead]] [[STAR|techbase]] style. |
||
| + | |||
| + | The yellow keycard room was originally an indoor area, with a circular walkway surrounded by silver railings, a giant hole in the ceiling, and the key resting in a rocky structure that, when entered, caused the corners of the room to open, revealing [[imp]]s. However, when Baker found the resulting area too difficult to maneuver in due to lack of room, he replaced it with the current outdoor section. |
||
| + | |||
| + | The computer room from which the blue keycard maze is accessed is based directly on the computer room in [[Doom]] [[E1M1: Hangar (Doom)|E1M1: Hangar]]. |
||
| + | |||
| + | The secret exit door originally had two [[shotgun guy]]s near it. However, after playtester [[Brian Nesser (Anima Zero)]] managed to open it with one of the shotgun guys, they were removed. |
||
| + | |||
| + | == Trivia == |
||
| + | If you activate the [[Doom cheat codes|noclip cheat]], jump into the lava pit around the red keycard, and look at the north, south, east, or west ends of the platform, you will find a message reading "TGH says: Quit using noclip!" If you use noclip to go all the way to either end of the cliff at the south of the map, you will find message that says, "You're not supposed to be here! -TGH" These are homages to professional [[Wikipedia:level designer|level designer]] [[Wikipedia:Richard Gray|Richard Gray]], who is well known for hiding easter egg messages in his levels, often accessible only by cheating, most notably in his levels for [[Duke Nukem 3D]]. |
||
| + | |||
| + | [[Wikipedia:Rocket Knight Adventures|Rocket Knight Adventures]] is a 1993 [[Wikipedia:Sega Mega Drive|Sega Genesis]] game by [[Wikipedia:Konami|Konami]], featuring an opossum knight named Sparkster who wears a jetpack enabling flight. Baker is a fan of the Sparkster series, and included the title screen of the game as an easter egg. |
||
| + | |||
| + | The coordinates that appear on one of the teleportation machine's monitors are the XYZ coordinates of the player 1 starting position in [[MAP31: Disarming the Mechanism (Community Chest 3)|MAP31]]. The monitor also gives its location as "Berlin, Germany," which is a reference to the fact that MAP31 once contained [[Wolfenstein SS|SS Nazis]]. |
||
| + | |||
| + | {{Navbox Community Chest 3}} |
||
[[Category:Levels by name|Clash of Galaxies (Community Chest 3)]] |
[[Category:Levels by name|Clash of Galaxies (Community Chest 3)]] |
||
Latest revision as of 04:13, 22 September 2019
- This level occupies the map slot MAP15. For other maps which occupy this slot, see Category:MAP15.
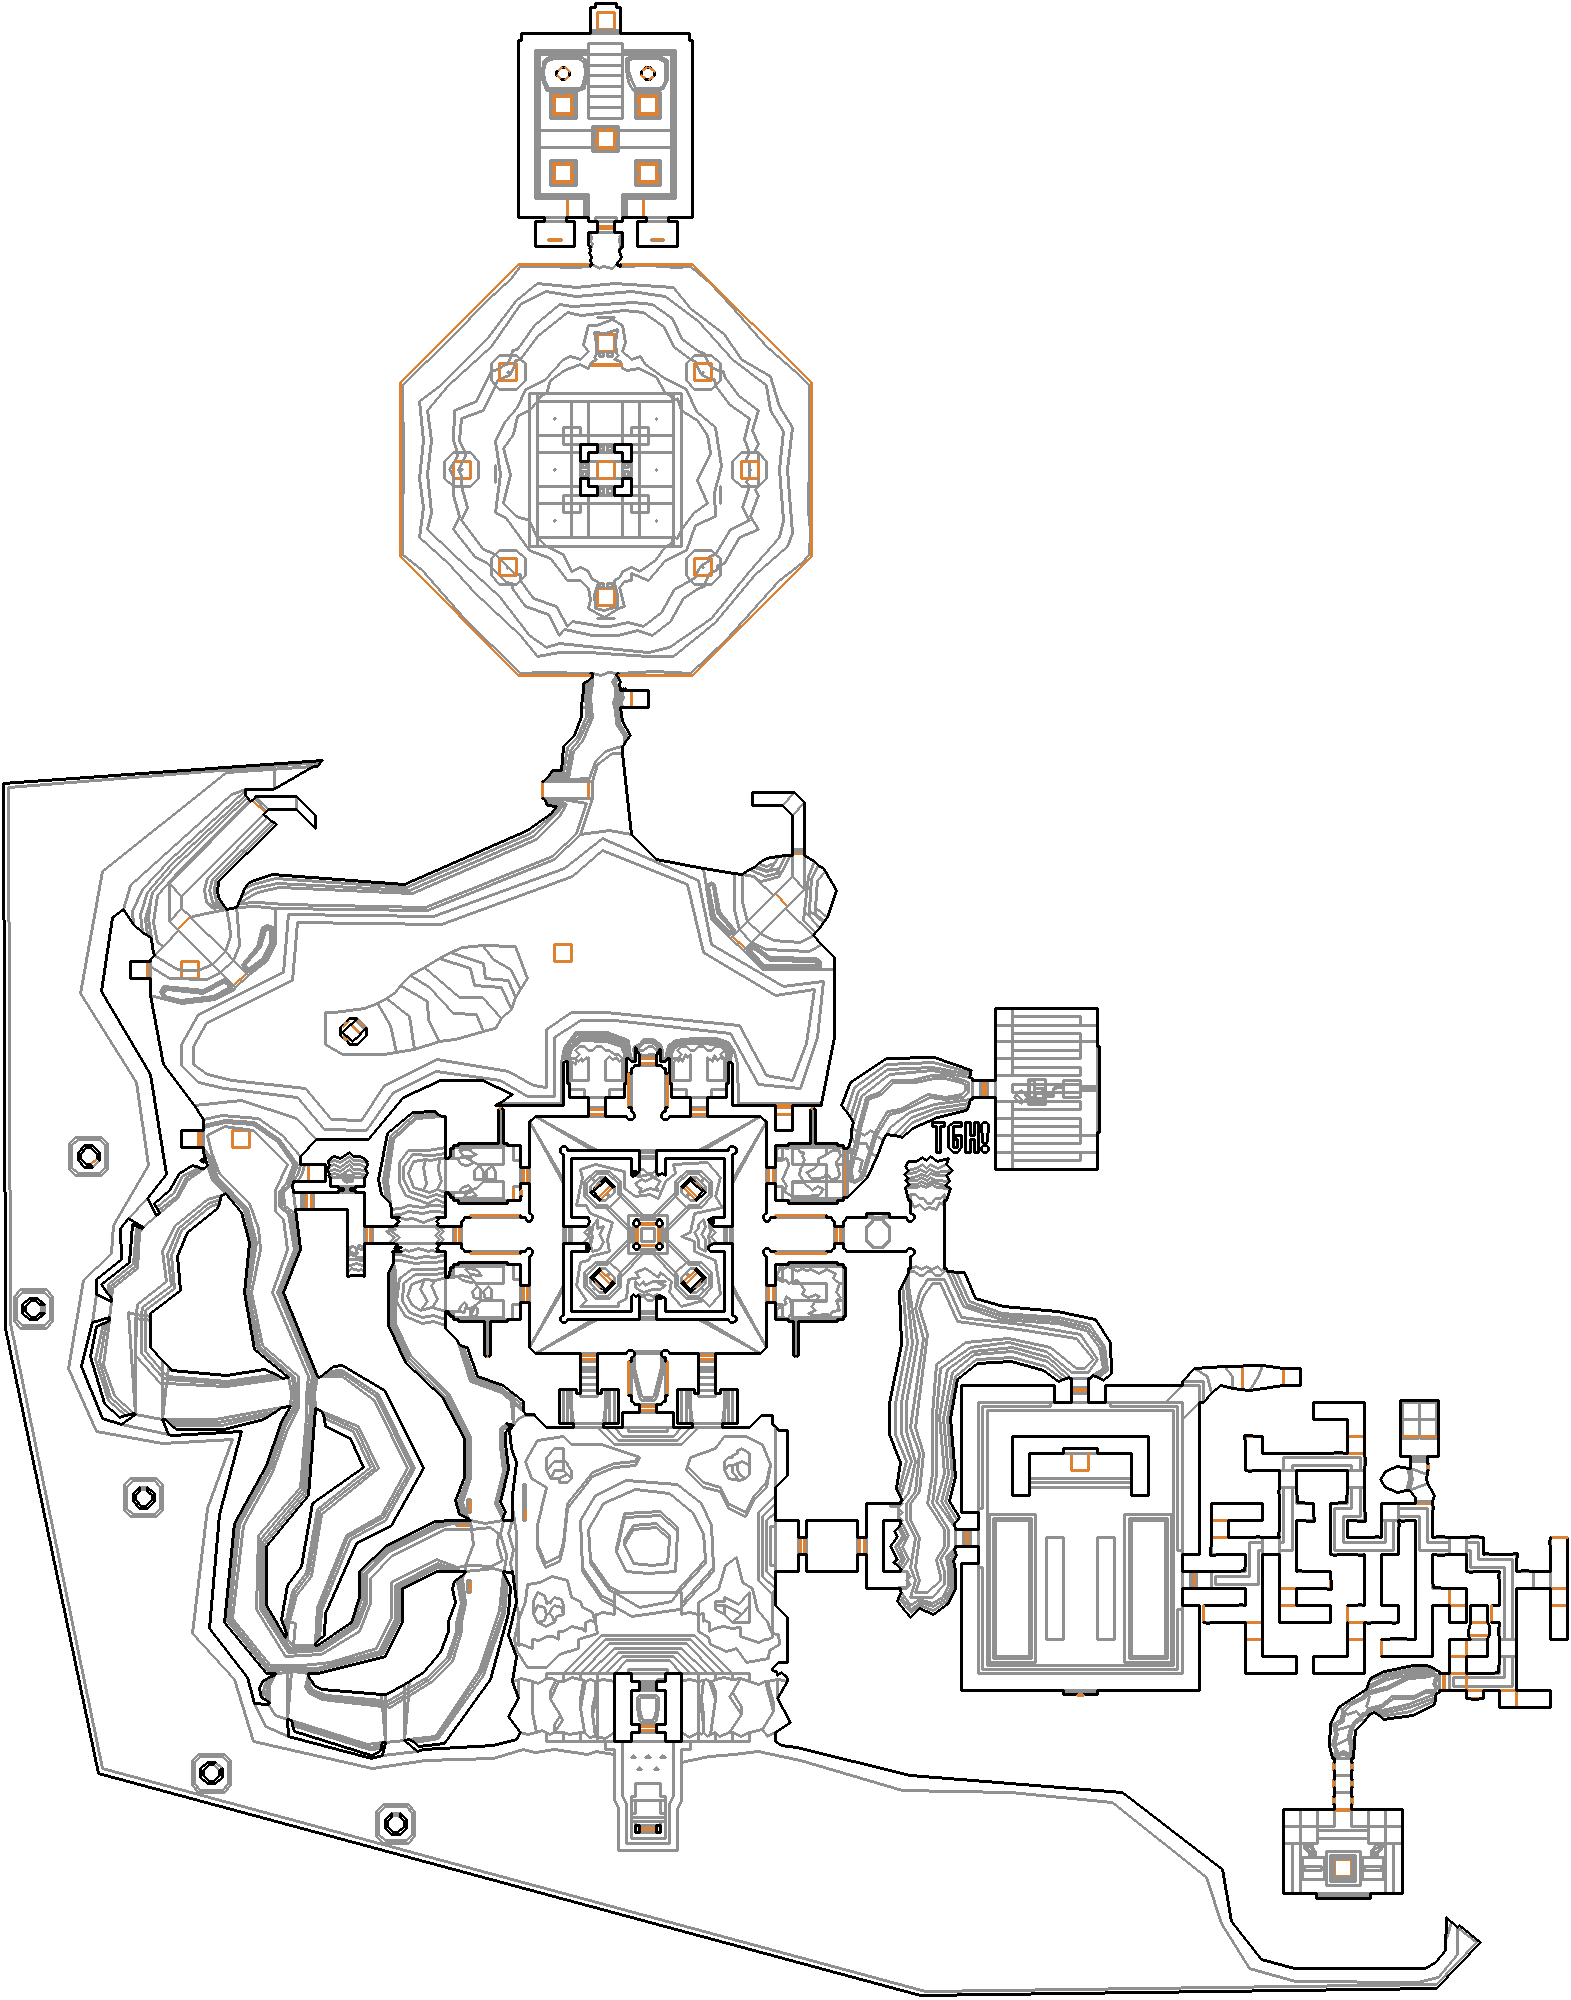
MAP15: Clash of Galaxies is the fifteenth map of Community Chest 3. It was designed by Eric Baker (The Green Herring), and was the author's second completed and published level. It uses the music track "Liberty Through Violence," composed by Baker specifically for the map; the only other level in the megawad with this distinction is MAP27: Ruby Abyss, by the same author.
The level itself is nonlinear, and is set in a white, cavernous section of Hell, littered with fragments of a UAC base literally torn out by an unknown force. The objective of the level is to find three keycards hidden throughout the level, return to the start of the level, and use the keycards to open barriers blocking access to an exit portal. The title of the level refers to the level's mixed hell / techbase theme.
This level contains a secret exit leading to MAP31: Disarming the Mechanism.
Walkthrough
Map of MAP15
- Letters in italics refer to marked spots on the map. Sector numbers in boldface are secrets which count toward the end-of-level tally.
Essentials
- Normal exit:
To obtain the red keycard, head to the end of the tunnel at the southwest of the map. There, you will find a touchplate on the floor. Step on it, and a button will reveal itself in the distant pillar. Shoot it with an impact weapon, and quickly head through the teleporter that opens to the west before it closes. You will be warped to a cavernous platform at the northwest, with another touchplate. Step on this touchplate, and another button will appear on another side of the pillar. Shoot it, and the wall will lower nearby to reveal a path. Head across the path, and then head north across the circular walkway. Open the next door, climb the stairs, and step into the spaces at the south of the upper floor where the ammo boxes sit. Each time you do this, a door will open nearby to reveal a switch. Activate both switches to enable access to the touchplate at the north. Step on the touchplate, and quickly step on the rest of the touchplates on the lower floor, before their barriers close, in this order: southwest, northeast, northwest, southeast. After this, quickly make your way into the teleporter in the center before its barrier closes. Step off the teleporter, approach the metal structure in the center, and zombiemen will begin to teleport in with you as the barriers in the structure lower. Once the barriers finish doing so, grab the red keycard inside, and leave the area through the southern teleporter.
To get the yellow keycard, enter the central base. In each of the computer rooms at the east and west of the base, there are holes blasted in one of the monitors, leading to a button. Shoot all four of these buttons with an impact weapon, and doors will open into the center of the base. Here, you will find the yellow keycard; when you grab it, the doors will close, and portals will open around you, letting imps into the room. Use the teleporting switches behind each portal to evade the imps if you must, and hold them off for nine seconds. After that amount of time passes, the doors will open, and steps will raise, allowing you to climb up and escape.
To find the blue keycard, head to the computer room at the southeast of the level. At the north is a touchplate. Step on the touchplate, and computer panels at the south will briefly lower to show a button. Shoot this button to open the eastern door. The door will lead into a short maze of computer terminals. Head east, go south, move west, and activate the switch. Go east, run north, walk east, move south, walk east, and press the switch. Run west, head north, go west, move north, and trigger the switch. Head south, walk east, go south, move west, run south, go east, head through the southern passage, go west, and push the switch. Head back north, go east, run north, move east, dash south, go west, and hit the next switch. Move east, head through the northernmost passage at the east, go south, run east, run south, and activate the switch nearby. Go through the eastern passage, move north, and activate the last switch. Go south, head west, run south, and grab the blue key at the west. A path will light up in the floor, allowing you to find your way back.
Once you have all three keycards, backtrack to the start of the level. Activate all three switches at the south. Open the southern door and heavy weapon dudes will teleport in front of you. Carve your way through them into the portal.
- Secret exit:
Follow the procedure for the red and yellow keycards above. To get the blue keycard, head to the computer room at the southeast of the level. At the north is a touchplate. Step on the touchplate, and computer panels at the south will briefly lower to show a button. Shoot this button to open the eastern door. The door will lead into a short maze of computer terminals, which contains multiple secret compartments, each one of which is marked with a pair of two computer panels with hazard stripes. Head east, go south, open the secret compartment at the south, move west, and activate the switch. Go east, run north, head west, and open the secret compartment at the north. Go east, move south, open the secret compartment nearby, walk east, and press the switch. Run west, head north, go west, move north, and trigger the switch. Head south, walk east, open the secret compartment at the north, go south, move west, run south, go east, head through the southern passage, go west, and push the switch. Open the secret compartment to the south, and then head back north, go east, run north, and move east. There is a secret compartment to the north here, but it requires all three keys to open. Dash south, go west, and hit the next switch. Before or after you do so, open the secret compartment at the southermost passage to the east. Move east, head through the northernmost passage at the east, go south, run east, run south, and activate the switch nearby. Go through the eastern passage, move north, and activate the last switch. Go south, open the secret compartment, head west, and run south. Open the secret compartment in the south, grab the blue key at the west, and then open the secret compartment next to it. A path will light up in the floor, allowing you to find your way back.
Once you have all three keycards, backtrack to the secret compartment that was locked. Open it with the three keycards to find a tunnel of circuitry, at the end of which is a window looking into a demon scurrying around in a blood pool. Press the nearby button to allow it to use the teleporter nearby. Once it does so, it will warp through every secret compartment in the maze, teleport to where you found the blue keycard, and open the red skull door at the end of the maze. Head through that door, run through the tunnel to the elevator, and take it down. Walk into the next room, and a teleportation machine will ready itself, showing a screenshot of the start of MAP31 on the monitor behind it. Step into the teleporter.
Other points of interest
In no monsters mode, entering the circuitry tunnel where the demon can normally be seen instead yields a red skull key. This is to allow the player to reach the secret exit even without the demon around.
Secrets
- While traveling through the upper cave in the southwest of the level, there are "windows" from which you can see stone towers containing impaled bodies. In the northernmost one, the body is twitching. Shoot through the window of this tower with any impact weapon. Alternatively, in the central base, one of the terminals in the northernmost room at the west shows a different image than the rest. Press on the monitor, and the terminal will sink into the ground, revealing a switch; press the switch. Doing either of these will open a path between the lower tunnel at the west and the central base, leading into a hallway with five stimpacks. (sector 162)
- Inside the flesh and metal room at the north of the level, the lion switch at the southwest has another lion switch on its back. Activating this will open access to a teleporter at the south of the circular walkway. Enter the teleporter, and you will be taken to a tunnel of circuitry, containing three medikits. (sector 394) Walk forward, and a path will open at the other end into the southeast computer room.
- At the easternmost room at the north of the central base, step onto the ledge at the north. On the northeast side of the building outside, there are pipes and bullet holes in one spot. Tread your way to this part of the wall, and press on it to find a teleporter. Use it, and you will be warped to the cavernous platform at the northeast, where you can recover two medikits and 24 shotgun shells. (sector 897)
- In the northernmost room at the east of the central base, there are different images on the monitors in the back than the others in the base. Press on them, and they will rise to reveal a tunnel. Open the door at the opposite end to find an imp emulating Rocket Knight Adventures on a computer with a giant monitor in the wall. (sector 627) On the terminals at the south side are 40 shotgun shells and ten clips. Floating over the box that powers the monitor is a partial invisibility. Climb on top of the chair to reach the munitions, and jump from the terminals to get the partial invisibility.
- Near the blue keycard are eight computer panels with ridges on them. Press them, and they will rise to reveal a switch. Press the switch, and open the secret compartment to the north to find a teleporter. Use the teleporter to be taken to the island in the middle of the lava pool, where eight stimpacks can be obtained. (sector 667) Press on the northeast side of the pillar at the west to find a portal leading back into the computer maze.
- The room in which the secret exit is found counts as a secret. (sector 495)
Speedrunning
Current records
The records for the map at the Doomed Speed Demos Archive are:
| Run | Time | Player | Date | File | Notes |
|---|---|---|---|---|---|
| UV speed (normal exit) | 04:04 | Eric "The Green Herring" Baker | 2008-01-04 | c315-404.zip | |
| UV speed (secret exit) | 04:00 | Eric "The Green Herring" Baker | 2008-01-04 | c315-400.zip | |
| NM speed (normal exit) | |||||
| NM speed (secret exit) | |||||
| UV max | 06:53 | Eric "The Green Herring" Baker | 2008-01-04 | c315-653.zip | |
| NM100S | |||||
| UV -fast | |||||
| UV -respawn | |||||
| UV Tyson | |||||
| UV pacifist |
Miscellaneous demos
| Run | Time | Player | Date | File | Notes |
|---|---|---|---|---|---|
| UV speed nomo (normal exit) | 02:05 | Eric "The Green Herring" Baker | c315o205.zip | ||
| UV speed nomo (secret exit) | 02:08 | Eric "The Green Herring" Baker | c315o208.zip |
Statistics
Map data
| Things | 874 |
| Vertexes | 8663 |
| Linedefs | 10080 |
| Sidedefs | 16481 |
| Sectors | 1083 |
Things
This level contains the following numbers of things per skill level:
| Monsters | 1-2 | 3 | 4-5 |
|---|---|---|---|
| Zombieman | 18 | 30 | 42 |
| Shotgun guy | 76 | 99 | 107 |
| Heavy weapon dude | 8 | 8 | 8 |
| Imp | 105 | 111 | 115 |
| Demon | 1 | 1 | 1 |
| Powerups | 1-2 | 3 | 4-5 |
| Armor bonus | 38 | 38 | 38 |
| Medikit | 12 | 12 | 12 |
| Stimpack | 83 | 83 | 83 |
| Health bonus | 42 | 38 | 24 |
| Berserk | 1 | 1 | 1 |
| Partial invisibility | 1 | 1 | 1 |
| Weapons | 1-2 | 3 | 4-5 |
| Super shotgun | 1 | 1 | 1 |
| Chaingun | 1 | 1 | 1 |
| Ammunition | 1-2 | 3 | 4-5 |
| Clip | 135 | 135 | 135 |
| Box of bullets | 3 | 3 | 3 |
| 4 shotgun shells | 47 | 47 | 47 |
| Box of shotgun shells | 2 | 2 | 2 |
| Keys | 1-2 | 3 | 4-5 |
| Blue keycard | 1 | 1 | 1 |
| Red keycard | 1 | 1 | 1 |
| Red skull key | 1 | 1 | 1 |
| Yellow keycard | 1 | 1 | 1 |
Technical information
The secret exit exploits a bug in the Doom engine, retained in all source ports, that allows monsters to open locked doors, if the other side of the door is not locked, the monster is fast enough, and the door is thin enough. This bug has been exploited by Compet-n speedrunners on Doom II MAP27: Monster Condo to open the exit door early.
Inspiration and development
This level was started on July 10, 2007. At that point, Samuel Villarreal (Kaiser) held the MAP15 slot with a level called Spasmolytic, but had not been heard from regarding his level for a long period of time. On the day the level was started, Baker posted to say he could "bang up" a MAP15 if nobody else wanted to do it, or Villarreal could not work on it for any reason. After five days of silence on the subject, Baker took the slot. A beta of the level was submitted to playtesters on August 26, 2007. On September 3, 2007, the level was submitted to Andy Leaver, alongside MAP27.
The theme of the level and its title was decided on from the beginning. The central base was deliberately textured in the specific Knee-Deep in the Dead techbase style.
The yellow keycard room was originally an indoor area, with a circular walkway surrounded by silver railings, a giant hole in the ceiling, and the key resting in a rocky structure that, when entered, caused the corners of the room to open, revealing imps. However, when Baker found the resulting area too difficult to maneuver in due to lack of room, he replaced it with the current outdoor section.
The computer room from which the blue keycard maze is accessed is based directly on the computer room in Doom E1M1: Hangar.
The secret exit door originally had two shotgun guys near it. However, after playtester Brian Nesser (Anima Zero) managed to open it with one of the shotgun guys, they were removed.
Trivia
If you activate the noclip cheat, jump into the lava pit around the red keycard, and look at the north, south, east, or west ends of the platform, you will find a message reading "TGH says: Quit using noclip!" If you use noclip to go all the way to either end of the cliff at the south of the map, you will find message that says, "You're not supposed to be here! -TGH" These are homages to professional level designer Richard Gray, who is well known for hiding easter egg messages in his levels, often accessible only by cheating, most notably in his levels for Duke Nukem 3D.
Rocket Knight Adventures is a 1993 Sega Genesis game by Konami, featuring an opossum knight named Sparkster who wears a jetpack enabling flight. Baker is a fan of the Sparkster series, and included the title screen of the game as an easter egg.
The coordinates that appear on one of the teleportation machine's monitors are the XYZ coordinates of the player 1 starting position in MAP31. The monitor also gives its location as "Berlin, Germany," which is a reference to the fact that MAP31 once contained SS Nazis.
| ||||||||