m (→Essentials: clarify) |
m (→Current records: clean up) |
||
| (10 intermediate revisions by 3 users not shown) | |||
| Line 1: | Line 1: | ||
{{map|slot=MAP12}} |
{{map|slot=MAP12}} |
||
| ⚫ | '''MAP12: Kinetics''' is the twelfth level of [[Memento Mori]]. It was designed by Mackey "Avatar" McCandlish (credited simply as "Avatar") and uses the music track "Scary 2" by Mark Klem. It is notable for possessing an extremely tall, rising, spiral staircase (called "the mother of all building staircases" in the Infopack.) |
||
| ⚫ | |||
| ⚫ | '''MAP12: Kinetics''' is the twelfth level of [[Memento Mori]]. |
||
== Walkthrough == |
== Walkthrough == |
||
| − | [[ |
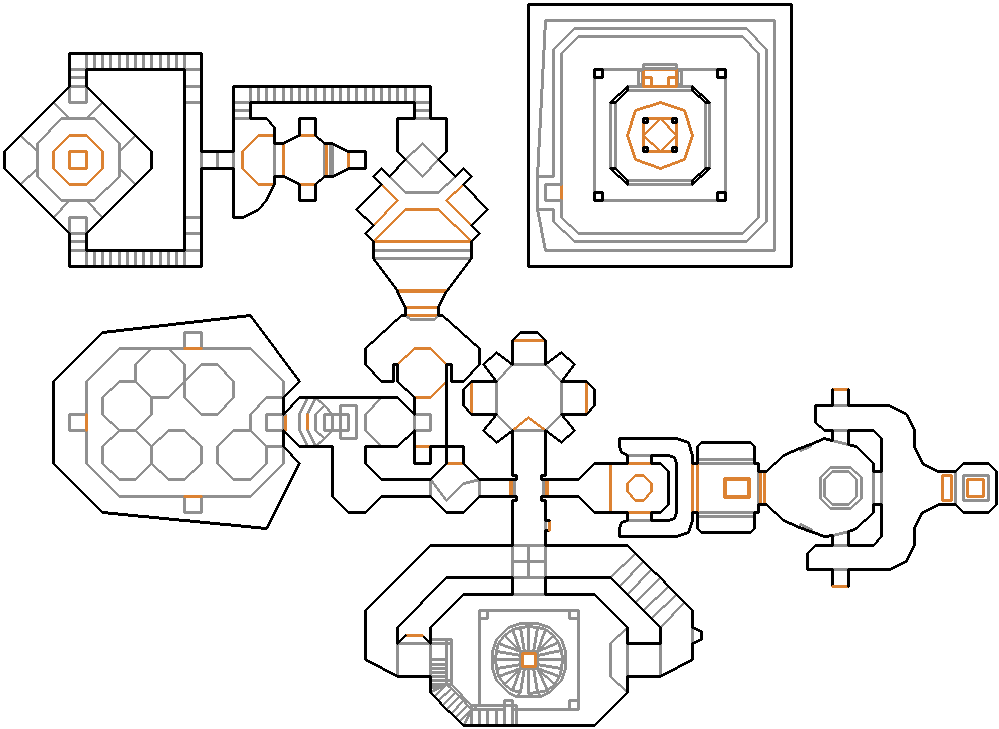
+ | [[file:MM_MAP12_map.png|thumb|300px|Map of MAP12]] |
| − | : Letters in ''italics'' refer to marked spots on the map. |
+ | : Letters in ''italics'' refer to marked spots on the map. [[Sector]] numbers in '''boldface''' are [[secrets]] which count toward the [[Intermission screen|end-of-level tally]]. |
===Essentials=== |
===Essentials=== |
||
| Line 12: | Line 11: | ||
:''Single-player:'' |
:''Single-player:'' |
||
| − | Walk forward, and kill all of the enemies that appear while the elevator lowers. |
+ | Walk forward, and kill all of the enemies that appear while the elevator lowers. Once you reach the bottom, rush south, go to the east side, and push the switch, but make sure you are not under the ceiling after you do so (see [[#Bugs|Bugs]].) After the stairs have formed, go around the hallway, jump across the gap, and grab the yellow [[keys|key]] at the end. Go north, open the doors, and head east. Go down the lift, head around the hallway east, and grab the red key. Backtrack to the central hallway, and head through the western doorway. Go west, and head north to be faced with the choice of going east or west. Both of them lead to the red door in different ways. |
| − | If you wish to go east, drop down the eastern hole, go down the lift, and open the yellow door. |
+ | If you wish to go east, drop down the eastern hole, go down the lift, and open the yellow door. Walk forward, and the barriers in front of you will open. Drop into the hole, go upstairs, and head to the east of your destination to activate a secret lift. If you wish to go west, drop down the pit to the west, open the yellow door, and jump down acros the platforms until you reach the one northeast of the western teleporter. Walk (not run) into the teleporter. Push on any of the walls around you, and step off. Wait until the walls have lowered, and take either stairway down. At the foot of the steps, go through the doorway, and head east to activate a secret lift. In either case, open the red door and step into the teleporter. |
| − | Go around to the north of the next area, and drop into the hole. |
+ | Go around to the north of the next area, and drop into the hole. Activate the switch, and step on either one of the southern corners to raise the floor. Once you are at the top, push on the wooden pillar to find the blue key, grab it. Stepping on the blue key platform opens a teleport in the southwest; rush in there as quickly as you can. Return to where you found the red key, and open the blue door. Press on either one of the switches at the north or south, and jump into the eastern portal. |
:''Cooperative multiplayer:'' |
:''Cooperative multiplayer:'' |
||
| − | Walk forward, and kill all of the enemies that appear while the floor lowers. |
+ | Walk forward, and kill all of the enemies that appear while the floor lowers. Once you reach the bottom, dash south, go to the east side, and push the switch, but make sure you are not under the ceiling after you do it (see [[#Bugs|Bugs]].) After the stairs have formed, go around the hallway, jump across the gap, and grab the yellow key at the end. Go north, open the doors, and head east. Go down the lift, head around the hallway east, and grab the red key. Backtrack to the central hallway, and head through the western doorway. Go west, and head north to be faced with the choice of going east or west. Both of them lead to the red door in different ways. |
| − | If you wish to go east, drop down the eastern hole, go down the lift, and open the yellow door. |
+ | If you wish to go east, drop down the eastern hole, go down the lift, and open the yellow door. Walk forward, and the barriers in front of you will open. Drop into the hole, go upstairs, and head to the east of your destination to activate a secret lift. If you wish to go west, drop down the pit to the west, open the yellow door, and jump down acros the platforms until you reach the one northeast of the western teleporter. Walk (not run) into the teleporter. Push on any of the walls around you, and step off. Wait until the walls have lowered, and take either stairway down. At the foot of the steps, go through the doorway, and head east to activate a secret lift. In either case, open the red door and step into the teleporter. |
| − | |||
| ⚫ | Head around to the north of the next area, and jump into the hole. |
||
| − | |||
| − | ===Other points of interest=== |
||
| ⚫ | Head around to the north of the next area, and jump into the hole. Activate the switch, and step on either one of the southern corners to raise the floor. Once you are at the top, push on the wooden pillar to find the blue key, grab it. Stepping on the blue key platform opens a teleport in the southwest; rush in there as quickly as you can. Have one player wait at the skull switch south of the central hallway, and backtrack to where you found the red key. Open the blue door, and head to the east of the curved hallway. At this point, have the one player press the switch, and the barrier will lower. Quickly jump into the portal. |
||
===Secrets=== |
===Secrets=== |
||
There are no official secrets in this level. |
There are no official secrets in this level. |
||
| Line 34: | Line 30: | ||
If you do not move back from under the small ceiling after you flip the switch that raises the stairways, you will be [[crushing ceiling|crushed]] by the rising floor underneath you. |
If you do not move back from under the small ceiling after you flip the switch that raises the stairways, you will be [[crushing ceiling|crushed]] by the rising floor underneath you. |
||
| − | At the area where you find the blue key, it is possible to trigger the linedef raising the walls without falling into the hole, and then drop off the wall you are standing on to the ground while it rises. |
+ | At the area where you find the blue key, it is possible to trigger the linedef raising the walls without falling into the hole, and then drop off the wall you are standing on to the ground while it rises. If you do this, it will become impossible to finish the level, unless you use the [[Doom cheat codes|noclip cheat]]. |
| − | |||
| − | ===Demo files=== |
||
| − | * |
||
| − | |||
| − | == Areas / screenshots == |
||
| − | |||
| − | <gallery> |
||
| − | Image: | |
||
| − | </gallery> |
||
== Speedrunning == |
== Speedrunning == |
||
| − | |||
| − | ===Routes and tricks=== |
||
| − | |||
===Current records=== |
===Current records=== |
||
The [[Compet-N]] records for the map are: |
The [[Compet-N]] records for the map are: |
||
| + | {| class="WikiaTable" |
||
| − | {| {{prettytable}} |
||
!Run||Time||Player||Date||File||Notes |
!Run||Time||Player||Date||File||Notes |
||
|- |
|- |
||
| − | |[[UV speed]]||04:37||[[Casey Alvis]]||2002-09-27||{{competnftp|pwads/mm/speed/mm12-437.zip|mm12-437.zip}}|| |
+ | |[[UV speed]]||04:37||[[Casey Alvis]]||2002-09-27||{{External Link|site=competnftp|file_path=pwads/mm/speed/mm12-437.zip|text=mm12-437.zip}}|| |
|- |
|- |
||
|[[NM speed]]|| || || || || |
|[[NM speed]]|| || || || || |
||
|- |
|- |
||
| − | |[[UV max]]||05:30||[[Casey Alvis]]||2004-03-30||{{competnftp|pwads/mm/max/mm12-530.zip|mm12-530.zip}}|| |
+ | |[[UV max]]||05:30||[[Casey Alvis]]||2004-03-30||{{External Link|site=competnftp|file_path=pwads/mm/max/mm12-530.zip|text=mm12-530.zip}}|| |
|- |
|- |
||
|[[NM100S]]|| || || || || |
|[[NM100S]]|| || || || || |
||
| Line 73: | Line 57: | ||
===Miscellaneous demos=== |
===Miscellaneous demos=== |
||
| + | {| class="WikiaTable" |
||
| − | {| {{prettytable}} |
||
!Run||Time||Player||Date||File||Notes |
!Run||Time||Player||Date||File||Notes |
||
|- |
|- |
||
| || || || ||[ftp://.zip .zip]|| |
| || || || ||[ftp://.zip .zip]|| |
||
|} |
|} |
||
| − | |||
| − | == Deathmatch == |
||
== Statistics == |
== Statistics == |
||
| − | |||
===Map data=== |
===Map data=== |
||
| + | {| class="WikiaTable" |
||
| − | {| {{prettytable}} |
||
|[[Things]]||229 |
|[[Things]]||229 |
||
|- |
|- |
||
| Line 97: | Line 78: | ||
===Things=== |
===Things=== |
||
| + | {| class="WikiaTable" |
||
| − | {| {{prettytable}} |
||
![[Monsters]]||[[ITYTD]] and [[HNTR]]||[[HMP]]||[[UV]] and [[NM]] |
![[Monsters]]||[[ITYTD]] and [[HNTR]]||[[HMP]]||[[UV]] and [[NM]] |
||
|- |
|- |
||
| − | |[[Arachnotron]]s|| |
+ | |[[Arachnotron]]s||0||0||4 |
|- |
|- |
||
| − | |[[Arch- |
+ | |[[Arch-vile]]s||1||1||1 |
|- |
|- |
||
| − | |[[Baron of |
+ | |[[Baron of hell|Barons of hell]]||1||1||2 |
|- |
|- |
||
| − | |[[Cacodemon]]s|| |
+ | |[[Cacodemon]]s||0||3||3 |
|- |
|- |
||
| − | |[[ |
+ | |[[Demon]]s||6||7||8 |
|- |
|- |
||
| − | |[[ |
+ | |[[Heavy weapon dude]]s||5||8||7 |
|- |
|- |
||
| − | |[[ |
+ | |[[Hell knight]]s||0||6||10 |
|- |
|- |
||
| − | |[[ |
+ | |[[Imp]]s||24||20||17 |
|- |
|- |
||
| − | |[[ |
+ | |[[Mancubus|Mancubi]]||1||1||2 |
|- |
|- |
||
| − | |[[ |
+ | |[[Revenant]]s||3||7||7 |
|- |
|- |
||
| − | |[[ |
+ | |[[Shotgun guy]]s||9||26||24 |
|- |
|- |
||
| − | |[[ |
+ | |[[Spectre]]s||1||1||1 |
|- |
|- |
||
| − | |[[ |
+ | |[[Zombiemen]]||7||0||0 |
| − | |- |
||
| − | |[[Pain Elemental]]s|| || || |
||
| − | |- |
||
| − | |[[Revenant]]s|| || || |
||
| − | |- |
||
| − | |[[Sergeant]]s|| || || |
||
| − | |- |
||
| − | |[[Spectre]]s|| || || |
||
| − | |- |
||
| − | |[[Spider Mastermind]]s|| || || |
||
| − | |- |
||
| − | |[[Trooper]]s|| || || |
||
| − | |- |
||
| − | |[[Wolfenstein SS]]|| || || |
||
|- |
|- |
||
![[Powerup]]s||ITYTD and HNTR||HMP||UV and NM |
![[Powerup]]s||ITYTD and HNTR||HMP||UV and NM |
||
|- |
|- |
||
| − | |[[ |
+ | |[[Berserk pack]]s||0||1||1 |
|- |
|- |
||
| − | |[[ |
+ | |[[Medikit]]s||29||23||14 |
|- |
|- |
||
| − | |[[ |
+ | |[[Stimpack]]s||4||0||0 |
| − | |- |
||
| − | |[[Combat armor|Blue armor]]s|| || || |
||
| − | |- |
||
| − | |[[Computer map]]s|| || || |
||
| − | |- |
||
| − | |[[Security armor|Green armor]]s|| || || |
||
| − | |- |
||
| − | |[[Health bonus]]es|| || || |
||
| − | |- |
||
| − | |[[Blur artifact|Invisibilities]]|| || || |
||
| − | |- |
||
| − | |[[Invulnerability|Invulnerabilities]]|| || || |
||
| − | |- |
||
| − | |[[Light amplification visor|Light goggles]]|| || || |
||
| − | |- |
||
| − | |[[Medikit]]s|| || || |
||
| − | |- |
||
| − | |[[Megasphere]]s|| || || |
||
| − | |- |
||
| − | |[[Radiation suit]]s|| || || |
||
| − | |- |
||
| − | |[[Soul Sphere]]s|| || || |
||
| − | |- |
||
| − | |[[Stimpack]]s|| || || |
||
|- |
|- |
||
![[Weapons]]||ITYTD and HNTR||HMP||UV and NM |
![[Weapons]]||ITYTD and HNTR||HMP||UV and NM |
||
|- |
|- |
||
| − | |[[ |
+ | |[[Shotgun]]s||4||4||2 |
| − | |- |
||
| − | |[[Shotgun]]s|| || || |
||
| − | |- |
||
| − | |[[Super shotgun]]s|| || || |
||
| − | |- |
||
| − | |[[Chaingun]]s|| || || |
||
|- |
|- |
||
| − | |[[ |
+ | |[[Super shotgun]]s||1||1||1 |
|- |
|- |
||
| − | |[[ |
+ | |[[Chaingun]]s||1||1||1 |
|- |
|- |
||
| − | |[[ |
+ | |[[Rocket launcher]]s||1||1||1 |
|- |
|- |
||
![[Ammunition]]||ITYTD and HNTR||HMP||UV and NM |
![[Ammunition]]||ITYTD and HNTR||HMP||UV and NM |
||
|- |
|- |
||
| − | |[[ |
+ | |[[4 shotgun shells]]||0||4||0 |
|- |
|- |
||
| − | |[[Box of |
+ | |[[Box of shells|Shell boxes]]||6||4||4 |
|- |
|- |
||
| − | |[[ |
+ | |[[Box of rockets|Rocket boxes]]||7||7||7 |
|- |
|- |
||
| − | |[[ |
+ | |[[Energy cell pack]]s||2||2||2 |
| − | |- |
||
| − | |[[Rocket]]s|| || || |
||
| − | |- |
||
| − | |[[Box of rockets|Rocket boxes]]|| || || |
||
| − | |- |
||
| − | |[[Cell]]s|| || || |
||
| − | |- |
||
| − | |[[Bulk cell]]s|| || || |
||
|- |
|- |
||
![[Keys]]||ITYTD and HNTR||HMP||UV and NM |
![[Keys]]||ITYTD and HNTR||HMP||UV and NM |
||
|- |
|- |
||
| − | |Blue cards|| |
+ | |Blue cards||1||1||1 |
|- |
|- |
||
| − | | |
+ | |Red cards||1||1||1 |
| − | |- |
||
| ⚫ | |||
| − | |- |
||
| − | |Red skulls|| || || |
||
| − | |- |
||
| − | |Yellow cards|| || || |
||
| − | |- |
||
| − | |Yellow skulls|| || || |
||
|- |
|- |
||
| ⚫ | |||
|} |
|} |
||
| − | |||
| − | == Technical information == |
||
| − | |||
| − | == Inspiration and development == |
||
| − | |||
| − | == Trivia == |
||
| − | |||
| − | == See also == |
||
| − | |||
| − | * |
||
| − | |||
| − | == Sources == |
||
| − | |||
| − | * |
||
== External links == |
== External links == |
||
| ⚫ | |||
| ⚫ | |||
| ⚫ | |||
[[Category:Levels by name|Kinetics (Memento Mori)]] |
[[Category:Levels by name|Kinetics (Memento Mori)]] |
||
Latest revision as of 04:39, 23 March 2020
- This level occupies the map slot MAP12. For other maps which occupy this slot, see Category:MAP12.
MAP12: Kinetics is the twelfth level of Memento Mori. It was designed by Mackey "Avatar" McCandlish (credited simply as "Avatar") and uses the music track "Scary 2" by Mark Klem. It is notable for possessing an extremely tall, rising, spiral staircase (called "the mother of all building staircases" in the Infopack.)
Walkthrough
Map of MAP12
- Letters in italics refer to marked spots on the map. Sector numbers in boldface are secrets which count toward the end-of-level tally.
Essentials
- Single-player:
Walk forward, and kill all of the enemies that appear while the elevator lowers. Once you reach the bottom, rush south, go to the east side, and push the switch, but make sure you are not under the ceiling after you do so (see Bugs.) After the stairs have formed, go around the hallway, jump across the gap, and grab the yellow key at the end. Go north, open the doors, and head east. Go down the lift, head around the hallway east, and grab the red key. Backtrack to the central hallway, and head through the western doorway. Go west, and head north to be faced with the choice of going east or west. Both of them lead to the red door in different ways.
If you wish to go east, drop down the eastern hole, go down the lift, and open the yellow door. Walk forward, and the barriers in front of you will open. Drop into the hole, go upstairs, and head to the east of your destination to activate a secret lift. If you wish to go west, drop down the pit to the west, open the yellow door, and jump down acros the platforms until you reach the one northeast of the western teleporter. Walk (not run) into the teleporter. Push on any of the walls around you, and step off. Wait until the walls have lowered, and take either stairway down. At the foot of the steps, go through the doorway, and head east to activate a secret lift. In either case, open the red door and step into the teleporter.
Go around to the north of the next area, and drop into the hole. Activate the switch, and step on either one of the southern corners to raise the floor. Once you are at the top, push on the wooden pillar to find the blue key, grab it. Stepping on the blue key platform opens a teleport in the southwest; rush in there as quickly as you can. Return to where you found the red key, and open the blue door. Press on either one of the switches at the north or south, and jump into the eastern portal.
- Cooperative multiplayer:
Walk forward, and kill all of the enemies that appear while the floor lowers. Once you reach the bottom, dash south, go to the east side, and push the switch, but make sure you are not under the ceiling after you do it (see Bugs.) After the stairs have formed, go around the hallway, jump across the gap, and grab the yellow key at the end. Go north, open the doors, and head east. Go down the lift, head around the hallway east, and grab the red key. Backtrack to the central hallway, and head through the western doorway. Go west, and head north to be faced with the choice of going east or west. Both of them lead to the red door in different ways.
If you wish to go east, drop down the eastern hole, go down the lift, and open the yellow door. Walk forward, and the barriers in front of you will open. Drop into the hole, go upstairs, and head to the east of your destination to activate a secret lift. If you wish to go west, drop down the pit to the west, open the yellow door, and jump down acros the platforms until you reach the one northeast of the western teleporter. Walk (not run) into the teleporter. Push on any of the walls around you, and step off. Wait until the walls have lowered, and take either stairway down. At the foot of the steps, go through the doorway, and head east to activate a secret lift. In either case, open the red door and step into the teleporter.
Head around to the north of the next area, and jump into the hole. Activate the switch, and step on either one of the southern corners to raise the floor. Once you are at the top, push on the wooden pillar to find the blue key, grab it. Stepping on the blue key platform opens a teleport in the southwest; rush in there as quickly as you can. Have one player wait at the skull switch south of the central hallway, and backtrack to where you found the red key. Open the blue door, and head to the east of the curved hallway. At this point, have the one player press the switch, and the barrier will lower. Quickly jump into the portal.
Secrets
There are no official secrets in this level.
Bugs
If you do not move back from under the small ceiling after you flip the switch that raises the stairways, you will be crushed by the rising floor underneath you.
At the area where you find the blue key, it is possible to trigger the linedef raising the walls without falling into the hole, and then drop off the wall you are standing on to the ground while it rises. If you do this, it will become impossible to finish the level, unless you use the noclip cheat.
Speedrunning
Current records
The Compet-N records for the map are:
| Run | Time | Player | Date | File | Notes |
|---|---|---|---|---|---|
| UV speed | 04:37 | Casey Alvis | 2002-09-27 | mm12-437.zip | |
| NM speed | |||||
| UV max | 05:30 | Casey Alvis | 2004-03-30 | mm12-530.zip | |
| NM100S | |||||
| UV -fast | |||||
| UV -respawn | |||||
| UV Tyson | |||||
| UV pacifist |
Miscellaneous demos
| Run | Time | Player | Date | File | Notes |
|---|---|---|---|---|---|
| .zip |
Statistics
Map data
| Things | 229 |
| Vertexes | 956 |
| Linedefs | 1247 |
| Sidedefs | 1910 |
| Sectors | 226 |
Things
| Monsters | ITYTD and HNTR | HMP | UV and NM |
|---|---|---|---|
| Arachnotrons | 0 | 0 | 4 |
| Arch-viles | 1 | 1 | 1 |
| Barons of hell | 1 | 1 | 2 |
| Cacodemons | 0 | 3 | 3 |
| Demons | 6 | 7 | 8 |
| Heavy weapon dudes | 5 | 8 | 7 |
| Hell knights | 0 | 6 | 10 |
| Imps | 24 | 20 | 17 |
| Mancubi | 1 | 1 | 2 |
| Revenants | 3 | 7 | 7 |
| Shotgun guys | 9 | 26 | 24 |
| Spectres | 1 | 1 | 1 |
| Zombiemen | 7 | 0 | 0 |
| Powerups | ITYTD and HNTR | HMP | UV and NM |
| Berserk packs | 0 | 1 | 1 |
| Medikits | 29 | 23 | 14 |
| Stimpacks | 4 | 0 | 0 |
| Weapons | ITYTD and HNTR | HMP | UV and NM |
| Shotguns | 4 | 4 | 2 |
| Super shotguns | 1 | 1 | 1 |
| Chainguns | 1 | 1 | 1 |
| Rocket launchers | 1 | 1 | 1 |
| Ammunition | ITYTD and HNTR | HMP | UV and NM |
| 4 shotgun shells | 0 | 4 | 0 |
| Shell boxes | 6 | 4 | 4 |
| Rocket boxes | 7 | 7 | 7 |
| Energy cell packs | 2 | 2 | 2 |
| Keys | ITYTD and HNTR | HMP | UV and NM |
| Blue cards | 1 | 1 | 1 |
| Red cards | 1 | 1 | 1 |
| Yellow cards | 1 | 1 | 1 |