No edit summary |
Psi-ragnarok (talk | contribs) No edit summary |
||
| (38 intermediate revisions by 17 users not shown) | |||
| Line 1: | Line 1: | ||
| ⚫ | |||
| ⚫ | |||
| − | {{map|slot=MAP11}} |
||
| ⚫ | |||
==Walkthrough== |
==Walkthrough== |
||
| − | [[ |
+ | [[file:Plutonia MAP11 map.png|thumb|300px|Map of MAP11]] |
| − | Pressing the first switch will open the door and release the Arch-Viles. Grabbing the |
+ | Pressing the first switch will open the door and release the Arch-Viles. Grabbing the yellow skull key will release another Arch-Vile. |
| ⚫ | It is also essential to save your health in this maze — there are no forms of health recovery until the very end. That being said, it is possible to avoid getting hurt by the Arch-Viles if you kill them correctly. Blast them with the super shotgun until they start conjuring the flames, then get out of their line of sight by running around the corner. It takes the Arch-Vile about three full seconds to do one attack, from when it first calls the fire to when it actually sends out the blast, so if you time it correctly, you can drop these monsters painlessly; another cheap but effective method to deal with them, should you have enough plasma charges and a [[BFG9000]] available, is by blasting an Arch-Vile with a full-power, well-placed BFG9000 shot (the energy shot itself plus the subsequent radius "trail") before the Arch-Vile can complete its attack. |
||
| − | It is also essential to save your health in this maze-there are no forms of health recovery until the very end. |
||
| + | Another essential tip for this level regards the doors: the doors of this maze — unlike most other doors in Doom universe — cannot be opened via "conventional" means (i.e. switch activation or by simply hitting the "use" key in front of them); rather, you must walk to a specific spot of the way to open the door. Many of these locations are marked by silver lines running down the walls, and the sound of the opening door warns you when you've passed it. |
||
| ⚫ | That being said, it is possible to avoid getting hurt by the Arch-Viles if you kill them correctly. Blast them with the super shotgun until they start conjuring the flames, then get out of their line of sight by running around the corner. It takes the |
||
| − | You do not need both keys to exit the level |
+ | You do not need both keys to exit the level; only one key is required, be it the red or yellow one. Note that pressing one of the key-activated switches raises the bars next to the opposite switch, forcing you to walk around. |
| + | At the end you are presented with two exit teleporters: the left one will take you straight to the next level; however, the right one will take you to a type 11 [[damaging floor]] room - in the same style of [[Doom]]'s [[E1M8: Phobos Anomaly (Doom)|E1M8]] ending room - with the last 4 Arch-Viles of the level. When your health drops to 11% or lower, the level will end (but you will spawn in [[MAP12: Speed (The Plutonia Experiment)|MAP12]] with extremely low health). If playing in vanilla DOOM2.EXE or some source ports, the four Viles in this room are not factored into the kills percentage for the level, so you do not need to worry about them if you are gunning for 100% kills in these versions. However, other ports (such as [[ZDoom]]) count enemies wherever in the level they are, and calculate kill percentage based on this count; not only does this make it impossible to get more than 100% kills in such ports, it makes it nearly impossible to reach 100% kills in this level unless one cheats by using that port's "massacre" cheat (in ZDoom, opening the console and typing KILL MONSTERS)* (select the text between asterisks to reveal). Alternately, with max health for the level (115%) and a couple of perfectly timed BFG blasts (begin shooting just before entering the teleporter to kill the first two Arch-Viles and turn around quickly to shoot the second two), it can be done. |
||
| − | At the end you are presented with two exit teleporters; the left one will take you straight to the next level. However the right one will take you to a Type 11 damaging floor room with 4 Arch-Viles. When your health drops to 11% or lower, the level will end. |
||
| − | === |
+ | ====Path to the red skull key==== |
| + | ====Path to the yellow skull key==== |
||
| − | |||
| − | ===Yellow Key=== |
||
===Secrets=== |
===Secrets=== |
||
| − | # Once in the maze area, continue from the start along the path to the right until you reach the first door, which opens when you approach. Open the misaligned wall directly across from it. This reveals a switch in an alcove (you must actually walk into the alcove |
+ | # Once in the maze area, continue from the start along the path to the right until you reach the first door, which opens when you approach. Open the misaligned wall directly across from it. This reveals a switch in an alcove (you must actually walk into the alcove to trigger the secret). Pressing the switch causes lights in the floor to appear, which should help you to navigate (although not very much) through the maze. |
| − | == |
+ | ===Trivia=== |
| + | # Since there are only [[Arch-Vile]]s as enemies, this is the only level in [[The Plutonia Experiment]], aside from [[MAP17: Compound (The Plutonia Experiment)|MAP17: Compound]], to not include any [[Revenant]]s. Also, it is the only level to not have any [[Heavy weapon dude|Chaingunners]] to oppose you. |
||
| + | |||
| + | ===Screenshots=== |
||
<gallery> |
<gallery> |
||
| − | Image:Plutonia-map11-start.png|Hunted by [[ |
+ | Image:Plutonia-map11-start.png|Hunted by [[Archvile]]s. |
| − | Image:Plutonia-map11-end.png|Choose the correct one |
+ | Image:Plutonia-map11-end.png|Choose the correct one. |
</gallery> |
</gallery> |
||
| + | == End of Level Message == |
||
| ⚫ | |||
| + | Even the deadly Arch-Vile labyrinth could not stop you, and you've gotten to the prototype accelerator which is soon efficiently and permanently deactivated. |
||
| + | You're good at that kind of thing. |
||
| + | |||
| ⚫ | |||
===Routes and tricks=== |
===Routes and tricks=== |
||
| − | + | It is possible to avoid the releasing of the Arch-Viles with a good timed opening. Use caution when pressing the first switch; as some of the Arch-Viles may try to attack you the moment the switch is pressed. This is more common with "Fast Monsters" enabled. |
|
| − | *Use caution when pressing the first switch; as some of the Arch-Viles may try to attack you the moment the switch is pressed. this is more common with "Fast Monsters" enabled. |
||
===Records=== |
===Records=== |
||
The [[Compet-N]] records for the map are: |
The [[Compet-N]] records for the map are: |
||
| + | {| class="WikiaTable" |
||
| − | {| {{prettytable}} |
||
| − | !Run |
+ | !Run!!Time!!Player!!Date!!File!!Notes |
|- |
|- |
||
| − | |[[UV speed]]||00:49||[[Marijo "Sedlo" Sedlic]]||2004-02-05||{{competnftp|plutonia/speed/pl11-049.zip|pl11-049.zip}}|| |
+ | |[[UV speed]]||00:49||[[Marijo "Sedlo" Sedlic]]||2004-02-05||{{External Link|site=competnftp|file_path=plutonia/speed/pl11-049.zip|text=pl11-049.zip}}|| |
|- |
|- |
||
| − | |[[NM speed]]||00:52||[[Marijo "Sedlo" Sedlic]]||2000-09-16||{{competnftp|plutonia/nmare/pn11-052.zip|pn11-052.zip}}|| |
+ | |[[NM speed]]||00:52||[[Marijo "Sedlo" Sedlic]]||2000-09-16||{{External Link|site=competnftp|file_path=plutonia/nmare/pn11-052.zip|text=pn11-052.zip}}|| |
|- |
|- |
||
| − | |[[UV max]]||02:52||[[Radek Pecka]]||2002-03-28||{{competnftp|plutonia/max/pl11-252.zip|pl11-252.zip}}|| |
+ | |[[UV max]]||02:52||[[Radek Pecka]]||2002-03-28||{{External Link|site=competnftp|file_path=plutonia/max/pl11-252.zip|text=pl11-252.zip}}|| |
|- |
|- |
||
| − | |[[NM100S]]||00:54||[[Tamas Flamich]]||2008-05-19||{{competnftp| |
+ | |[[NM100S]]||00:54||[[Tamas Flamich]]||2008-05-19||{{External Link|site=competnftp|file_path=plutonia/nm100s/ps11-054.zip|text=ps11-054.zip}}|| |
|- |
|- |
||
| − | |[[UV -fast]]||02:49||[[Radek Pecka]]||2002-03-28||{{competnftp|plutonia/fast/pf11-249.zip|pf11-249.zip}}|| |
+ | |[[UV -fast]]||02:49||[[Radek Pecka]]||2002-03-28||{{External Link|site=competnftp|file_path=plutonia/fast/pf11-249.zip|text=pf11-249.zip}}|| |
|- |
|- |
||
| − | |[[UV -respawn]]||03:49||[[Radek Pecka]]||2002-03-28||{{competnftp|plutonia/respawn/pr11-349.zip|pr11-349.zip}}|| |
+ | |[[UV -respawn]]||03:49||[[Radek Pecka]]||2002-03-28||{{External Link|site=competnftp|file_path=plutonia/respawn/pr11-349.zip|text=pr11-349.zip}}|| |
|- |
|- |
||
| − | |[[UV Tyson]]||10:34||[[Xit Vono]]||2002-05-09||{{competnftp|plutonia/tyson/pt111034.zip|pt111034.zip}}|| |
+ | |[[UV Tyson]]||10:34||[[Xit Vono]]||2002-05-09||{{External Link|site=competnftp|file_path=plutonia/tyson/pt111034.zip|text=pt111034.zip}}|| |
|- |
|- |
||
| − | |[[UV pacifist]]||00:49||[[Marijo "Sedlo" Sedlic]]||2004-02-05||{{competnftp|plutonia/speed/pl11-049.zip|pl11-049.zip}}|| |
+ | |[[UV pacifist]]||00:49||[[Marijo "Sedlo" Sedlic]]||2004-02-05||{{External Link|site=competnftp|file_path=plutonia/speed/pl11-049.zip|text=pl11-049.zip}}|| |
|} |
|} |
||
==Statistics== |
==Statistics== |
||
===Map data=== |
===Map data=== |
||
| + | {| class="WikiaTable" |
||
| − | {| {{prettytable}} |
||
|[[Things]]||138 |
|[[Things]]||138 |
||
|- |
|- |
||
| Line 71: | Line 74: | ||
===Things=== |
===Things=== |
||
| + | {| class="WikiaTable" |
||
| − | {| {{prettytable}} |
||
| − | !Monsters |
+ | !Monsters!![[I'm Too Young To Die|ITYTD]] and [[Hey, Not Too Rough|HNTR]]!![[Hurt Me Plenty|HMP]]!![[Ultra-Violence|UV]] and [[Nightmare!|NM]] |
|- |
|- |
||
|[[Arch-Vile]]s||12||18||18 |
|[[Arch-Vile]]s||12||18||18 |
||
|- |
|- |
||
| − | !Powerups |
+ | !Powerups!!ITYTD and HNTR!!HMP!!UV and NM |
|- |
|- |
||
|[[Backpack]]s||1||1||1 |
|[[Backpack]]s||1||1||1 |
||
| Line 84: | Line 87: | ||
|[[Berserk]]s||1||1||1 |
|[[Berserk]]s||1||1||1 |
||
|- |
|- |
||
| − | !Weapons |
+ | !Weapons!!ITYTD and HNTR!!HMP!!UV and NM |
|- |
|- |
||
|[[BFG 9000]]s||1||1||1 |
|[[BFG 9000]]s||1||1||1 |
||
| Line 90: | Line 93: | ||
|[[Super shotgun]]s||1||1||1 |
|[[Super shotgun]]s||1||1||1 |
||
|- |
|- |
||
| − | !Ammunition |
+ | !Ammunition!!ITYTD and HNTR!!HMP!!UV and NM |
|- |
|- |
||
|[[Shell]]s||20||20||20 |
|[[Shell]]s||20||20||20 |
||
| Line 96: | Line 99: | ||
|[[Box of shells|Shell boxes]]||7||7||7 |
|[[Box of shells|Shell boxes]]||7||7||7 |
||
|- |
|- |
||
| − | !Keys |
+ | !Keys!!ITYTD and HNTR!!HMP!!UV and NM |
|- |
|- |
||
|[[Red skull]]s||1||1||1 |
|[[Red skull]]s||1||1||1 |
||
|- |
|- |
||
|[[Yellow skull]]s||1||1||1 |
|[[Yellow skull]]s||1||1||1 |
||
| − | |- |
||
|} |
|} |
||
| + | |||
| + | ==Trivia== |
||
| + | The music soundtrack, "Sweet Little Dead Bunny", is also played during the end scene of [[Inferno]]. It is a particularly disturbing composition, beginning with a happy simple tune (depicting a background scene of a rabbit playing in Earth's peaceful green fields) that suddenly becomes grotesquely distorted (now showing a destroyed city being set ablaze and Daisy's decapitated head impaled on a stone spike), before segueing into a dark [https://en.wikipedia.org/wiki/Twelve-bar_blues twelve-bar blues] . |
||
==External links== |
==External links== |
||
* [http://www.doom2.net/~compet-n/database/cn.cgi?map:plut:11 MAP11 demos from the Compet-N database] |
* [http://www.doom2.net/~compet-n/database/cn.cgi?map:plut:11 MAP11 demos from the Compet-N database] |
||
| + | |||
| ⚫ | |||
| + | |||
| + | [[es:MAP11: Hunted (FD-P)]] |
||
[[Category:Levels by name|Hunted (The Plutonia Experiment)]] |
[[Category:Levels by name|Hunted (The Plutonia Experiment)]] |
||
Revision as of 03:34, 29 June 2020
- This level occupies the map slot MAP11. For other maps which occupy this slot, see Category:MAP11.MAP11: Hunted is the eleventh map of The Plutonia Experiment. It uses the music track "Sweet Little Dead Bunny", the music from Doom's ending cinematic. It is a maze level notable for being populated exclusively by Arch-Viles.
Walkthrough
Map of MAP11
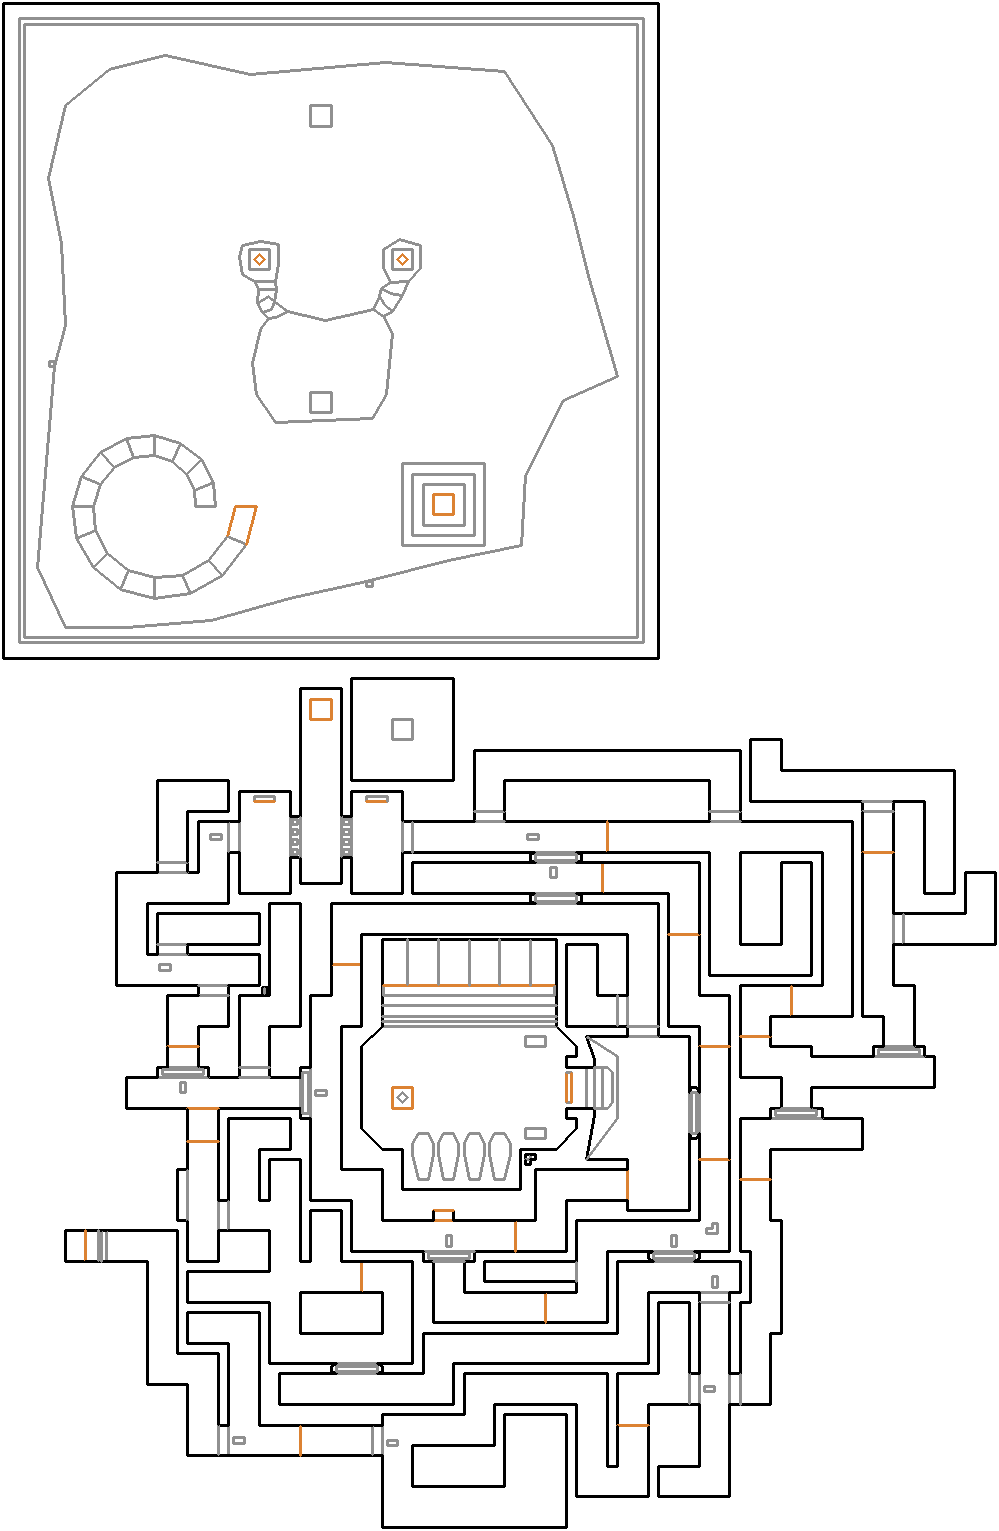
Pressing the first switch will open the door and release the Arch-Viles. Grabbing the yellow skull key will release another Arch-Vile.
It is also essential to save your health in this maze — there are no forms of health recovery until the very end. That being said, it is possible to avoid getting hurt by the Arch-Viles if you kill them correctly. Blast them with the super shotgun until they start conjuring the flames, then get out of their line of sight by running around the corner. It takes the Arch-Vile about three full seconds to do one attack, from when it first calls the fire to when it actually sends out the blast, so if you time it correctly, you can drop these monsters painlessly; another cheap but effective method to deal with them, should you have enough plasma charges and a BFG9000 available, is by blasting an Arch-Vile with a full-power, well-placed BFG9000 shot (the energy shot itself plus the subsequent radius "trail") before the Arch-Vile can complete its attack.
Another essential tip for this level regards the doors: the doors of this maze — unlike most other doors in Doom universe — cannot be opened via "conventional" means (i.e. switch activation or by simply hitting the "use" key in front of them); rather, you must walk to a specific spot of the way to open the door. Many of these locations are marked by silver lines running down the walls, and the sound of the opening door warns you when you've passed it.
You do not need both keys to exit the level; only one key is required, be it the red or yellow one. Note that pressing one of the key-activated switches raises the bars next to the opposite switch, forcing you to walk around.
At the end you are presented with two exit teleporters: the left one will take you straight to the next level; however, the right one will take you to a type 11 damaging floor room - in the same style of Doom's E1M8 ending room - with the last 4 Arch-Viles of the level. When your health drops to 11% or lower, the level will end (but you will spawn in MAP12 with extremely low health). If playing in vanilla DOOM2.EXE or some source ports, the four Viles in this room are not factored into the kills percentage for the level, so you do not need to worry about them if you are gunning for 100% kills in these versions. However, other ports (such as ZDoom) count enemies wherever in the level they are, and calculate kill percentage based on this count; not only does this make it impossible to get more than 100% kills in such ports, it makes it nearly impossible to reach 100% kills in this level unless one cheats by using that port's "massacre" cheat (in ZDoom, opening the console and typing KILL MONSTERS)* (select the text between asterisks to reveal). Alternately, with max health for the level (115%) and a couple of perfectly timed BFG blasts (begin shooting just before entering the teleporter to kill the first two Arch-Viles and turn around quickly to shoot the second two), it can be done.
Path to the red skull key
Path to the yellow skull key
Secrets
- Once in the maze area, continue from the start along the path to the right until you reach the first door, which opens when you approach. Open the misaligned wall directly across from it. This reveals a switch in an alcove (you must actually walk into the alcove to trigger the secret). Pressing the switch causes lights in the floor to appear, which should help you to navigate (although not very much) through the maze.
Trivia
- Since there are only Arch-Viles as enemies, this is the only level in The Plutonia Experiment, aside from MAP17: Compound, to not include any Revenants. Also, it is the only level to not have any Chaingunners to oppose you.
Screenshots
")
")
End of Level Message
Even the deadly Arch-Vile labyrinth could not stop you, and you've gotten to the prototype accelerator which is soon efficiently and permanently deactivated.
You're good at that kind of thing.
Speedrunning
Routes and tricks
It is possible to avoid the releasing of the Arch-Viles with a good timed opening. Use caution when pressing the first switch; as some of the Arch-Viles may try to attack you the moment the switch is pressed. This is more common with "Fast Monsters" enabled.
Records
The Compet-N records for the map are:
| Run | Time | Player | Date | File | Notes |
|---|---|---|---|---|---|
| UV speed | 00:49 | Marijo "Sedlo" Sedlic | 2004-02-05 | pl11-049.zip | |
| NM speed | 00:52 | Marijo "Sedlo" Sedlic | 2000-09-16 | pn11-052.zip | |
| UV max | 02:52 | Radek Pecka | 2002-03-28 | pl11-252.zip | |
| NM100S | 00:54 | Tamas Flamich | 2008-05-19 | ps11-054.zip | |
| UV -fast | 02:49 | Radek Pecka | 2002-03-28 | pf11-249.zip | |
| UV -respawn | 03:49 | Radek Pecka | 2002-03-28 | pr11-349.zip | |
| UV Tyson | 10:34 | Xit Vono | 2002-05-09 | pt111034.zip | |
| UV pacifist | 00:49 | Marijo "Sedlo" Sedlic | 2004-02-05 | pl11-049.zip |
Statistics
Map data
| Things | 138 |
| Vertices | 1507 |
| Linedefs | 1388 |
| Sidedefs | 1885 |
| Sectors | 109 |
Things
| Monsters | ITYTD and HNTR | HMP | UV and NM |
|---|---|---|---|
| Arch-Viles | 12 | 18 | 18 |
| Powerups | ITYTD and HNTR | HMP | UV and NM |
| Backpacks | 1 | 1 | 1 |
| Health bonuses | 15 | 15 | 15 |
| Berserks | 1 | 1 | 1 |
| Weapons | ITYTD and HNTR | HMP | UV and NM |
| BFG 9000s | 1 | 1 | 1 |
| Super shotguns | 1 | 1 | 1 |
| Ammunition | ITYTD and HNTR | HMP | UV and NM |
| Shells | 20 | 20 | 20 |
| Shell boxes | 7 | 7 | 7 |
| Keys | ITYTD and HNTR | HMP | UV and NM |
| Red skulls | 1 | 1 | 1 |
| Yellow skulls | 1 | 1 | 1 |
Trivia
The music soundtrack, "Sweet Little Dead Bunny", is also played during the end scene of Inferno. It is a particularly disturbing composition, beginning with a happy simple tune (depicting a background scene of a rabbit playing in Earth's peaceful green fields) that suddenly becomes grotesquely distorted (now showing a destroyed city being set ablaze and Daisy's decapitated head impaled on a stone spike), before segueing into a dark twelve-bar blues .