m (→Bugs: wikilinks, correct name for spectre for doom II) |
No edit summary |
||
| Line 21: | Line 21: | ||
===Bugs=== |
===Bugs=== |
||
| − | # In [[Versions of Doom and Doom II|versions]] of [[Doom II]] prior to [[Versions of Doom and Doom II#v1.9|1.9]], the [[Arachnotron]] that appears on [[Skill level#Doom and Doom II skill levels|Ultra-Violence]] near the left-side stairwell heading towards the blue-[[key]] room |
+ | # In [[Versions of Doom and Doom II|versions]] of [[Doom II]] prior to [[Versions of Doom and Doom II#v1.9|1.9]], the [[Arachnotron]] that appears on [[Skill level#Doom and Doom II skill levels|Ultra-Violence]] near the left-side stairwell heading towards the blue-[[key]] room is partially placed (i.e it's stuck) inside a tree, and hence does not move or attack. |
# Near the switch that activates the walkway leading to the red key platform, two [[Spectre]]s are immobile trapping another that is against the switch wall, which can be freed if the two stuck Spectres are killed. |
# Near the switch that activates the walkway leading to the red key platform, two [[Spectre]]s are immobile trapping another that is against the switch wall, which can be freed if the two stuck Spectres are killed. |
||
| Line 155: | Line 155: | ||
* [http://www.doom2.net/~compet-n/database/cn.cgi?map:doom2:11 MAP11 demos from the Compet-n database] |
* [http://www.doom2.net/~compet-n/database/cn.cgi?map:doom2:11 MAP11 demos from the Compet-n database] |
||
* [http://ian-albert.com/misc/doom2maps.php Top-down perspective view of all Doom II levels] by Ian Albert |
* [http://ian-albert.com/misc/doom2maps.php Top-down perspective view of all Doom II levels] by Ian Albert |
||
| − | |||
[[Category:Levels by name|Circle of Death (Doom II)]] |
[[Category:Levels by name|Circle of Death (Doom II)]] |
||
[[Category:John Romero levels]] |
[[Category:John Romero levels]] |
||
Revision as of 16:51, 5 April 2009
- This level occupies the map slot MAP11. For other maps which occupy this slot, see Category:MAP11.
Template:Doom II 1-11 MAP11: Circle of Death (the name 'O' of Destruction! is however shown on the automap) is the eleventh map of Doom II. It was designed by John Romero and uses the music track "The Healer Stalks". The automap name is a reference to the Hoe of Destruction in the Ultima series of games, of which Romero is a fan.
Strategy
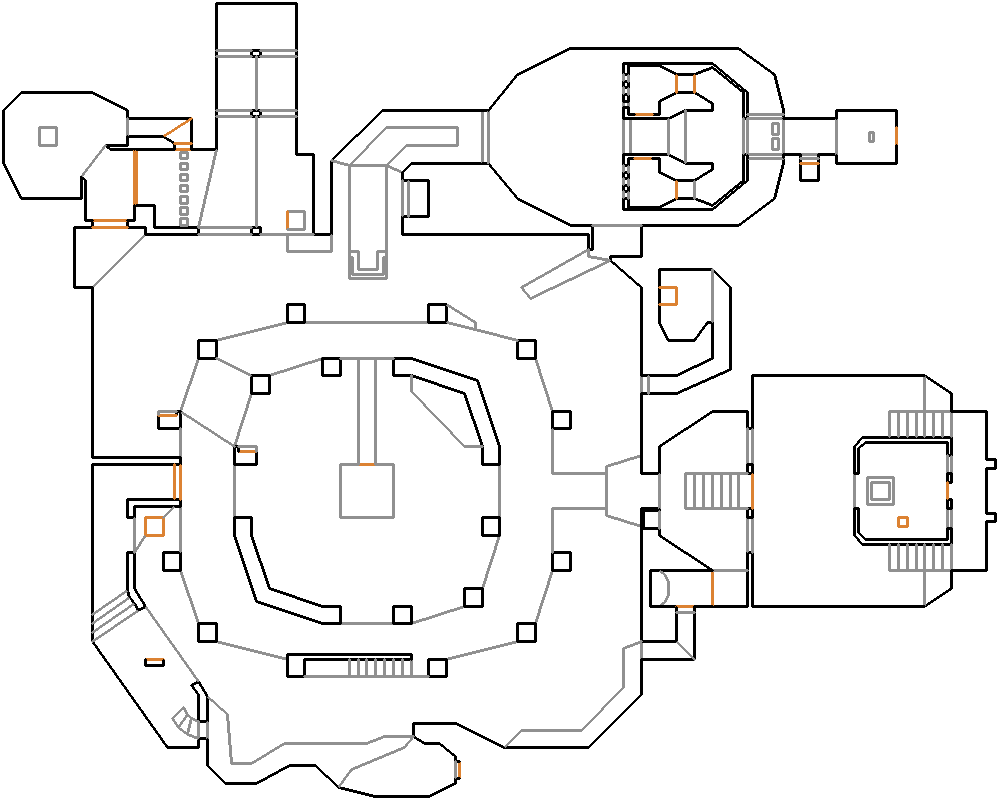
Map of MAP11
Walkthrough
Proceed along the walkway (A) to your right and take a right across the bridge into a rusty metal area. Climb the stairs and take out the arachnotrons and cacodemons that attack. Proceed up either staircase into the structure ahead of you. Once you pass through the doorway inside the structure, the first arch-vile of the game is released (B). Take cover behind either side of the door if needed. Once it's been killed, re-enter the room and pick up the blue keycard (C). Now return to the main area of the level.
Make your way along the walkway to the opposite end of the area and go through the blue door (D). Flip the switch to raise a ledge just outside (E). Continue through this room, up the small staircase, and along the newly risen ledge. Flip the satyr-faced switch and return to the main area once again. Continue along the walkway to the left about halfway, and across the newly created bridge to the red keycard (F).
Drop down into the slime to the northwest of the central circular walkway and head through the red door (G). Proceed through the hallway, towards the iron bars (which will automatically open), and up the stairs, arriving at a wooden skull switch. Flip it to lower a platform just outside. From the new platform, drop onto the cement walkway and continue along it, eventually dropping into a dark cave (H). Dispose of the flying enemies here and head through the brightly lit tunnel in the structure ahead. You should now be in a "E"-shaped watery room (I). Ride the lift in the upper prong of the "E" up to a switch. Press it, ride the lift back down, and run into the timed lift that just lowered in the lower prong of the "E". Press the switch there to open the gate to the exit switch (J). The teleport near the switch will take you back to the main area (on a ledge with an otherwise unreachable soul sphere, if you need it).
Secrets
- The first secret does not count towards the level's final score, but does contain an artifact. From the start, follow the path along to the right and take the next right through the doorway into a new area. You should be facing a set of stairs. Turn around, and look for the pool of blood on the ground to the left of the doorway you entered from (K). The wall behind the blood can be walked straight through in order to get the soul sphere behind it.
- From the secret above, turn back around and ascend the stairs. When you reach the top, a lift will lower back at the bottom of the stairs, along the south wall. Ride this lift up to a chaingun (L). To the left of the chaingun is a wall with pipes on it. Open this wall and follow the tunnel to the end, where you'll land on an otherwise unreachable platform with a blur sphere on it (M).
- After retrieving the blue keycard, return to the main area (the "O"). Along the eastern wall in the northern half of the nukage lake, a small opening will have opened. Go through and take the teleporter at the end to reach the Imp's platform (N).
- After passing through the red door, you'll go through a set of automatically-opening metal bars. The wall alongside the northernmost bar can be opened when the bars are opened. Take the passage out to the Hell Knight's cage, containing an invulnerability sphere (O).
Bugs
- In versions of Doom II prior to 1.9, the Arachnotron that appears on Ultra-Violence near the left-side stairwell heading towards the blue-key room is partially placed (i.e it's stuck) inside a tree, and hence does not move or attack.
- Near the switch that activates the walkway leading to the red key platform, two Spectres are immobile trapping another that is against the switch wall, which can be freed if the two stuck Spectres are killed.
Speedrunning
Routes and tricks
Records
The Compet-N records for the map are:
| Run | Time | Player | Date | File | Notes |
|---|---|---|---|---|---|
| UV speed | 00:34 | Ian Sabourin | 2001-12-07 | Template:Competnftp | |
| NM speed | 00:36 | Ian Sabourin | 2002-04-15 | Template:Competnftp | |
| UV max | 02:05 | Drew "stx-Vile" DeVore | 2003-03-29 | Template:Competnftp | |
| NM100S | 01:09 | Henning Skogsto | 1999-09-14 | Template:Competnftp | |
| UV -fast | 02:36 | Radek Pecka | 2002-03-06 | Template:Competnftp | |
| UV -respawn | 02:15 | Radek Pecka | 2002-03-06 | Template:Competnftp | |
| UV Tyson | 27:22 | Xit Vono | 2002-07-31 | Template:Competnftp | |
| UV pacifist | 00:47 | Radek Pecka | 2001-10-29 | Template:Competnftp |
Statistics
Map data
| Things | 238 |
| Vertices | 780 |
| Linedefs | 850 |
| Sidedefs | 1195 |
| Sectors | 143 |
Things
| Monsters | ITYTD and HNTR | HMP | UV and NM |
|---|---|---|---|
| Sergeants | 3 | 8 | 12 |
| Spectres | 1 | 5 | 12 |
| Imps | 7 | 12 | 13 |
| Demons | 0 | 1 | 1 |
| Troopers | 4 | 6 | 8 |
| Cacodemons | 1 | 6 | 10 |
| Lost Souls | 2 | 4 | 9 |
| Arch-Viles | 1 | 1 | 1 |
| Pain Elementals | 0 | 2 | 4 |
| Chaingunners | 1 | 3 | 4 |
| Revenants | 1 | 1 | 1 |
| Arachnotrons | 0 | 2 | 3 |
| Hell Knights | 0 | 2 | 2 |
| Powerups | ITYTD and HNTR | HMP | UV and NM |
| Backpacks | 1 | 1 | 1 |
| Stim packs | 14 | 14 | 14 |
| Medikits | 18 | 18 | 18 |
| Soul spheres | 2 | 2 | 2 |
| Health bonuses | 11 | 11 | 11 |
| Armor bonuses | 6 | 6 | 6 |
| Green armors | 1 | 1 | 1 |
| Blue armors | 1 | 1 | 1 |
| Invulnerabilities | 1 | 1 | 1 |
| Invisibilities | 1 | 1 | 1 |
| Radiation suits | 2 | 2 | 2 |
| Weapons | ITYTD and HNTR | HMP | UV and NM |
| Shotguns | 1 | 1 | 1 |
| Chainguns | 1 | 1 | 1 |
| Rocket launchers | 1 | 1 | 1 |
| Plasma guns | 1 | 1 | 1 |
| BFG 9000s | 1 | 1 | 1 |
| Ammunition | ITYTD and HNTR | HMP | UV and NM |
| Bulk Cells | 3 | 3 | 3 |
| Shells | 7 | 7 | 7 |
| Rocket boxes | 5 | 5 | 5 |
| Energy cells | 3 | 3 | 3 |
| Ammo boxes | 6 | 6 | 6 |
| Shell boxes | 3 | 3 | 3 |
| Keys | ITYTD and HNTR | HMP | UV and NM |
| Blue cards | 1 | 1 | 1 |
| Red cards | 1 | 1 | 1 |