No edit summary |
|||
| (35 intermediate revisions by 19 users not shown) | |||
| Line 1: | Line 1: | ||
| ⚫ | |||
{{map|slot=MAP07}} |
{{map|slot=MAP07}} |
||
| + | {{map|slot=MAP37}} |
||
| ⚫ | |||
| + | {{Infobox_Map|title = MAP07: Dead Simple|game = [[Doom II]]|map_number = 7|entry_from = [[MAP06: The Crusher (Doom II)|The Crusher]]|exits_to = [[MAP08: Tricks and Traps (Doom II)|Tricks and Traps]]}} |
||
| ⚫ | '''MAP07: Dead Simple (MAP37 in [[Sony PlayStation|PSX]]/[[Sega Saturn|Saturn]])''' is the seventh map of [[Doom II]]. It was designed by [[American McGee]] and [[Sandy Petersen]], uses the [[Doom II music|music]] track "Shawn's Got The Shotgun" and introduces two new enemies, the [[Mancubus]] and the [[Arachnotron]]. |
||
| ⚫ | |||
| − | ==Strategy== |
||
| ⚫ | |||
| ⚫ | |||
| ⚫ | Press the switch to lower the walls. Kill 2, 4 or 7 [[Mancubus|Mancubi]] you see and more walls will lower, revealing 4, 8 or 12 [[Arachnotron]]s (A). Kill them all and you will be able to end the level by pressing the eye switch in the middle of the map (B). Use the [[blur sphere]]s to avoid the monsters. |
||
| ⚫ | |||
| ⚫ | Press the switch to lower the walls. Kill 2,4 or 7 [[Mancubus|Mancubi]] you see and more walls will lower, revealing 4,8 or 12 [[Arachnotron]]s (A). Kill them all and you will be able to end the level by pressing the eye switch in the middle of the map (B). Use the [[blur sphere]]s to avoid the monsters. |
||
Before you exit, hit the switches in this room and the platforms the Mancubi were on will lower, revealing health and weapons. Also, get the [[ammo]] and [[health]] items in the areas where the Arachnotrons came from. Now go back to the center of the map and exit.[[File:Screenshot_Doom_20121125_002917_modified.png|thumb|A group of Mancubi.]] |
Before you exit, hit the switches in this room and the platforms the Mancubi were on will lower, revealing health and weapons. Also, get the [[ammo]] and [[health]] items in the areas where the Arachnotrons came from. Now go back to the center of the map and exit.[[File:Screenshot_Doom_20121125_002917_modified.png|thumb|A group of Mancubi.]] |
||
| Line 15: | Line 15: | ||
====Non-official==== |
====Non-official==== |
||
| − | # The northwest corner of the map has a secret alcove, housing a [[BFG9000]] and an [[energy cell pack]], along with another exit switch. In single-player or coop, it is inaccessible; it is only opened when a deathmatch player spawns in that location. This is usually discovered when a player uses the <tt>iddt</tt> or <tt>idclip</tt> [[cheat code]]s. If a player enters the region through noclip cheat, |
+ | # The northwest corner of the map has a secret alcove, housing a [[BFG9000]] and an [[energy cell pack]], along with another exit switch. In single-player or coop, it is inaccessible; it is only opened when a deathmatch player spawns in that location. This is usually discovered when a player uses the <tt>iddt</tt> or <tt>idclip</tt> [[cheat code]]s. If a player enters the region through the noclip cheat, the cheat can be disabled safely because the wall can be opened from inside. '''Note:''' this sector is the same one as the "secret" sector surrounding the open exit, due to the fact that sectors in Doom do not need to be contiguous. |
===Bugs=== |
===Bugs=== |
||
| Line 21: | Line 21: | ||
# Not really a bug, but more of a warning. If this level is played on Nightmare difficulty and/or with the <tt>-respawn</tt> parameter set, the arachnotrons that endlessly respawn may cause the stair step that surrounds the center exit to continuously rise each time all of them die, making the exit in the center inaccessible. |
# Not really a bug, but more of a warning. If this level is played on Nightmare difficulty and/or with the <tt>-respawn</tt> parameter set, the arachnotrons that endlessly respawn may cause the stair step that surrounds the center exit to continuously rise each time all of them die, making the exit in the center inaccessible. |
||
| − | == |
+ | == Trivia == |
| − | + | *Because the normal route through the map involves killing all of the monsters on the level, it was long believed that a [[UV pacifist]] run of this map was impossible. However, [[Drew "stx-Vile" DeVore]] proved this wrong in 2005 by releasing a {{External Link|site=competnftp|file_path=doom2/pacifist/pa07-041.zip|text=demo}} demonstrating that it is possible to complete the level if the player [[Rocket_jumping|propels himself to the exit switch with a rocket launcher]]. |
|
| − | + | *The alcove in the northwest corner contains a [[BFG9000]], a [[bulk cell]] and an additional exit switch (as the central exit is usually not reachable when using -nomonsters on deathmatch mode). However, this alcove is accessible only in [[deathmatch]] mode, after a player spawns inside and opens the door. |
|
| + | *The music for this level is inspired by the track "[[wikipedia:South_of_Heaven|South of Heaven]]" by [[wikipedia:Slayer|Slayer]]. |
||
| + | *There are actually 10 Backpacks in the starting room, placed in the same XY position, thus giving the illusion of a single backpack. |
||
| + | *The [[Doom (2016)|Doom reboot]] features a recreation of this level as a room in [[The Necropolis]], with almost the exact same level layout, as a tribute to Doom II. |
||
| + | *The 2015 Arena Shooter [[wikipedia:Toxikk|TOXIKK]] featured a map called "Cube" that is a direct copy of Dead Simple. |
||
==Speedrunning== |
==Speedrunning== |
||
| − | ===Routes and tricks=== |
||
| − | |||
===Records=== |
===Records=== |
||
The [[Compet-N]] records for the map are: |
The [[Compet-N]] records for the map are: |
||
| + | {| class="WikiaTable" |
||
| − | {| {{prettytable}} |
||
!Run||Time||Player||Date||File||Notes |
!Run||Time||Player||Date||File||Notes |
||
|- |
|- |
||
| − | |[[UV speed]]||00:06||[[Marijo "Sedlo" Sedlic]]||2002-05-01||{{competnftp|doom2/speed/lv07-006.zip|lv07-006.zip}}|| |
+ | |[[UV speed]]||00:06||[[Marijo "Sedlo" Sedlic]]||2002-05-01||{{External Link|site=competnftp|file_path=doom2/speed/lv07-006.zip|text=lv07-006.zip}}|| |
|- |
|- |
||
| − | |[[NM speed]]||00:48||[[Adam Hegyi]]||2001-11-26||{{competnftp|doom2/nmare/nm07-048.zip|nm07-048.zip}}|| |
+ | |[[NM speed]]||00:48||[[Adam Hegyi]]||2001-11-26||{{External Link|site=competnftp|file_path=doom2/nmare/nm07-048.zip|text=nm07-048.zip}}|| |
|- |
|- |
||
| − | |[[UV max]]||00:46||[[Adam Hegyi]]||2000-06-21||{{competnftp|doom2/max/lv07-046.zip|lv07-046.zip}}|| |
+ | |[[UV max]]||00:46||[[Adam Hegyi]]||2000-06-21||{{External Link|site=competnftp|file_path=doom2/max/lv07-046.zip|text=lv07-046.zip}}|| |
|- |
|- |
||
| − | |[[UV -fast]]||00:51||[[Adam Hegyi]]||1999-11-19||{{competnftp|doom2/fast/fa07-051.zip|fa07-051.zip}}|| |
+ | |[[UV -fast]]||00:51||[[Adam Hegyi]]||1999-11-19||{{External Link|site=competnftp|file_path=doom2/fast/fa07-051.zip|text=fa07-051.zip}}|| |
|- |
|- |
||
| − | |[[UV -respawn]]||00:48||[[Adam Hegyi]]||2000-03-21||{{competnftp|doom2/respawn/re07-048.zip|re07-048.zip}}|| |
+ | |[[UV -respawn]]||00:48||[[Adam Hegyi]]||2000-03-21||{{External Link|site=competnftp|file_path=doom2/respawn/re07-048.zip|text=re07-048.zip}}|| |
|- |
|- |
||
| − | |[[UV Tyson]]||07:12||[[Xit Vono]]||2003-04-02||{{competnftp|doom2/tyson/ty07-712.zip|ty07-712.zip}}|| |
+ | |[[UV Tyson]]||07:12||[[Xit Vono]]||2003-04-02||{{External Link|site=competnftp|file_path=doom2/tyson/ty07-712.zip|text=ty07-712.zip}}|| |
|- |
|- |
||
| − | |[[UV pacifist]]||00:41||[[Drew "stx-Vile" DeVore]]||2005-04-21|| {{competnftp|doom2/pacifist/pa07-041.zip|pa07-041.zip}}|| |
+ | |[[UV pacifist]]||00:41||[[Drew "stx-Vile" DeVore]]||2005-04-21|| {{External Link|site=competnftp|file_path=doom2/pacifist/pa07-041.zip|text=pa07-041.zip}}|| |
|} |
|} |
||
==Statistics== |
==Statistics== |
||
===Map data=== |
===Map data=== |
||
| + | {| class="WikiaTable" |
||
| − | {| {{prettytable}} |
||
|[[Things]]||98 |
|[[Things]]||98 |
||
|- |
|- |
||
| Line 63: | Line 65: | ||
===Things=== |
===Things=== |
||
| + | {| class="WikiaTable" |
||
| − | {| {{prettytable}} |
||
!Monsters||[[I'm Too Young To Die|ITYTD]] and [[Hey, Not Too Rough|HNTR]]||[[Hurt Me Plenty|HMP]]||[[Ultra-Violence|UV]] and [[Nightmare!|NM]] |
!Monsters||[[I'm Too Young To Die|ITYTD]] and [[Hey, Not Too Rough|HNTR]]||[[Hurt Me Plenty|HMP]]||[[Ultra-Violence|UV]] and [[Nightmare!|NM]] |
||
|- |
|- |
||
| Line 109: | Line 111: | ||
|- |
|- |
||
!Keys||ITYTD and HNTR||HMP||UV and NM |
!Keys||ITYTD and HNTR||HMP||UV and NM |
||
| − | |- |
||
|} |
|} |
||
| − | == |
+ | ==Video== |
| + | <gallery widths="500" position="center" hideaddbutton="true" spacing="small" bordersize="medium" captionalign="center"> |
||
| + | File:Doom II (1994) - MAP07 Dead Simple 4K 60FPS |
||
| + | </gallery> |
||
| + | |||
| + | == See also == |
||
* [[Tag 666]] |
* [[Tag 666]] |
||
* [[Tag 667]] |
* [[Tag 667]] |
||
| Line 119: | Line 125: | ||
* [http://www.doom2.net/~compet-n/database/cn.cgi?map:doom2:07 MAP07 demos from the Compet-n database] |
* [http://www.doom2.net/~compet-n/database/cn.cgi?map:doom2:07 MAP07 demos from the Compet-n database] |
||
* [http://ian-albert.com/misc/doom2maps.php Top-down perspective view of all Doom II levels] by Ian Albert |
* [http://ian-albert.com/misc/doom2maps.php Top-down perspective view of all Doom II levels] by Ian Albert |
||
| + | |||
| + | {{S-start}} |
||
| + | {{L-bef|before=[[MAP06: The Crusher (Doom II)|The Crusher]]}} |
||
| + | {{S-ttl|title=[[Doom II]] Level}} |
||
| + | {{L-aft|after=[[MAP08: Tricks and Traps (Doom II)|Tricks and Traps]]}} |
||
| + | {{S-end}} |
||
| + | |||
| ⚫ | |||
[[Category:Levels by name|Dead Simple (Doom II)]] |
[[Category:Levels by name|Dead Simple (Doom II)]] |
||
[[Category:American McGee levels]] |
[[Category:American McGee levels]] |
||
[[Category:Sandy Petersen levels]] |
[[Category:Sandy Petersen levels]] |
||
| + | [[Category:Doom II levels]] |
||
Revision as of 14:53, 28 June 2020
- This level occupies the map slot MAP07. For other maps which occupy this slot, see Category:MAP07.
- This level occupies the map slot MAP37. For other maps which occupy this slot, see Category:MAP37.
MAP07: Dead Simple (MAP37 in PSX/Saturn) is the seventh map of Doom II. It was designed by American McGee and Sandy Petersen, uses the music track "Shawn's Got The Shotgun" and introduces two new enemies, the Mancubus and the Arachnotron.
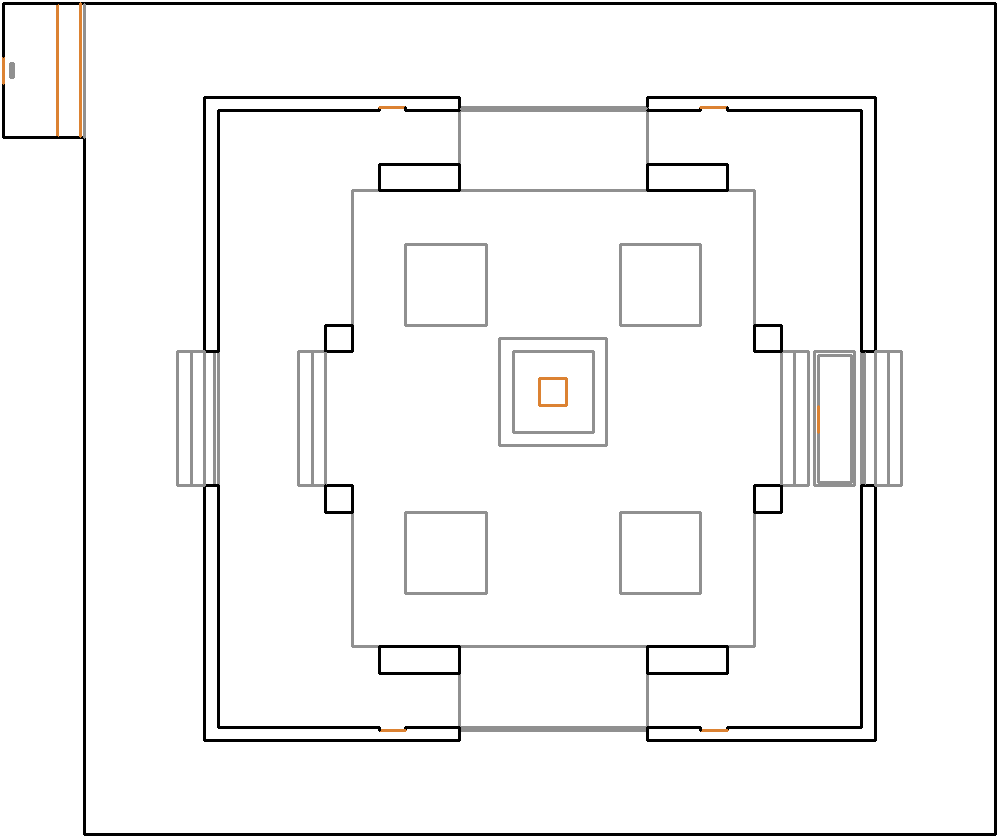
Map of MAP07
Walkthrough
Press the switch to lower the walls. Kill 2, 4 or 7 Mancubi you see and more walls will lower, revealing 4, 8 or 12 Arachnotrons (A). Kill them all and you will be able to end the level by pressing the eye switch in the middle of the map (B). Use the blur spheres to avoid the monsters.
Before you exit, hit the switches in this room and the platforms the Mancubi were on will lower, revealing health and weapons. Also, get the ammo and health items in the areas where the Arachnotrons came from. Now go back to the center of the map and exit.
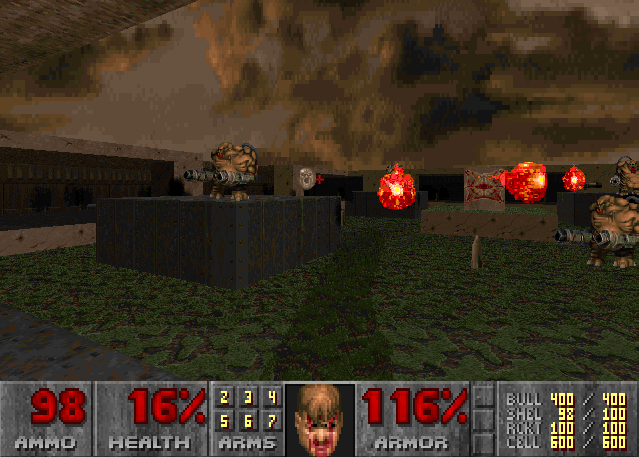
A group of Mancubi.
Secrets
Official
- The only secret in this level is the area surrounding the exit switch. Therefore, it is impossible to exit the level without triggering the secret.
Non-official
- The northwest corner of the map has a secret alcove, housing a BFG9000 and an energy cell pack, along with another exit switch. In single-player or coop, it is inaccessible; it is only opened when a deathmatch player spawns in that location. This is usually discovered when a player uses the iddt or idclip cheat codes. If a player enters the region through the noclip cheat, the cheat can be disabled safely because the wall can be opened from inside. Note: this sector is the same one as the "secret" sector surrounding the open exit, due to the fact that sectors in Doom do not need to be contiguous.
Bugs
- A possible bug or warning that occurs is that if the last 2 arachnotrons die at the same time, it may cause the stair step surrounding the exit in the center to rise twice, making the exit in the center become seemingly inaccessible, but if this happens, you can still access the exit by running across from the lowered northwest or northeast platforms.
- Not really a bug, but more of a warning. If this level is played on Nightmare difficulty and/or with the -respawn parameter set, the arachnotrons that endlessly respawn may cause the stair step that surrounds the center exit to continuously rise each time all of them die, making the exit in the center inaccessible.
Trivia
- Because the normal route through the map involves killing all of the monsters on the level, it was long believed that a UV pacifist run of this map was impossible. However, Drew "stx-Vile" DeVore proved this wrong in 2005 by releasing a demo demonstrating that it is possible to complete the level if the player propels himself to the exit switch with a rocket launcher.
- The alcove in the northwest corner contains a BFG9000, a bulk cell and an additional exit switch (as the central exit is usually not reachable when using -nomonsters on deathmatch mode). However, this alcove is accessible only in deathmatch mode, after a player spawns inside and opens the door.
- The music for this level is inspired by the track "South of Heaven" by Slayer.
- There are actually 10 Backpacks in the starting room, placed in the same XY position, thus giving the illusion of a single backpack.
- The Doom reboot features a recreation of this level as a room in The Necropolis, with almost the exact same level layout, as a tribute to Doom II.
- The 2015 Arena Shooter TOXIKK featured a map called "Cube" that is a direct copy of Dead Simple.
Speedrunning
Records
The Compet-N records for the map are:
| Run | Time | Player | Date | File | Notes |
|---|---|---|---|---|---|
| UV speed | 00:06 | Marijo "Sedlo" Sedlic | 2002-05-01 | lv07-006.zip | |
| NM speed | 00:48 | Adam Hegyi | 2001-11-26 | nm07-048.zip | |
| UV max | 00:46 | Adam Hegyi | 2000-06-21 | lv07-046.zip | |
| UV -fast | 00:51 | Adam Hegyi | 1999-11-19 | fa07-051.zip | |
| UV -respawn | 00:48 | Adam Hegyi | 2000-03-21 | re07-048.zip | |
| UV Tyson | 07:12 | Xit Vono | 2003-04-02 | ty07-712.zip | |
| UV pacifist | 00:41 | Drew "stx-Vile" DeVore | 2005-04-21 | pa07-041.zip |
Statistics
Map data
| Things | 98 |
| Vertices | 195 |
| Linedefs | 188 |
| Sidedefs | 283 |
| Sectors | 29 |
Things
| Monsters | ITYTD and HNTR | HMP | UV and NM |
|---|---|---|---|
| Mancubi | 2 | 4 | 7 |
| Arachnotrons | 4 | 8 | 12 |
| Powerups | ITYTD and HNTR | HMP | UV and NM |
| Backpacks | 10 | 10 | 10 |
| Medikits | 4 | 4 | 4 |
| Berserks | 1 | 1 | 1 |
| Invisibilities | 4 | 4 | 4 |
| Megasphere | 1 | 1 | 1 |
| Weapons | ITYTD and HNTR | HMP | UV and NM |
| Chainguns | 1 | 1 | 1 |
| Rocket launchers | 1 | 1 | 1 |
| Plasma guns | 1 | 1 | 1 |
| BFG 9000s | 1 | 1 | 1 |
| Super shotguns | 1 | 1 | 1 |
| Ammunition | ITYTD and HNTR | HMP | UV and NM |
| Bulk Cells | 1 | 1 | 1 |
| Ammo clips | 2 | 2 | 2 |
| Rockets | 13 | 13 | 13 |
| Energy cells | 4 | 4 | 4 |
| Ammo boxes | 4 | 4 | 4 |
| Shell boxes | 8 | 8 | 8 |
| Keys | ITYTD and HNTR | HMP | UV and NM |
Video
 - MAP07 Dead Simple 4K 60FPS (12 KB)")
See also
External links
- MAP07 demos from the Compet-n database
- Top-down perspective view of all Doom II levels by Ian Albert
| Entry from The Crusher |
Doom II Level | Exit to Tricks and Traps |