m (clean up) |
|||
| (19 intermediate revisions by 8 users not shown) | |||
| Line 1: | Line 1: | ||
{{map|slot=MAP06}} |
{{map|slot=MAP06}} |
||
| ⚫ | |||
| ⚫ | |||
| ⚫ | |||
== Walkthrough == |
== Walkthrough == |
||
| − | [[ |
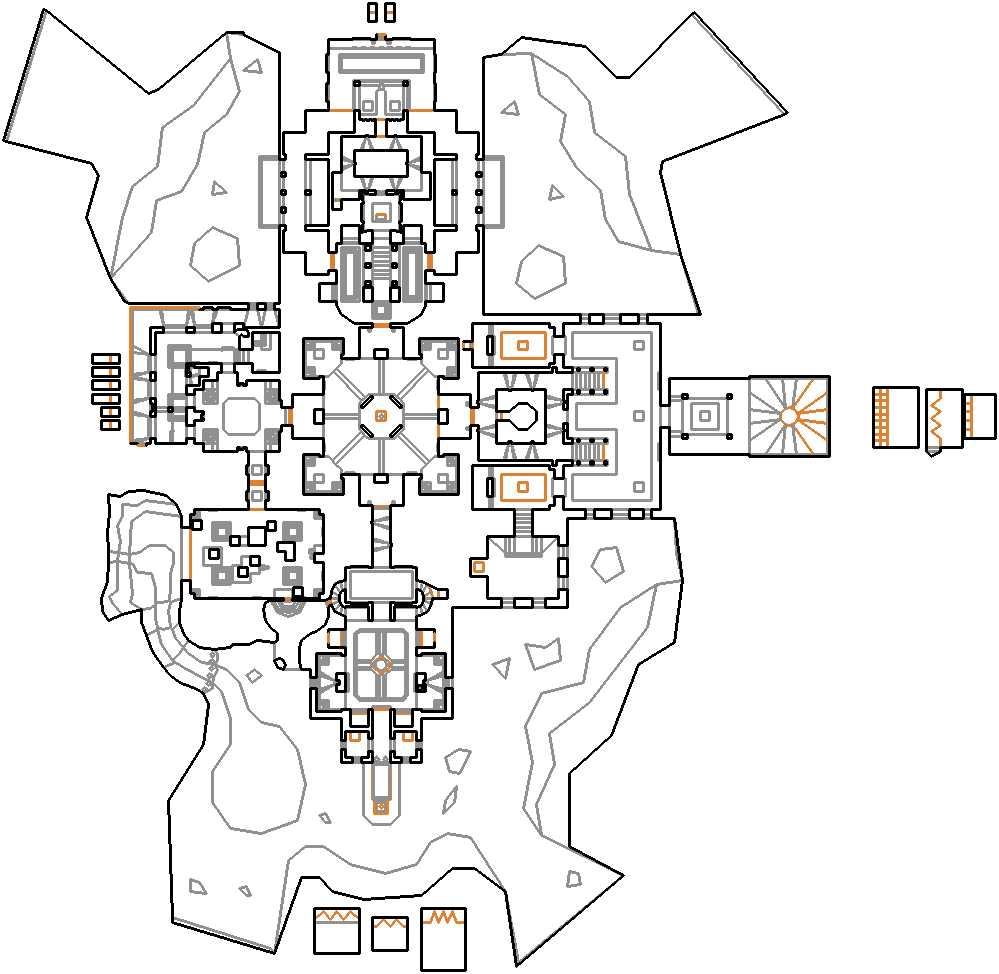
+ | [[file:PL2_MAP06_map.png|thumb|300px|Map of MAP06]] |
| − | : Letters in ''italics'' refer to marked spots on the map. |
+ | : Letters in ''italics'' refer to marked spots on the map. [[Sector]] numbers in '''boldface''' are [[secrets]] which count toward the [[Intermission screen|end-of-level tally]]. |
| − | |||
| − | ===Essentials=== |
||
| − | |||
| − | ===Other points of interest=== |
||
===Secrets=== |
===Secrets=== |
||
| − | + | # In the red door section, after getting the blue key, in the southwestern corner of the corridor where the [[chaingunner]]s came out, use the southern wall to reveal a secret niche containing a [[blue armor]]. |
|
| + | # After entering the blue door, take any of the two corridors and descent the stairs. As you leave the last step, a secret room across the blue door opens temporarily. There are a [[bulk cell]], a [[box of rockets]], two [[medikit]]s, a [[soul sphere]] and a blue armor. |
||
| + | # After entering the blue door, take the left (northern) corridor, descent the stairs, make an hairpin turn to the left, enter the room with the teleporter and the monster hideout. Push the demon-faced wall to reveal a switch. Using it will open a stairway in the southern teleporter room that leads to a secret room, containing twelve [[health bonus]]es, 16 [[armor bonus]]es, two [[backpack]]s , two bulk cells and a teleporter to the map start. |
||
| + | # After passing the yellow door, on the narrow staircase on the right side of the room with the [[Hell knight]]s, push the wall with the lantern on it to reveal a secret room, containing three rocket boxes, two [[energy cell]]s, a bulk cell and an [[Partial invisibility|invisibility sphere]]. Push the face on top of the stairs at the northern wall to access to the [[megasphere]] you saw in the crate depot early in the level. |
||
| + | # On the opposite narrow staircase, using the corresponding wall will reveal a teleporter to the [[BFG9000]] standing on the pillar in the centre of the main room. |
||
===Bugs=== |
===Bugs=== |
||
| + | # In Secret #3 ([[sector]] 413) the two [[armor bonus]]es northwest and southwest ([[thing]]s 795 and 796) of the teleporter (sector 449) cannot be picked up without using the <tt>idclip</tt> [[Doom cheat codes#Doom II and Final Doom|noclip cheat code]]. |
||
| − | |||
| + | # For the same reason, some armor bonuses in the teleporter rooms (sector 395) west and east of the hallway exiting the [[BFG9000]] room cannot be picked up. |
||
| − | ===Demo files=== |
||
| + | # In the south of the BFG-9000 room, there are two alcoves each on the western and eastern side of the exiting hallway, each containing two armor bonuses that are not tagged as multiplayer only. Those alcoves can only be accessed in deathmatch mode, using the <tt>idclip</tt> cheat or by using a [[source port]] that allows jumping. |
||
| − | |||
| − | == Areas / screenshots == |
||
| − | |||
| − | == Speedrunning == |
||
| − | |||
| − | ===Routes and tricks=== |
||
| − | |||
| − | ===Current records=== |
||
| − | |||
| − | ===Miscellaneous demos=== |
||
| − | |||
| − | == Deathmatch == |
||
== Statistics == |
== Statistics == |
||
| − | |||
| − | ===Map data=== |
||
===Things=== |
===Things=== |
||
| + | {| class="WikiaTable" |
||
| − | |||
| + | |- |
||
| − | == Technical information == |
||
| + | ![[Monster]]s||[[I'm Too Young To Die|ITYTD]] and [[Hey, Not Too Rough|HNTR]]||[[Hurt Me Plenty|HMP]]||[[Ultra-Violence|UV]] and [[Nightmare!|NM]] |
||
| − | |||
| + | |- |
||
| − | == Inspiration and development == |
||
| + | |[[Shotgun guy|Sergeants]]||7||11||15 |
||
| + | |- |
||
| + | |[[Zombieman|Troopers]]||6||2||2 |
||
| + | |- |
||
| + | |[[Heavy weapon dude|Chaingunners]]||11||33||54 |
||
| + | |- |
||
| + | |[[Pain elemental]]s||2||2||6 |
||
| + | |- |
||
| + | |[[Cyberdemon]]s||0||0||1 |
||
| + | |- |
||
| + | |[[Arch-vile]]s||1||3||2 |
||
| + | |- |
||
| + | |[[Demon]]s||22||23||26 |
||
| + | |- |
||
| + | |[[Spectre]]s||6||4||10 |
||
| + | |- |
||
| + | |[[Imp]]s||39||56||71 |
||
| + | |- |
||
| + | |[[Cacodemon]]s||4||12||16 |
||
| + | |- |
||
| + | |[[Hell knight]]s||5||9||17 |
||
| + | |- |
||
| + | |[[Baron of hell|Barons of hell]]||2||5||9 |
||
| + | |- |
||
| + | |[[Revenant]]s||18||31||54 |
||
| + | |- |
||
| + | |[[Arachnotron]]s||3||2||4 |
||
| + | |- |
||
| + | |[[Mancubus|Mancubi]]||4||10||16 |
||
| + | |- |
||
| + | ![[Weapon]]s||ITYTD and HNTR||HMP||UV and NM |
||
| + | |- |
||
| + | |[[Shotgun]]s||2||2||2 |
||
| + | |- |
||
| + | |[[Super shotgun]]s||1||1||1 |
||
| + | |- |
||
| + | |[[Chaingun]]s||2||2||2 |
||
| + | |- |
||
| + | |[[Rocket launcher]]s||1||1||1 |
||
| + | |- |
||
| + | |[[Plasma gun]]s||1||1||1 |
||
| + | |- |
||
| + | |[[BFG9000]]s||1||1||1 |
||
| + | |- |
||
| + | ![[Ammo|Ammunition]]||ITYTD and HNTR||HMP||UV and NM |
||
| + | |- |
||
| + | |[[Box of bullets|Bullet boxes]]||6||6||6 |
||
| + | |- |
||
| + | |[[4 shotgun shells|Shells]]||28||28||28 |
||
| + | |- |
||
| + | |[[Box of shotgun shells|Shell boxes]]||14||14||14 |
||
| + | |- |
||
| + | |[[Box of rockets|Rocket boxes]]||26||26||26 |
||
| + | |- |
||
| + | |[[Energy cell]]s||14||14||14 |
||
| + | |- |
||
| + | |[[Energy cell pack|Bulk cells]]||5||5||5 |
||
| + | |- |
||
| + | ![[Item|Powerups]]||ITYTD and HNTR||HMP||UV and NM |
||
| + | |- |
||
| + | |[[Backpack]]s||3||3||3 |
||
| + | |- |
||
| + | |[[Berserk]]s||1||1||1 |
||
| + | |- |
||
| + | |[[Medikit]]s||35||35||35 |
||
| + | |- |
||
| + | |[[Stimpack]]s||34||34||34 |
||
| + | |- |
||
| + | |[[Health bonus]]es||72||72||72 |
||
| + | |- |
||
| + | |[[Supercharge|Soul spheres]]||1||1||1 |
||
| + | |- |
||
| + | |[[Megasphere]]s||1||1||1 |
||
| + | |- |
||
| + | |[[Armor|Green armors]]||1||1||1 |
||
| + | |- |
||
| + | |[[Megaarmor|Blue armors]]||2||2||2 |
||
| + | |- |
||
| + | |[[Armor bonus]]es||64||64||64 |
||
| + | |- |
||
| + | |[[Partial invisibility|Invisibilities]]||1||1||1 |
||
| + | |- |
||
| + | ![[Key]]s||ITYTD and HNTR||HMP||UV and NM |
||
| + | |- |
||
| + | |[[Blue skull]]s||1||1||1 |
||
| + | |- |
||
| + | |[[Yellow skull]]s||1||1||1 |
||
| + | |- |
||
| + | |[[Red skull]]s||1||1||1 |
||
| + | |- |
||
| + | ![[Barrel]]s||ITYTD and HNTR||HMP||UV and NM |
||
| + | |- |
||
| + | |[[Barrel|Exploding barrels]]||15||15||15 |
||
| + | |} |
||
== Trivia == |
== Trivia == |
||
*During development this map was called '''Complex'''. |
*During development this map was called '''Complex'''. |
||
| + | *This map shares three commonalities with its predecessor, [[MAP06: Baron's Lair]] of [[The Plutonia Experiment]]: both levels (1) are arranged with the player starting in a central "hub" sector surrounded by four doors leading to surrounding sectors, (2) use the music track "Sign of Evil" from the Classic Doom soundtrack, and (3) mark the player's first encounter with a [[Cyberdemon]] in the episode. ''Note that this last commonality is only the case on the [[UV]] and [[NM]] skill levels. When playing on [[HMP]] the player will encounter the Cyberdemon for the first time in [[MAP14: Charon Eclipse (Plutonia 2)|MAP14: Charon Eclipse]], and players who play on [[ITYTD]] or [[HNTR]] will not mark their first encounter with a Cyberdemon until [[MAP17: Nuclear Horror (Plutonia 2)|MAP17: Nuclear Horror]], or until the secret levels.'' |
||
| ⚫ | |||
| − | == See also == |
||
| − | |||
| − | == Sources == |
||
| − | |||
| − | == External links == |
||
[[Category:Levels by name|Collider Complex (Plutonia 2)]] |
[[Category:Levels by name|Collider Complex (Plutonia 2)]] |
||
Revision as of 06:37, 14 December 2019
- This level occupies the map slot MAP06. For other maps which occupy this slot, see Category:MAP06.
MAP06: Collider Complex is the sixth map of Plutonia 2. It was designed by Sam Woodman and Vincent Catalaá, and uses the music track "Sign of Evil" by Robert Prince.
Walkthrough
Map of MAP06
- Letters in italics refer to marked spots on the map. Sector numbers in boldface are secrets which count toward the end-of-level tally.
Secrets
- In the red door section, after getting the blue key, in the southwestern corner of the corridor where the chaingunners came out, use the southern wall to reveal a secret niche containing a blue armor.
- After entering the blue door, take any of the two corridors and descent the stairs. As you leave the last step, a secret room across the blue door opens temporarily. There are a bulk cell, a box of rockets, two medikits, a soul sphere and a blue armor.
- After entering the blue door, take the left (northern) corridor, descent the stairs, make an hairpin turn to the left, enter the room with the teleporter and the monster hideout. Push the demon-faced wall to reveal a switch. Using it will open a stairway in the southern teleporter room that leads to a secret room, containing twelve health bonuses, 16 armor bonuses, two backpacks , two bulk cells and a teleporter to the map start.
- After passing the yellow door, on the narrow staircase on the right side of the room with the Hell knights, push the wall with the lantern on it to reveal a secret room, containing three rocket boxes, two energy cells, a bulk cell and an invisibility sphere. Push the face on top of the stairs at the northern wall to access to the megasphere you saw in the crate depot early in the level.
- On the opposite narrow staircase, using the corresponding wall will reveal a teleporter to the BFG9000 standing on the pillar in the centre of the main room.
Bugs
- In Secret #3 (sector 413) the two armor bonuses northwest and southwest (things 795 and 796) of the teleporter (sector 449) cannot be picked up without using the idclip noclip cheat code.
- For the same reason, some armor bonuses in the teleporter rooms (sector 395) west and east of the hallway exiting the BFG9000 room cannot be picked up.
- In the south of the BFG-9000 room, there are two alcoves each on the western and eastern side of the exiting hallway, each containing two armor bonuses that are not tagged as multiplayer only. Those alcoves can only be accessed in deathmatch mode, using the idclip cheat or by using a source port that allows jumping.
Statistics
Things
Trivia
- During development this map was called Complex.
- This map shares three commonalities with its predecessor, MAP06: Baron's Lair of The Plutonia Experiment: both levels (1) are arranged with the player starting in a central "hub" sector surrounded by four doors leading to surrounding sectors, (2) use the music track "Sign of Evil" from the Classic Doom soundtrack, and (3) mark the player's first encounter with a Cyberdemon in the episode. Note that this last commonality is only the case on the UV and NM skill levels. When playing on HMP the player will encounter the Cyberdemon for the first time in MAP14: Charon Eclipse, and players who play on ITYTD or HNTR will not mark their first encounter with a Cyberdemon until MAP17: Nuclear Horror, or until the secret levels.