- This level occupies the map slot MAP04. For other maps which occupy this slot, see Category:MAP04.
MAP04: The Stand is the fourth map of Memento Mori. It was designed by Jens Nielsen, and uses the music track "Scary 1" by Mark Klem. Although designed for cooperative multiplayer gameplay, a switch at the beginning of the level allows it to be completed in single player gameplay as well.
Description[]
According to Memento Mori info pack:
Watch those corners guys :) Work together guys and it will be a walk in the park. You need to work together to get the fanciest of the secrets.
Walkthrough[]

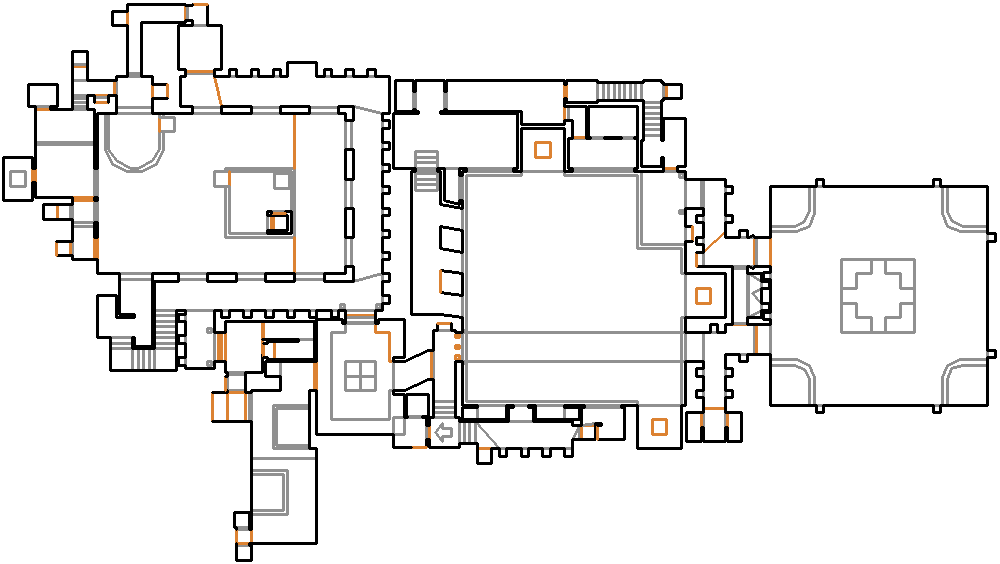
Map of MAP04
- Letters in italics refer to marked spots on the map. Sector numbers in boldface are secrets which count toward the end-of-level tally.
Essentials[]
- Single player:
Flip the switch behind you. Open the door to the south, and go down the southwest stairway. Enter the western opening, and flip the switch when it is revealed. Get on the eastern lift before it rises, and flip the switch in the southeast corner. Go to the northwest lift before it rises. Open the northern door, and enter the teleporter inside the hallway. Open the eastern door, and walk out to reveal a passage in the northeast. Walk (not run) into the alcove to grab the blue key, and open the eastern door. Backtrack to the blue door, go through it, and enter the eastern hall.
Open the wall the arrow on the floor is pointing to, and flip the switch. Take the lift up, and open the west door. Go to the end of the hallway, and flip the switch. Go back to the entrance into the hallway, and grab the red key. Reenter the eastern hallway, and take the southern teleporter. Go east, open the door, head down the stairs, lower the southern wall, and flip the switch south of the door. Open the next door, and grab the yellow key at the center of the next room. Head out through the southern door, and use one of the teleporters around the slime pit. Return through the blue door, and open the yellow door in the southwest.
Upon entering, the entire room will turn dark. Flip the eastern switch, and go through the northeast opening. At the end of the hall, flip the switch. Exit the hall, and press the eastern switch again. Enter the southern alcove and hit the switch.
- Cooperative multiplayer:
(To be written eventually...)
Secrets[]
Official[]
- In the room south of the blue keycard, open the northern wall's western part with pipes on it to reveal a secret alcove (sector 99) containing a box of shotgun shells, a box of bullets and two medikits. On hard skill levels, there is also a spectre.
- Upon grabbing the blue key, open the wall with the lightning bolt on it to reveal a secret compartment (sector 107) with a blue armor.
- The mandatory room accessed from the wall the arrow on the floor is pointing to in the blue key-accessed hallway counts as a secret (sector 138). It contains a spectre on hard skill levels. Using the switch lowers a lift that is part of the southeastern wall in the room south of the blue door. Simultaneously that room's northeastern wall with a soul sphere on it is lowered as a lift. So right after using the switch, do not ride the lift up. Instead quickly backtrack to that room to get the soul sphere before that lift raises again. Stepping on the lift opens secret #3's northern wall, revealing a medikit and - skill dependent - none, one or two sergeants.
- At the switch that lowers the platform the red keycard is on, open the southern wall with the lightning bolt on it to reveal a compartment (sector 158) containing a backpack (and a chaingunner on medium and hard skills). Simultaneously the wall across opens, revealing another compartment with a berserk pack (and a chaingunner on hard skills). Only the one with the backpack counts as a secret.
- From secret #3, ascend the stairs to the east and use the teleporter. Exit the room you land in and ascend the stairs to the south to find a skull switch. Flip it, descend the stairs and enter the passage to the east. Pass the gray steel door and descend the stairs. Approaching the switch that lowered the red keycard in secret #4 opened the teleporter in front of you. (In case it is still closed, you have to use one of the teleporters in the slime pit.) Use it to return to the southern hallway to find that a wall has lowered to the east. Enter the lift to be taken down to a lookout point with a switch. Flip the switch, and backtrack to the room where you found the red keycard to find that a wall has lowered to the west. Step inside the alcove to lower it and to find a computer map and a blur artifact (sector 317). Press the skull switch to lower the northern wall, leading into the alcove where you will eventually find the exit. Ride the lift up and make an attack noise to attract the hell knight (easy and medium) or baron of hell (hard skills). Help him riding up the lift and kill him here (instead of later, when there is no place to dodge his attacks).
- Return to the north of the slime pit and press on the wooden wall south of the eastern, gray steel door mentioned in secret #5 to reveal a passageway (sector 200) to the northeastern battlement, as well as a set of shotgun shells, a green armor and two medikits.
Non-official[]
- From the blue keycards's alcove, look to the southeast, where you see a lightning bolt on the southern wall. Open this part of the wall to reveal a switch and use it. Open the eastern wall with pipes on it and return to the yard. Enter the passage in the south of the western wall to find a new compartment with a backpack. Use the switch inside and run to the yard's center to ride the lift up. To the south of the super shotgun is a new switch, use it to lower the plinth and grab the gun.
- After exiting the yellow keycard area through the yellow door, open the northern wall with the lightning bolt on it to reveal a shortcut to the entry of that area among a green armor and two stimpacks.
Bugs[]
- The yellow door leading to the map exit can repeatedly temporarily be opened from outside (Linedef 163, Action: 27 - DR Door (Yellow) Open Wait Close). If this door is manually permanently opened from inside (Linedef 166, Action: 103 - S1 Door Open Wait Stay, Tag 36) before the player triggers it to close permanently (Linedef 158, Action: 107 - WR Door Close Stay (fast), Tag 36) when entering the northern passage (opened by the skull switch), it cannot be opened anymore from inside. If this happened and if the skull switch in secret #5 has not been activated before (thus opening the wall south of the map exit switch), the player is unable to return to the rest of the map to collect remaining items.
Areas / screenshots[]
")
")
")
Speedrunning[]
Current records[]
The Compet-N records for the map are:
| Run | Time | Player | Date | File | Notes |
|---|---|---|---|---|---|
| UV speed | 02:35 | Casey Alvis | 2003-06-06 | mm04-235.zip | |
| NM speed | |||||
| UV max | 05:55 | Oyvind Stenhaug | 2003-05-28 | mm04-555.zip | |
| NM100S | |||||
| UV -fast | 07:01 | Oyvind Stenhaug | 2003-07-30 | mm04f701.zip | |
| UV -respawn | |||||
| UV Tyson | |||||
| UV pacifist |
Miscellaneous demos[]
| Run | Time | Player | Date | File | Notes |
|---|---|---|---|---|---|
| .zip |
Statistics[]
Map data[]
| Things | 329 |
| Vertices | 1200 |
| Linedefs | 1531 |
| Sidedefs | 2085 |
| Sectors | 322 |
Things[]
| Monsters | ITYTD and HNTR | HMP | UV and NM |
|---|---|---|---|
| Barons of hell | 0 | 0 | 4 |
| Cacodemons | 0 | 0 | 3 |
| Demons | 7 | 7 | 7 |
| Heavy weapon dudes | 1 | 12 | 15 |
| Hell knights | 5 | 11 | 18 |
| Imps | 30 | 39 | 32 |
| Shotgun guys | 20 | 37 | 42 |
| Spectres | 0 | 0 | 2 |
| Powerups | ITYTD and HNTR | HMP | UV and NM |
| Backpacks | 2 | 2 | 2 |
| Berserk packs | 1 | 1 | 1 |
| Blue armors | 1 | 1 | 1 |
| Computer maps | 1 | 1 | 1 |
| Green armors | 3 | 3 | 3 |
| Invisibilities | 1 | 1 | 1 |
| Medikits | 10 | 10 | 10 |
| Soul Spheres | 2 | 2 | 2 |
| Stimpacks | 26 | 26 | 26 |
| Weapons | ITYTD and HNTR | HMP | UV and NM |
| Chainsaws | 1 | 1 | 1 |
| Shotguns | 4 | 4 | 4 |
| Super shotguns | 1 | 1 | 1 |
| Chainguns | 1 | 1 | 1 |
| Ammunition | ITYTD and HNTR | HMP | UV and NM |
| Bullet boxes | 11 | 11 | 11 |
| 4 shotgun shells | 8 | 12 | 16 |
| Shell boxes | 5 | 5 | 5 |
| Keys | ITYTD and HNTR | HMP | UV and NM |
| Blue cards | 1 | 1 | 1 |
| Red cards | 1 | 1 | 1 |
| Yellow cards | 1 | 1 | 1 |