(Added 2 speedrunning tricks.) Tag: sourceedit |
(Don't forget, there ARE par times in Doom II maps!) Tag: sourceedit |
||
| Line 1: | Line 1: | ||
{{Doom II 1-10}} |
{{Doom II 1-10}} |
||
| − | '''MAP03: The Gantlet''' (also called '''The Gauntlet''') is the third map of [[Doom II]]. It was designed by [[American McGee]] and uses the [[Doom II music|music]] track "Countdown To Death". The new enemy [[Heavy weapon dude|chaingunner]], third and strongest type of hell-possessed human soldier, debuts in this map, only if played on skill 3, 4, or 5.. |
+ | '''MAP03: The Gantlet''' (also called '''The Gauntlet''') is the third map of [[Doom II]]. It was designed by [[American McGee]] and uses the [[Doom II music|music]] track "Countdown To Death". The par time is 2:00. The new enemy [[Heavy weapon dude|chaingunner]], third and strongest type of hell-possessed human soldier, debuts in this map, only if played on skill 3, 4, or 5.. |
==Strategy== |
==Strategy== |
||
Revision as of 20:35, 5 August 2017
Template:Doom II 1-10 MAP03: The Gantlet (also called The Gauntlet) is the third map of Doom II. It was designed by American McGee and uses the music track "Countdown To Death". The par time is 2:00. The new enemy chaingunner, third and strongest type of hell-possessed human soldier, debuts in this map, only if played on skill 3, 4, or 5..
Strategy
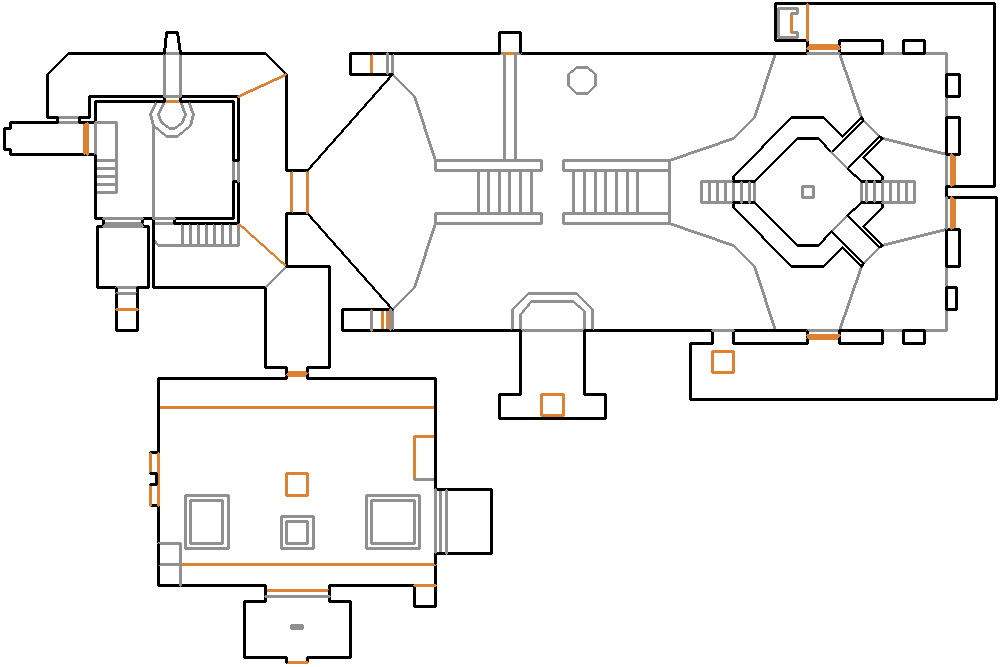
Map of MAP03
Walkthrough
Enter the door straight ahead of you at the start of the level (A). Go down the stairs and through the doorway at the bottom, then ascend another set of stairs (B). Follow the path left, along past the lift to the end. There is a small river of water crossing the path - follow it left to get a combat armor. Return to the lift you passed earlier and ride it up.
In the next area, go straight down some stairs (C), across the water, back up another set (D), and down some more into the structure, where a chaingun lies. Continue going forward, up yet another set of stairs, to get the blue key (E). Enter the blue door on the left and follow the corridor to its end, where a switch is found. Press the switch, which causes a bridge to rise in the water area, and exit through the blue door next to it (F). Go right, going down and then up the stairs again. On the far side, turn around and walk on the ledge to reach the bridge that rose. Cross it and go through the teleport (G).
In the next area, go through the door, then drop down into the grassy pit (H). Pick up the red keycard in the center (I). There are two switches on the west end of this pit. The left switch opens a room on the far end of the pit that contains some armor bonuses, but also releases several monsters (J). The right switch lowers a lift to the left that takes you up to the red door (K). Go through the red door to reach the exit switch.
Secrets
Official
- Upon reaching the watery outdoor area, you will find a "well" set against the southern wall of the southern pool. In order to get into the secret area, the player must run along the raised walkway which leads into the level's final teleporter. Alternatively, it is possible to straferun into the "well" from the stairway leading down into the water. If playing the game with a source port that allows jumping, the player can simply jump into the well (L).
Non-official
- After activating the bridge that leads to the unaccessible teleporter (G), return to the starting point (A), climb down the stairs (B) and turn left twice. Standing on the water spot the megaarmor is/was causes a panel containing several sergeants to open up on the ground level, right aside the (A) set of stairs. Take the teleporter inside it to grab the first backpack in the game. Alternative way: after activating the bridge, approach the secret "well" (L) described above, turn west and open the noticeably detached wall. This secret is not in the PlayStation and Saturn versions. It is not present in early PC versions of Doom II.
Bugs
- Linedefs 567 and 568 (the exit from the non-official secret listed above) are linked to linedefs 254 and 255. As a consequence, opening the door to the non-official secret also opens the leftmost blue door up the stairs, beyond the dark cellar.
Trivia
- Surprisingly, "gantlet" is not a misspelling of "gauntlet", but an old spelling thereof. Originally, a "gantlet" (from the Swedish for "lane") was a pair of lines of people between which someone being punished was forced to run whilst the people beat him with sticks, whilst a "gauntlet" (from the French) specifically meant a glove. The latter spelling came to replace the former. The "gantlet" spelling is still used for railway tracks in places where the way is not quite wide enough for two separate parallel tracks, so the two tracks are laid in such a way that they slightly overlap, although even in this usage it is being replaced by "gauntlet".[1]
Speedrunning
Routes and tricks
It is possible to straferun into the window where you can see behind the blue door. Alternatively, it is also possible to straferun using strafe 50 into the teleporter that takes you to the ledge, bypassing any use of the blue key.
Records
The Compet-N records for the map are:
| Run | Time | Player | Date | File | Notes |
|---|---|---|---|---|---|
| UV speed | 00:19 | Marijo "Sedlo" Sedlic | 2002-03-13 | Template:Competnftp | |
| NM speed | 00:25 | Henning Skogsto | 1999-10-02 | Template:Competnftp | |
| UV max | 01:19 | Radek Pecka | 2004-01-16 | Template:Competnftp | |
| NM100S | 00:36 | Frank "Jesus" Siebers | 1997-08-16 | Template:Competnftp | |
| UV -fast | 01:30 | Radek Pecka | 2003-01-26 | Template:Competnftp | |
| UV -respawn | 01:29 | Zvonimir Bužanić (fx) | 2000-09-05 | Template:Competnftp | |
| UV Tyson | 03:09 | Adam Williamson | 1999-07-11 | Template:Competnftp | |
| UV pacifist | 00:28 | Adam Williamson | 2003-02-16 | Template:Competnftp |
Statistics
Map data
| Things | 148 |
| Vertices | 544 |
| Linedefs | 594 |
| Sidedefs | 894 |
| Sectors | 121 |
Things
| Monsters | ITYTD and HNTR | HMP | UV and NM |
|---|---|---|---|
| Sergeants | 5 | 15 | 20 |
| Spectres | 2 | 3 | 4 |
| Imps | 9 | 16 | 22 |
| Demons | 4 | 7 | 8 |
| Troopers | 9 | 11 | 15 |
| Chaingunners | 0 | 4 | 9 |
| Powerups | ITYTD and HNTR | HMP | UV and NM |
| Backpacks | 1 | 1 | 1 |
| Medikits | 7 | 7 | 7 |
| Soul spheres | 1 | 1 | 1 |
| Armor bonuses | 7 | 7 | 7 |
| Blue armors | 2 | 2 | 2 |
| Invisibilities | 1 | 1 | 1 |
| Weapons | ITYTD and HNTR | HMP | UV and NM |
| Shotguns | 1 | 1 | 1 |
| Chainguns | 1 | 1 | 1 |
| Rocket launchers | 1 | 1 | 1 |
| Ammunition | ITYTD and HNTR | HMP | UV and NM |
| Bulk Cells | 1 | 1 | 1 |
| Shells | 2 | 2 | 2 |
| Ammo boxes | 2 | 2 | 2 |
| Shell boxes | 1 | 1 | 1 |
| Keys | ITYTD and HNTR | HMP | UV and NM |
| Blue cards | 1 | 1 | 1 |
| Red cards | 1 | 1 | 1 |
External links
- MAP03 demos from the Compet-n database
- Top-down perspective view of all Doom II levels by Ian Albert