m (Reverted edits by 61.1.194.191 (talk | block) to last version by Dravencour) Tag: rollback |
m (→Records: clean up) |
||
| (28 intermediate revisions by 12 users not shown) | |||
| Line 1: | Line 1: | ||
| ⚫ | |||
{{map|slot=MAP02}} |
{{map|slot=MAP02}} |
||
| + | {{map|slot=MAP32}} |
||
| ⚫ | |||
| − | ==Strategy== |
||
| ⚫ | |||
| ⚫ | |||
| − | You start on a platform across a narrow stream overlooking a raised platform with stairs (A), where three Zombiemen are facing away from you. There are two barriers on either side of the stream barring the way to two tunnels leading beyond. Kill the Zombiemen, travel across the stream, and then go up the stairs and open the door. There will be two more Zombiemen to deal with on either side of the door in the small room beyond. In the alcoves on either side of the room are Shotgun Guys guarding two switches. The alcove to the right has bars requiring a red key to open, but the alcove to the left doesn't have any bars. Kill the Shotgun Guy guarding the left switch and then hit it (if you don't feel like fighting the other Shotgun Guy once you get the key, you can kill him through the bars). |
||
| ⚫ | |||
| − | The left switch brings down the left barrier in the entrance room, allowing you to access the left tunnel. You will have 3-5 Zombiemen and Shotgun Guys to clear out with your new shotgun, including a Shotgun Guy in the alcove to your right, which has a Medkit. To the left further on down the tunnel is a set of stairs leading down to a door. This door leads to a room divided into two parts by a computer terminal. There will be a good number of Zombiemen and Shotgun Guys to deal with in this room, but at the end of the room behind the terminal is a [[Super Shotgun]]. |
||
| ⚫ | |||
| − | The left tunnel leads to a clearing with a walkway, a building and an opening to the sky (B). There will be a good number of Imps, Zombiemen and Shotgun Guys to deal with both inside and outside the building. Make sure to kill the Shotgun Guys through the smaller window to make things a little easier on you. Follow the walkway to the end where there is a window to the building, then jump through by running. Climb the stairs and then grab the red key. Grabbing the red key will open up two alcoves on either side of the walkway and disgorge a good number of Imps and a Demon to deal with. Kill them and go back down the tunnel. Another secret alcove will have opened on the opposite side of the stairway to the Super Shotgun room, where a medkit and four Shotgun Guys await. Deal with them and continue down the tunnel until you return to the entrance room. |
||
| ⚫ | |||
| + | From the start point, cross the water river, then turn right, go up the stairs, and open the door. You are in a room with two alcoves, the left one is open, press the switch to open up a barricade to the northeast of the water. Backtrack to the start, follow it east, then south, then west, until you come to a brick building. Go up the stairs, follow the ledge south until you come to the window, RUN to get inside the building, then turn right and go up the stairs, and then get the red key. Backtrack to the start, again go south and open the door, this time open the red bars to the right, kill the shotgunner, and press the switch. You should see a new barricade open to the west of the water. Follow it until you come to a barrel and a shotgunner. Turn right into a pool with more barrels and shotgunners. Fall down into the southwest hole, then follow it to the blue key. Open the door to the north of the river, and follow it north until you come to a blue door. Open the blue door, go up the stairs, then open the other blue door. Kill the shotgunners, and press the switch. |
||
| + | ===Other points of interest=== |
||
| − | It's a good chance that some of the Shotgun Guys from the building's small window will have teleported into the entrance room via the hidden teleporter in the room they were in, so you will most likely have to deal with one or two of them. Return to the switch room, open the red key bars (C), kill the other Shotgun Guy if you haven't already, and then hit the right switch to lower the barrier to the right tunnel outside. |
||
| + | There are several traps and monster-only teleporters that can roll in shotgunners and other enemies, and getting the red key opens up imps and demons. |
||
| − | Just like before, go down the right tunnel until you reach the end and kill any zombie that gets in your way. Both of the doors to the left and right of the tunnel require a blue key to open, and the one to the right has a staircase leading down and two barrels to either side. At the end of the tunnel, you will see a grey platform with a zombie and another barrel (D). Kill the zombie or blow the barrel and kill the zombie. |
||
| + | Near the middle of the east water river, is an alcove taking you to a door. Open it into a computer room with lots of zombiemen and shotgun guys to kill. On the other side is a [[super shotgun]]. |
||
| − | The next room (E) has two holes in the floor, a number of barrels, and a number of imps and zombies. If you position yourself just right, you can set off a chain reaction that will blow the barrels and kill everything in the room while leaving yourself unscathed. Once everything is dead, take the left-hand hole, which will drop you into a dark room filled with water and barrels. You will have to deal with more Imps, and in a dead-end tunnel to the left, more Imps and a Demon guard the blue key. You can either kill them all normally, or blow the barrels lining the tunnel to make things easier. |
||
| − | |||
| − | There will be an Imp almost right in your face when you open the door to the next room. Kill it, kill the Imp directly to the left, and then blow the barrels lining the tunnel to the blue key door to kill the rest of the monsters in your way. Pick up whatever health items you need, then go through the blue key door and up the stairs. The only door left is the blue door you passed earlier. Go through the door, kill the Shotgun Guys waiting for you, and then hit the exit switch (F). |
||
===Secrets=== |
===Secrets=== |
||
# At the top of the staircase inside the structure the red keycard is found in, open the west wall just west of the alcove the key was resting in. Behind this wall is a small room containing a few sergeants (G), a combat armor vest, and a teleport shortcut back to the start of the level. |
# At the top of the staircase inside the structure the red keycard is found in, open the west wall just west of the alcove the key was resting in. Behind this wall is a small room containing a few sergeants (G), a combat armor vest, and a teleport shortcut back to the start of the level. |
||
| − | # ''Secret exit <nowiki |
+ | # ''Secret exit [<nowiki/>[[Xbox]] version only]:'' after obtaining the red keycard, drop down, and enter the northeast chamber (H) that has just opened. Walk up to the narrow, stone wall in the northwest of this chamber (I), and press on it to be taken to the Xbox-exclusive secret level, [[MAP33: Betray (Doom II)|MAP33: Betray]]. The button that allows you to enter this level is active in the [[Doom 3 BFG Edition]] version of the map, however, it will simply take you back to the beginning of MAP02: Underhalls. |
===Bugs=== |
===Bugs=== |
||
| Line 31: | Line 26: | ||
==Trivia== |
==Trivia== |
||
| − | * In the first |
+ | * In the first versions of this map, the left alcove of the small room across the river from the start had bars closing it which needed to be opened by the Use key. These were removed from subsequent versions. |
* This level marks the first appearance of the Shotgun Guys in Doom II, and if you didn't get the secret shotgun in the last level, your first shotgun will likely come from the Sergeant you kill to get to the left switch. |
* This level marks the first appearance of the Shotgun Guys in Doom II, and if you didn't get the secret shotgun in the last level, your first shotgun will likely come from the Sergeant you kill to get to the left switch. |
||
| Line 37: | Line 32: | ||
===Routes and tricks=== |
===Routes and tricks=== |
||
| + | |||
| + | You can use a bar glide. In order to do so, get to the location of the water that you can see the brick building with the red key. Then run facing west. You will be behind the barricade opened by a switch behind the red door. However, you will be confined to the western portion of this map. Also it may take several tries. |
||
===Records=== |
===Records=== |
||
The [[Compet-N]] records for the map are: |
The [[Compet-N]] records for the map are: |
||
| + | {| class="WikiaTable" |
||
| − | {| {{prettytable}}="margin: 1em 1em 1em 0; background: #f9f9f9; border: 1px #aaa solid; border-collapse: collapse; font-size: 95%;" |
||
| − | !Run |
+ | !Run!!Time!!Player!!Date!!File!!Notes |
|- |
|- |
||
| − | |[[UV speed]]||00:40||[[Adam Williamson]]||2001-12-16||{{competnftp|doom2/speed/lv02-040.zip|lv02-040.zip}}|| |
+ | |[[UV speed]]||00:40||[[Adam Williamson]]||2001-12-16||{{External Link|site=competnftp|file_path=doom2/speed/lv02-040.zip|text=lv02-040.zip}}|| |
|- |
|- |
||
| − | |[[NM speed]]||00:45||[[Juho "ocelot" Ruohonen]]||2002-12-06||{{competnftp|doom2/nmare/nm02-045.zip|nm02-045.zip}}|| |
+ | |[[NM speed]]||00:45||[[Juho "ocelot" Ruohonen]]||2002-12-06||{{External Link|site=competnftp|file_path=doom2/nmare/nm02-045.zip|text=nm02-045.zip}}|| |
|- |
|- |
||
| − | |[[UV max]]||01:07||[[Radek Pecka]]||2004-01-15||{{competnftp|doom2/max/lv02-107.zip|lv02-107.zip}}|| |
+ | |[[UV max]]||01:07||[[Radek Pecka]]||2004-01-15||{{External Link|site=competnftp|file_path=doom2/max/lv02-107.zip|text=lv02-107.zip}}|| |
|- |
|- |
||
| − | |[[NM100S]]||00:45||[[Juho "ocelot" Ruohonen]]||2002-12-06||{{competnftp|doom2/nmare/nm02-045.zip|nm02-045.zip}}|| |
+ | |[[NM100S]]||00:45||[[Juho "ocelot" Ruohonen]]||2002-12-06||{{External Link|site=competnftp|file_path=doom2/nmare/nm02-045.zip|text=nm02-045.zip}}|| |
|- |
|- |
||
| − | |[[UV -fast]]||01:30||[[Radek Pecka]]||2003-01-26||{{competnftp|doom2/fast/fa02-130.zip|fa02-130.zip}}|| |
+ | |[[UV -fast]]||01:30||[[Radek Pecka]]||2003-01-26||{{External Link|site=competnftp|file_path=doom2/fast/fa02-130.zip|text=fa02-130.zip}}|| |
|- |
|- |
||
| − | |[[UV -respawn]]||01:10||[[Radek Pecka]]||2003-01-01||{{competnftp|doom2/respawn/re02-110.zip|re02-110.zip}}|| |
+ | |[[UV -respawn]]||01:10||[[Radek Pecka]]||2003-01-01||{{External Link|site=competnftp|file_path=doom2/respawn/re02-110.zip|text=re02-110.zip}}|| |
|- |
|- |
||
| − | |[[UV Tyson]]||03:19||[[Radek Pecka]]||2003-12-21||{{competnftp|doom2/tyson/ty02-319.zip|ty02-319.zip}}|| |
+ | |[[UV Tyson]]||03:19||[[Radek Pecka]]||2003-12-21||{{External Link|site=competnftp|file_path=doom2/tyson/ty02-319.zip|text=ty02-319.zip}}|| |
|- |
|- |
||
| − | |[[UV pacifist]]|| || || || || |
+ | |[[UV pacifist]]|| 21:26 || Zero Master || 2017-09-08 || https://www.youtube.com/watch?v=tReY9gbSOV8 || |
|} |
|} |
||
==Statistics== |
==Statistics== |
||
===Map data=== |
===Map data=== |
||
| + | {| class="WikiaTable" |
||
| − | {| {{prettytable}}="margin: 1em 1em 1em 0; background: #f9f9f9; border: 1px #aaa solid; border-collapse: collapse; font-size: 95%;" |
||
|[[Things]]||173 |
|[[Things]]||173 |
||
|- |
|- |
||
| Line 75: | Line 72: | ||
===Things=== |
===Things=== |
||
| + | {| class="WikiaTable" |
||
| − | {| {{prettytable}}="margin: 1em 1em 1em 0; background: #f9f9f9; border: 1px #aaa solid; border-collapse: collapse; font-size: 95%;" |
||
!Monsters||[[I'm Too Young To Die|ITYTD]] and [[Hey, Not Too Rough|HNTR]]||[[Hurt Me Plenty|HMP]]||[[Ultra-Violence|UV]] and [[Nightmare!|NM]] |
!Monsters||[[I'm Too Young To Die|ITYTD]] and [[Hey, Not Too Rough|HNTR]]||[[Hurt Me Plenty|HMP]]||[[Ultra-Violence|UV]] and [[Nightmare!|NM]] |
||
|- |
|- |
||
| Line 115: | Line 112: | ||
|- |
|- |
||
|[[Exploding barrel]]s||18||18||18 |
|[[Exploding barrel]]s||18||18||18 |
||
| ⚫ | |||
|} |
|} |
||
| + | |||
| + | ==Video== |
||
| + | <gallery widths="500" position="center" hideaddbutton="true" spacing="small" bordersize="medium" captionalign="center"> |
||
| + | File:Doom II (1994) - MAP02 Underhalls 4K 60FPS |
||
| + | </gallery> |
||
| + | |||
| + | ==Trivia== |
||
| + | The music for this level is inspired by "[[Wikipedia:Elements (Atheist album)#Track listing|Samba Briza]]" by [[Wikipedia:Atheist (band)|Atheist]]. |
||
| + | |||
| + | A [[Shotgun guy|Shotgun Guy]] next to an explosive barrel appears to be stuck and can't move, only walk in place. |
||
==External links== |
==External links== |
||
* [http://www.doom2.net/~compet-n/database/cn.cgi?map:doom2:02 MAP02 demos from the Compet-n database] |
* [http://www.doom2.net/~compet-n/database/cn.cgi?map:doom2:02 MAP02 demos from the Compet-n database] |
||
* [http://ian-albert.com/misc/doom2maps.php Top-down perspective view of all Doom II levels] by Ian Albert |
* [http://ian-albert.com/misc/doom2maps.php Top-down perspective view of all Doom II levels] by Ian Albert |
||
| + | |||
| + | {{S-start}} |
||
| + | {{L-bef|rows=3|before=[[MAP01: Entryway (Doom II)|Entryway]]}} |
||
| + | {{S-ttl|title=[[Doom II]] Level}} |
||
| + | {{L-aft|after=[[MAP03: The Gantlet (Doom II)|The Gantlet]]}} |
||
| ⚫ | |||
| + | {{S-ttl|rows=2|title=[[Xbox]] [[Doom II]] Level}} |
||
| + | {{L-aft|after=[[MAP03: The Gantlet (Doom II)|The Gantlet]]}} |
||
| + | |- |
||
| + | {{L-aft|after=[[MAP33: Betray (Xbox Doom II)|Betray]]}} |
||
| + | {{S-end}} |
||
| + | |||
| ⚫ | |||
[[Category:Levels by name|Underhalls (Doom II)]] |
[[Category:Levels by name|Underhalls (Doom II)]] |
||
[[Category:American McGee levels]] |
[[Category:American McGee levels]] |
||
| + | [[Category:Doom II levels]] |
||
Revision as of 04:14, 23 March 2020
- This level occupies the map slot MAP02. For other maps which occupy this slot, see Category:MAP02.
- This level occupies the map slot MAP32. For other maps which occupy this slot, see Category:MAP32.
MAP02: Underhalls (MAP32 in PSX/Saturn) is the second map of Doom II. It was designed by American McGee and uses the music track "The Healer Stalks". The par time is 1:30.
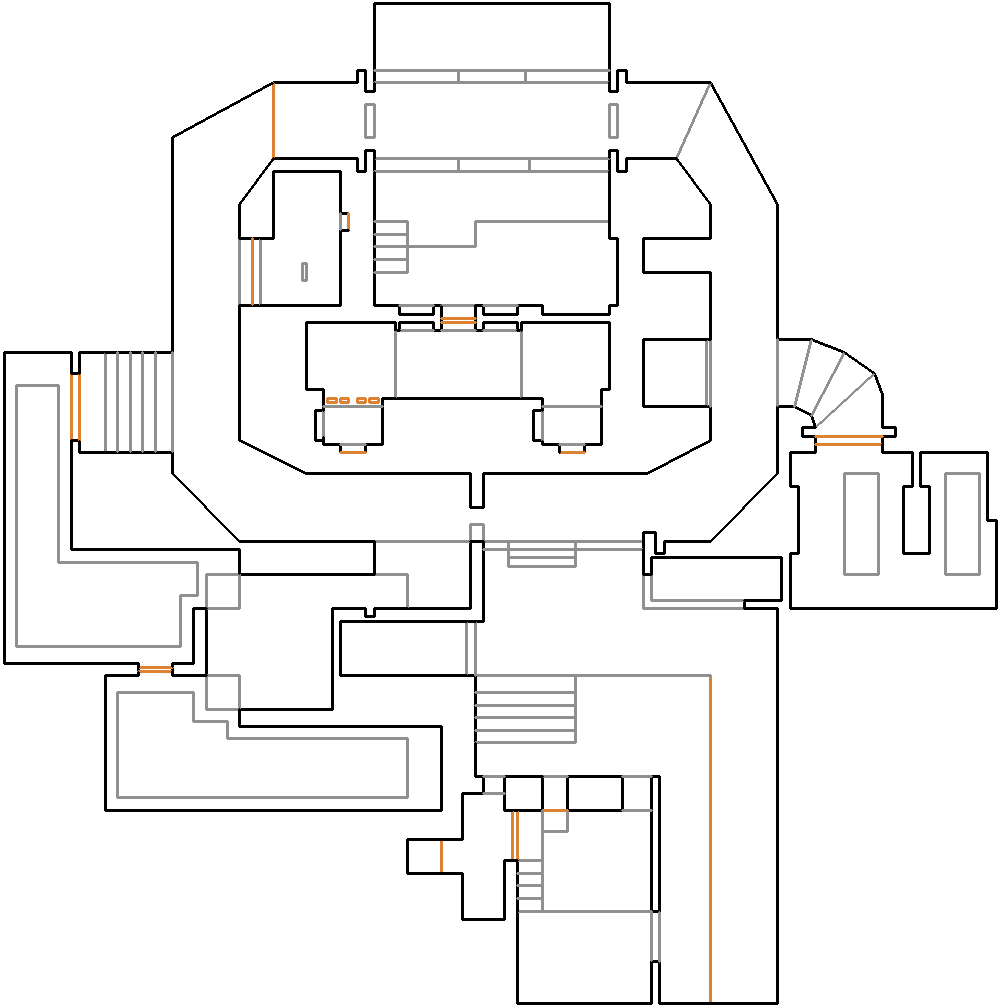
Map of MAP02
Walkthrough
From the start point, cross the water river, then turn right, go up the stairs, and open the door. You are in a room with two alcoves, the left one is open, press the switch to open up a barricade to the northeast of the water. Backtrack to the start, follow it east, then south, then west, until you come to a brick building. Go up the stairs, follow the ledge south until you come to the window, RUN to get inside the building, then turn right and go up the stairs, and then get the red key. Backtrack to the start, again go south and open the door, this time open the red bars to the right, kill the shotgunner, and press the switch. You should see a new barricade open to the west of the water. Follow it until you come to a barrel and a shotgunner. Turn right into a pool with more barrels and shotgunners. Fall down into the southwest hole, then follow it to the blue key. Open the door to the north of the river, and follow it north until you come to a blue door. Open the blue door, go up the stairs, then open the other blue door. Kill the shotgunners, and press the switch.
Other points of interest
There are several traps and monster-only teleporters that can roll in shotgunners and other enemies, and getting the red key opens up imps and demons.
Near the middle of the east water river, is an alcove taking you to a door. Open it into a computer room with lots of zombiemen and shotgun guys to kill. On the other side is a super shotgun.
Secrets
- At the top of the staircase inside the structure the red keycard is found in, open the west wall just west of the alcove the key was resting in. Behind this wall is a small room containing a few sergeants (G), a combat armor vest, and a teleport shortcut back to the start of the level.
- Secret exit [Xbox version only]: after obtaining the red keycard, drop down, and enter the northeast chamber (H) that has just opened. Walk up to the narrow, stone wall in the northwest of this chamber (I), and press on it to be taken to the Xbox-exclusive secret level, MAP33: Betray. The button that allows you to enter this level is active in the Doom 3 BFG Edition version of the map, however, it will simply take you back to the beginning of MAP02: Underhalls.
Bugs
- There is a blind Sergeant in the room behind the first door near the start of the map.
- Behind the bars locked with the red key, sector 39 (the western monitor) is not "closed", because linedef 312 (the southern border of the monitor) originates along the body of linedef 491 (the southwest wall south of the western monitor) rather than its endpoint. This creates a paper-thin wall at the southern end of the monitor.
- On your way to the blue key, one Sergeant (thing 85) situated near a barrel on a platform south of the main tunnel is immobile due to being partially inside the southern wall.
- The lower sides of linedefs 327, 328, 338, and 339 are all untextured, producing Hall of Mirrors effects if you stand in any of the small pools you fall into when entering the sewer and face outward.
- Thing number 69, a barrel (x=464 y=784) is in a linedef because it had the same Y position.
Trivia
- In the first versions of this map, the left alcove of the small room across the river from the start had bars closing it which needed to be opened by the Use key. These were removed from subsequent versions.
- This level marks the first appearance of the Shotgun Guys in Doom II, and if you didn't get the secret shotgun in the last level, your first shotgun will likely come from the Sergeant you kill to get to the left switch.
Speedrunning
Routes and tricks
You can use a bar glide. In order to do so, get to the location of the water that you can see the brick building with the red key. Then run facing west. You will be behind the barricade opened by a switch behind the red door. However, you will be confined to the western portion of this map. Also it may take several tries.
Records
The Compet-N records for the map are:
| Run | Time | Player | Date | File | Notes |
|---|---|---|---|---|---|
| UV speed | 00:40 | Adam Williamson | 2001-12-16 | lv02-040.zip | |
| NM speed | 00:45 | Juho "ocelot" Ruohonen | 2002-12-06 | nm02-045.zip | |
| UV max | 01:07 | Radek Pecka | 2004-01-15 | lv02-107.zip | |
| NM100S | 00:45 | Juho "ocelot" Ruohonen | 2002-12-06 | nm02-045.zip | |
| UV -fast | 01:30 | Radek Pecka | 2003-01-26 | fa02-130.zip | |
| UV -respawn | 01:10 | Radek Pecka | 2003-01-01 | re02-110.zip | |
| UV Tyson | 03:19 | Radek Pecka | 2003-12-21 | ty02-319.zip | |
| UV pacifist | 21:26 | Zero Master | 2017-09-08 | https://www.youtube.com/watch?v=tReY9gbSOV8 |
Statistics
Map data
| Things | 173 |
| Vertices | 501 |
| Linedefs | 523 |
| Sidedefs | 715 |
| Sectors | 97 |
Things
| Monsters | ITYTD and HNTR | HMP | UV and NM |
|---|---|---|---|
| Sergeants | 21 | 38 | 50 |
| Imps | 5 | 9 | 16 |
| Demons | 0 | 1 | 2 |
| Troopers | 21 | 22 | 22 |
| Powerups | ITYTD and HNTR | HMP | UV and NM |
| Stim packs | 11 | 11 | 11 |
| Medikits | 5 | 5 | 5 |
| Health bonuses | 13 | 13 | 13 |
| Armor bonuses | 7 | 7 | 7 |
| Blue armors | 1 | 1 | 1 |
| Weapons | ITYTD and HNTR | HMP | UV and NM |
| Super shotguns | 1 | 1 | 1 |
| Ammunition | ITYTD and HNTR | HMP | UV and NM |
| Shells | 1 | 1 | 1 |
| Keys | ITYTD and HNTR | HMP | UV and NM |
| Blue cards | 1 | 1 | 1 |
| Red cards | 1 | 1 | 1 |
| Barrels | ITYTD and HNTR | HMP | UV and NM |
| Exploding barrels | 18 | 18 | 18 |
Video
 - MAP02 Underhalls 4K 60FPS (14 KB)")
Trivia
The music for this level is inspired by "Samba Briza" by Atheist.
A Shotgun Guy next to an explosive barrel appears to be stuck and can't move, only walk in place.
External links
- MAP02 demos from the Compet-n database
- Top-down perspective view of all Doom II levels by Ian Albert
| Entry from Entryway |
Doom II Level | Exit to The Gantlet |
| Xbox Doom II Level | Exit to The Gantlet | |
| Exit to Betray |