m (→Things: clean up) |
m (→Current records: clean up) |
||
| (3 intermediate revisions by the same user not shown) | |||
| Line 1: | Line 1: | ||
{{map|slot=MAP02}} |
{{map|slot=MAP02}} |
||
| ⚫ | |||
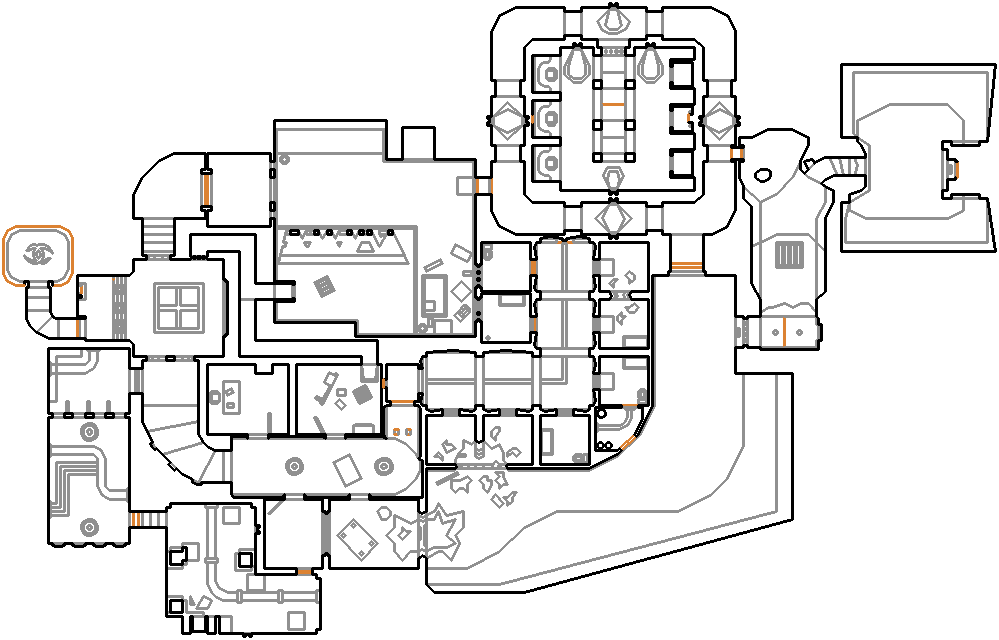
'''MAP02: Nullth Precinct''' is the second map of [[Community Chest]]. It is set inside of and around a demon-infested police station. It was designed by Thomas van der Velden. |
'''MAP02: Nullth Precinct''' is the second map of [[Community Chest]]. It is set inside of and around a demon-infested police station. It was designed by Thomas van der Velden. |
||
== Walkthrough == |
== Walkthrough == |
||
| − | [[ |
+ | [[file:Cchest_MAP02_map.png|thumb|300px|Map of MAP02]] |
: Letters in ''italics'' refer to marked spots on the map. [[Sector]] numbers in '''boldface''' are [[secrets]] which count toward the [[Intermission screen|end-of-level tally]]. |
: Letters in ''italics'' refer to marked spots on the map. [[Sector]] numbers in '''boldface''' are [[secrets]] which count toward the [[Intermission screen|end-of-level tally]]. |
||
| Line 11: | Line 10: | ||
Climb onto the roof using the dumpster and miscellaneous junk around. Enter the ventilation shaft, and take the southern path. Enter the hallway, and go up the stairs to the lobby. Flip the switch behind the desk, and go through the western doorway to your south into the shooting range. Climb through any of the openings, and open the southeast door. Grab the blue [[keys|key]] from the open box in the south of the storage room. Open the next door, and then open the blue bars in the northeast. Take the lift, and go through the cell block to the switch. Flip it, and leave the building through the hole from either the first or second southern cells from the west. Go northeast, and open the northern door. Go around the hall and through the northern doorway. Enter the middle cubicle to the west, and press the switch. Enter the central box at the east, and flip the switch. Return to the outside, and approach the eastern door; you will be lowered into a tunnel. Walk up the rocky stairway, and press on the eastern door. |
Climb onto the roof using the dumpster and miscellaneous junk around. Enter the ventilation shaft, and take the southern path. Enter the hallway, and go up the stairs to the lobby. Flip the switch behind the desk, and go through the western doorway to your south into the shooting range. Climb through any of the openings, and open the southeast door. Grab the blue [[keys|key]] from the open box in the south of the storage room. Open the next door, and then open the blue bars in the northeast. Take the lift, and go through the cell block to the switch. Flip it, and leave the building through the hole from either the first or second southern cells from the west. Go northeast, and open the northern door. Go around the hall and through the northern doorway. Enter the middle cubicle to the west, and press the switch. Enter the central box at the east, and flip the switch. Return to the outside, and approach the eastern door; you will be lowered into a tunnel. Walk up the rocky stairway, and press on the eastern door. |
||
| − | |||
| − | ===Other points of interest=== |
||
===Secrets=== |
===Secrets=== |
||
| Line 18: | Line 15: | ||
# After opening all the jail cells, go to the southernmost cell in the east to find a panel on the southern wall. Press on it to reveal an opening leading down to a [[medikit]] and two [[backpack]]s. ('''sector 387''') Open the southern wall to head outside. |
# After opening all the jail cells, go to the southernmost cell in the east to find a panel on the southern wall. Press on it to reveal an opening leading down to a [[medikit]] and two [[backpack]]s. ('''sector 387''') Open the southern wall to head outside. |
||
# In the final tunnel, there is a metal section of wall to the northwest. Press on it to activate a lift upon which a backpack sits. ('''sector 336''') Take it up to return to the upper level. |
# In the final tunnel, there is a metal section of wall to the northwest. Press on it to activate a lift upon which a backpack sits. ('''sector 336''') Take it up to return to the upper level. |
||
| − | |||
| − | ===Bugs=== |
||
| − | |||
| − | ===Demo files=== |
||
| − | * |
||
== Areas / screenshots == |
== Areas / screenshots == |
||
| Line 35: | Line 27: | ||
== Speedrunning == |
== Speedrunning == |
||
| − | |||
| − | ===Routes and tricks=== |
||
| − | |||
===Current records=== |
===Current records=== |
||
The records for the map on the [http://www.doomworld.com/sda/doom_sda.htm Doomed Speed Demos Archive] are: |
The records for the map on the [http://www.doomworld.com/sda/doom_sda.htm Doomed Speed Demos Archive] are: |
||
| Line 44: | Line 33: | ||
!Run||Time||Player||Date||File||Notes |
!Run||Time||Player||Date||File||Notes |
||
|- |
|- |
||
| − | |[[UV speed]]|| || || ||{{competnftp|**|**}}|| |
+ | |[[UV speed]]|| || || ||{{External Link|site=competnftp|file_path=**|**}}|| |
|- |
|- |
||
| − | |[[NM speed]]|| || || ||{{competnftp|**|**}}|| |
+ | |[[NM speed]]|| || || ||{{External Link|site=competnftp|file_path=**|**}}|| |
|- |
|- |
||
|[[UV max]]||03:25||[[Mark "Marco" Anders]]||2005-11-14||[http://competn.doom2.net/pub/sda/b-c/cc_marco1.zip cc_marco1.zip]|| |
|[[UV max]]||03:25||[[Mark "Marco" Anders]]||2005-11-14||[http://competn.doom2.net/pub/sda/b-c/cc_marco1.zip cc_marco1.zip]|| |
||
|- |
|- |
||
| − | |[[NM100S]]|| || || ||{{competnftp|**|**}}|| |
+ | |[[NM100S]]|| || || ||{{External Link|site=competnftp|file_path=**|**}}|| |
|- |
|- |
||
| − | |[[UV -fast]]|| || || ||{{competnftp|**|**}}|| |
+ | |[[UV -fast]]|| || || ||{{External Link|site=competnftp|file_path=**|**}}|| |
|- |
|- |
||
| − | |[[UV -respawn]]|| || || ||{{competnftp|**|**}}|| |
+ | |[[UV -respawn]]|| || || ||{{External Link|site=competnftp|file_path=**|**}}|| |
|- |
|- |
||
| − | |[[UV Tyson]]|| || || ||{{competnftp|**|**}}|| |
+ | |[[UV Tyson]]|| || || ||{{External Link|site=competnftp|file_path=**|**}}|| |
|- |
|- |
||
| − | |[[UV pacifist]]|| || || ||{{competnftp|**|**}}|| |
+ | |[[UV pacifist]]|| || || ||{{External Link|site=competnftp|file_path=**|**}}|| |
|} |
|} |
||
| Line 67: | Line 56: | ||
| || || || ||[ftp://.zip .zip]|| |
| || || || ||[ftp://.zip .zip]|| |
||
|} |
|} |
||
| − | |||
| − | == Deathmatch == |
||
== Statistics == |
== Statistics == |
||
| − | |||
===Map data=== |
===Map data=== |
||
{| class="WikiaTable" |
{| class="WikiaTable" |
||
| Line 147: | Line 133: | ||
|[[Keys|Blue keycards]]|| colspan="3" align="center"|1 |
|[[Keys|Blue keycards]]|| colspan="3" align="center"|1 |
||
|} |
|} |
||
| − | |||
| − | == Technical information == |
||
| − | |||
| − | == Inspiration and development == |
||
| − | |||
| − | == Trivia == |
||
| − | |||
| − | == See also == |
||
| − | |||
| − | * |
||
| − | |||
| − | == Sources == |
||
| − | |||
| − | * |
||
== External links == |
== External links == |
||
| ⚫ | |||
| ⚫ | |||
| ⚫ | |||
[[Category:Levels by name|Nullth Precinct (Community Chest)]] |
[[Category:Levels by name|Nullth Precinct (Community Chest)]] |
||
Latest revision as of 04:40, 23 March 2020
- This level occupies the map slot MAP02. For other maps which occupy this slot, see Category:MAP02.
MAP02: Nullth Precinct is the second map of Community Chest. It is set inside of and around a demon-infested police station. It was designed by Thomas van der Velden.
Walkthrough
Map of MAP02
- Letters in italics refer to marked spots on the map. Sector numbers in boldface are secrets which count toward the end-of-level tally.
Essentials
Climb onto the roof using the dumpster and miscellaneous junk around. Enter the ventilation shaft, and take the southern path. Enter the hallway, and go up the stairs to the lobby. Flip the switch behind the desk, and go through the western doorway to your south into the shooting range. Climb through any of the openings, and open the southeast door. Grab the blue key from the open box in the south of the storage room. Open the next door, and then open the blue bars in the northeast. Take the lift, and go through the cell block to the switch. Flip it, and leave the building through the hole from either the first or second southern cells from the west. Go northeast, and open the northern door. Go around the hall and through the northern doorway. Enter the middle cubicle to the west, and press the switch. Enter the central box at the east, and flip the switch. Return to the outside, and approach the eastern door; you will be lowered into a tunnel. Walk up the rocky stairway, and press on the eastern door.
Secrets
- On the back side of the desk in the lobby is a switch. Flip it, and the shelf will open to reveal a stairway. (sector 385) Go up the stairs to find a blur artifact, a soul sphere, and the Community Chest logo on the floor.
- After opening all the jail cells, go to the southernmost cell in the east to find a panel on the southern wall. Press on it to reveal an opening leading down to a medikit and two backpacks. (sector 387) Open the southern wall to head outside.
- In the final tunnel, there is a metal section of wall to the northwest. Press on it to activate a lift upon which a backpack sits. (sector 336) Take it up to return to the upper level.
Areas / screenshots
")
")
")
")
")
Speedrunning
Current records
The records for the map on the Doomed Speed Demos Archive are:
| Run | Time | Player | Date | File | Notes |
|---|---|---|---|---|---|
| UV speed | [1] | ||||
| NM speed | [2] | ||||
| UV max | 03:25 | Mark "Marco" Anders | 2005-11-14 | cc_marco1.zip | |
| NM100S | [3] | ||||
| UV -fast | [4] | ||||
| UV -respawn | [5] | ||||
| UV Tyson | [6] | ||||
| UV pacifist | [7] |
Miscellaneous demos
| Run | Time | Player | Date | File | Notes |
|---|---|---|---|---|---|
| .zip |
Statistics
Map data
| Things | 131 |
| Vertexes | 2642 |
| Linedefs | 3173 |
| Sidedefs | 5072 |
| Sectors | 408 |
Things
| Monsters | ITYTD and HNTR | HMP | UV and NM |
|---|---|---|---|
| Cacodemons | 2 | 6 | 8 |
| Demons | 11 | 14 | 16 |
| Hell knights | 1 | ||
| Imps | 4 | 5 | |
| Mancubi | 3 | 4 | |
| Sergeants | 8 | 9 | |
| Troopers | 4 | ||
| Weapons | ITYTD and HNTR | HMP | UV and NM |
| Chainguns | 2 | ||
| Chainsaws | 1 | ||
| Rocket launchers | 1 | ||
| Shotguns | 2 | ||
| Super shotguns | 1 | ||
| Powerups | ITYTD and HNTR | HMP | UV and NM |
| Armor bonuses | 2 | ||
| Backpacks | 3 | 4 | |
| Blue armors | 2 | ||
| Health bonuses | 1 | ||
| Invisibilities | 1 | ||
| Medikits | 4 | ||
| Soul spheres | 1 | ||
| Stim packs | 5 | 7 | |
| Ammunition | ITYTD and HNTR | HMP | UV and NM |
| Ammo boxes | 4 | ||
| Ammo clips | 5 | ||
| Shell boxes | 3 | ||
| Shells | 5 | ||
| Keys | ITYTD and HNTR | HMP | UV and NM |
| Blue keycards | 1 | ||