Tag: Visual edit |
Tag: Visual edit |
||
| Line 8: | Line 8: | ||
Travel to the east side of the tower and note the symbol on the podium to the left of the stairs before you head outside. |
Travel to the east side of the tower and note the symbol on the podium to the left of the stairs before you head outside. |
||
| − | You must travel around each quarter setting the symbol on each pedestal (in a preset order, you can't choose which order you do them in) to the same one as is on the podium by the stairs back in the tower and then press each pedestal's switch to set them — all the while dodging [[Death Wyvern| |
+ | You must travel around each quarter setting the symbol on each pedestal (in a preset order, you can't choose which order you do them in) to the same one as is on the podium by the stairs back in the tower and then press each pedestal's switch to set them — all the while dodging [[Death Wyvern|Wyvern]] breath. Fortunately, if you have assembled your ultimate weapon by now, killing the Wyverns becomes considerably easier. (Also, note that the Fighter will have considerably more trouble with the Wyverns than the Cleric or Mage, so if you are playing Fighter, dodging and ignoring them may be a better option.) |
Note that the symbol may change for the second, third and fourth pedestals, so you'll have to return to the podium by the stairs to get the new symbol. |
Note that the symbol may change for the second, third and fourth pedestals, so you'll have to return to the podium by the stairs to get the new symbol. |
||
Revision as of 16:10, 26 January 2015
Template:Blight

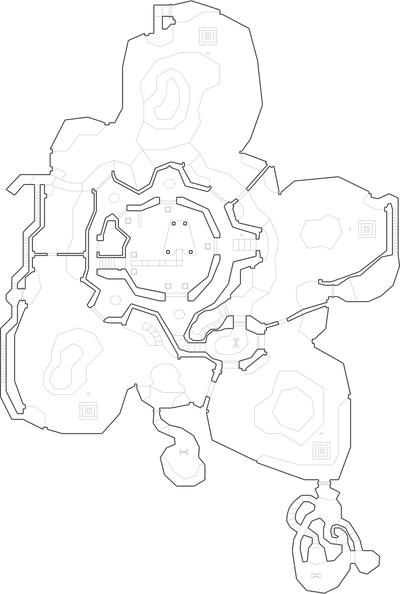
Map of the Brackenwood
Brackenwood
Travel up the stairs in front of you up into the south side of the tower like structure that is the centre piece of this map. You could have a peek out of the windows in the start area, but that leaves you open to a fire bombing. Travel around to the north end of the tower to find a switch. If you travel around the left side of the tower, note the currently blocked passage way to the centre of the tower.
Pressing the switch lowers stairs over at the east side of the tower that lead outside. It also unblocks access to the afore mentioned passage. If you are playing as the fighter, you may to try to carefully jump across the raised platforms to get your third weapon at this point, though it will become much easier to get later in the map.
Travel to the east side of the tower and note the symbol on the podium to the left of the stairs before you head outside.
You must travel around each quarter setting the symbol on each pedestal (in a preset order, you can't choose which order you do them in) to the same one as is on the podium by the stairs back in the tower and then press each pedestal's switch to set them — all the while dodging Wyvern breath. Fortunately, if you have assembled your ultimate weapon by now, killing the Wyverns becomes considerably easier. (Also, note that the Fighter will have considerably more trouble with the Wyverns than the Cleric or Mage, so if you are playing Fighter, dodging and ignoring them may be a better option.)
Note that the symbol may change for the second, third and fourth pedestals, so you'll have to return to the podium by the stairs to get the new symbol.
Once you have set the correct symbol on all four pedestals, the switch on the inside west side of the tower becomes functional. Pressing it will transform the statues in the middle into Chaos Serpents and a Dark Servant. It will also spawn a magic bridge leading up to the planet from the middle platform. Defeat the serpents and jump on the magic bridge to get the maps’ planet, which you should take back to Hub 1: Blight (map).
