- This level occupies the map slot E4M8. For other maps which occupy this slot, see Category:E4M8.
- This level occupies the map slot MAP28. For other maps which occupy this slot, see Category:MAP28.
E4M8: Unto the Cruel (MAP28 in PSX/Saturn) is the final map of Thy Flesh Consumed in The Ultimate Doom. It was designed by Shawn Green and uses the music track "Demons on the Prey".
Overview[]
The map title comes from Proverb 5:9: "Lest thou give thine honour unto others, and thy years unto the cruel."[1]
Similar to Knee-Deep in the Dead, unlike The Shores of Hell and Inferno, the level does not automatically end upon the death of the boss. Its death, however, will lower the area's center which you can walk into to exit. You can instead choose to also kill the other monsters if you wish.
The map is relatively easy compared to the rest of the levels in the episode, and can be completed without too much difficulty on Ultra-Violence, even from a default start with only the pistol.
After killing the four Imps, the door below is activiated by a switch. Open up the door, but do not proceed through it yet, as you cannot open it from the other side. Instead, make a gunfire sound (e.g. punching your fist) to alert the enemies, and then retreat. Open up the door from time to time in order to pick off former humans that walk through, and grab their ammo.
The tricky part is when you go through the teleporter. The new area is pretty open, exposing you to considerable fire, so it is advised that you get inside as quickly as possible.
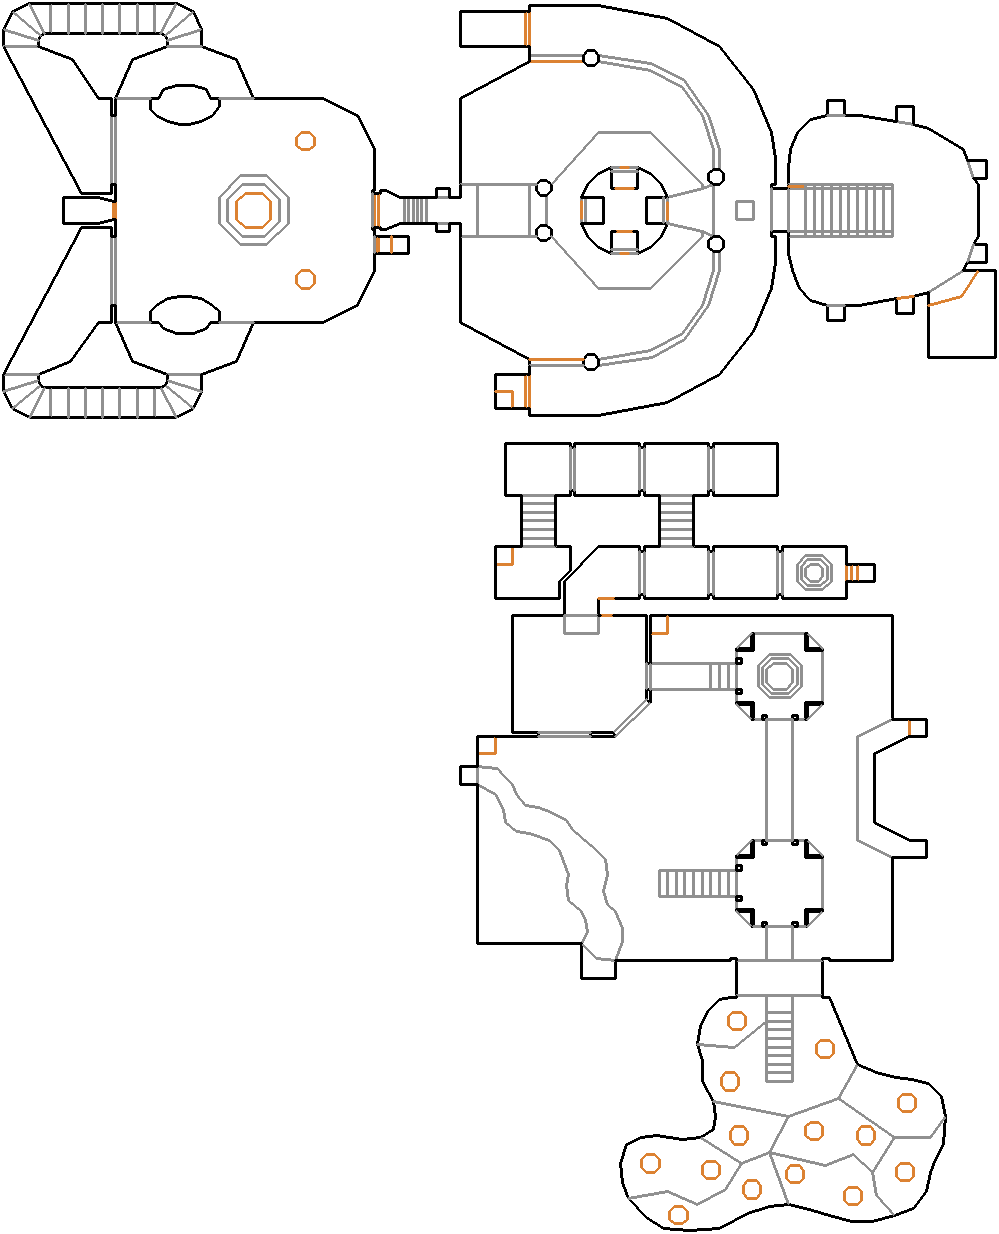
Map of E4M8
Walkthrough[]
At the very start, destroy any Imps, grab any weapons and ammo and run down the stairs. Hit the skull switch to open the door and arrive at the room containing the "green main pillar". Kill every enemy in this room - beware of their numbers depending on the skill level you are playing, because they are mostly hitscan-weapon enemies such as Troopers and Shotgun Guys, then open the green, demon-themed marble door at the north side room and grab the red skull key inside. Go to the green "pillar", open its north face, kill the monster and hit the switch. This will cause a bridge to raise at the middle of the lava moat below - if you fall into the lava moat, be sure to quickly pick up any radiation shielding suits available and kill any Demons and/or Spectres who are lurking around, then use any of the northern/southern steel lifts to go back to the upper floor. Go to the south side room, open the door and take the teleporter.
You are in a wider open-air area with several enemies, so if you find yourself wide open to enemy fire run up the stairs to the nearest "open cage" (grab the plasma gun near the base of the other "cage" before climbing up the stairs). South of it is a space with a harmless water "floor" and several tall pillars containing useful goodies (you can simply hit the Spacebar near each pillar to lower it and take the goodies). Cross the bridge that connects the "open cages", then enter the wooden room. Hit the skull switch to lower the lift (watch out for possible Demons and Barons of Hell, depending on the skill level you are playing). Grab the yellow skull key. Climb up the nearest set of stairs, then climb down another set of stairs to reach a room containing a soul sphere near another teleporter. Step through it and you'll be warped back to the room containing the "green main pillar". This time open its south face, wipe out whatever monster hides inside and hit another skull switch. Upon doing so, a set of stairs will form up to the final, skull-decorated door.
You are now at the final area of the level (and the game as well). The green pillars at this room contain another soul sphere and an invisibility sphere. These may come in handy for battling against the Spider Mastermind hiding behind the big pillar. Once you kill it, the big pillar at the center of the room will lower, revealing the exit. Unlike episodes 2 and 3, the level will not end automatically once you defeat the episode boss, so if you want, you can choose to enter the adjoining upper rooms and finish off the last enemies that will appear - including a pair of Barons of Hell, one for each room. Once you are done with killing all enemies and picking up all items you want, step through the big portal to end the level.
Congratulations for finishing the game!
Secrets[]
Official[]
- The area you start in contains six alcoves along the outer wall with tortured corpses in them. Press the spacebar on the left center one to open a nearby secret item cache.
Non-official[]
- In the main room, the west and east faces of the "green main pillar", obviously disconsidering the yellow and red "doors", are actually 2 secret caches, each one hiding medikits, protected from inside by Shotgun Guys on skills levels 1 and 2, Cacodemons on 3, or Barons of Hell on 4 and 5.
- In the wooden-walled rooms, at the very spot where you grab the yellow skull key, press the wall directly behind it. Take the teleporter it hides and it'll warp you onto the C-shaped side platform (which has a Shotgun Guy "patrolling" it) at the east end of the map, just east of the bridge that connects the "caged" rooms.
- At the final room, where you battle the Spiderdemon, just south of the entrance you'll notice a detached portion of the wall. It hides a teleporter that warps you back to the wooden-walled rooms - precisely the one where you find a soul sphere, right after obtaining the yellow skull key.
- In the final room of the map, right behind the Spider Mastermind's starting point, there is a secret alcove in the wall that hides a BFG 9000 and two energy cell packs. These can come in handy when facing the boss and its hordes of demons. In this same room, there are also a soul sphere and a megaarmor atop two pillars. You can simply get close and hit the spacebar to lower them and collect these items.
Speedrunning[]
Records[]
The Compet-N records for the map are:
| Run | Time | Player | Date | File | Notes |
|---|---|---|---|---|---|
| UV speed | 00:49 | Andy Kempling | 1999-06-22 | u4m8-049.zip | |
| NM speed | 01:05 | Adam Hegyi | 2000-01-05 | n4m8-105.zip | |
| UV max | 02:20 | Radek Pecka | 2001-09-19 | u4m8-220.zip | |
| NM100S | 01:14 | Adam Hegyi | 2000-05-01 | n4s8-114.zip | |
| UV -fast | 02:44 | Radek Pecka | 2001-09-16 | f4m8-244.zip | |
| UV -respawn | |||||
| UV Tyson | 05:14 | Xit Vono | 2003-05-18 | t4m8-514.zip | |
| UV pacifist | 01:27 | Radek Pecka | 2004-02-14 | p4m8-127.zip |
Statistics[]
Map data[]
| Things | 315 |
| Vertices | 1041 |
| Linedefs | 1280 |
| Sidedefs | 1908 |
| Sectors | 223 |
Things[]
| Monsters | ITYTD and HNTR | HMP | UV and NM |
|---|---|---|---|
| Spider Mastermind | 1 | 1 | 1 |
| Sergeants | 17 | 34 | 48 |
| Spectres | 0 | 0 | 7 |
| Imps | 6 | 11 | 13 |
| Demons | 2 | 6 | 7 |
| Barons of Hell | 2 | 4 | 11 |
| Troopers | 21 | 16 | 14 |
| Cacodemons | 2 | 7 | 5 |
| Lost Souls | 2 | 8 | 14 |
| Powerups | ITYTD and HNTR | HMP | UV and NM |
| Backpacks | 1 | 1 | 1 |
| Stim packs | 12 | 12 | 12 |
| Medikits | 11 | 11 | 11 |
| Soul spheres | 3 | 3 | 3 |
| Blue armors | 2 | 2 | 2 |
| Berserks | 1 | 1 | 1 |
| Invisibilities | 1 | 1 | 1 |
| Radiation suits | 0 | 2 | 2 |
| Light amplification visor | 1 | 1 | 1 |
| Weapons | ITYTD and HNTR | HMP | UV and NM |
| Shotguns | 1 | 1 | 1 |
| Chainguns | 1 | 1 | 1 |
| Rocket launchers | 2 | 2 | 2 |
| Plasma guns | 2 | 2 | 2 |
| BFG 9000s | 1 | 1 | 1 |
| Ammunition | ITYTD and HNTR | HMP | UV and NM |
| Bulk cells | 9 | 9 | 9 |
| Shells | 14 | 14 | 14 |
| Rocket boxes | 9 | 9 | 9 |
| Ammo boxes | 11 | 11 | 11 |
| Shell boxes | 2 | 2 | 2 |
| Keys | ITYTD and HNTR | HMP | UV and NM |
| Red skulls | 1 | 1 | 1 |
| Yellow skulls | 1 | 1 | 1 |
Trivia[]
The Spider Mastermind is removed from the PlayStation/Saturn ports' version of the level, replaced instead with a grand army of Hell Knights. Killing them all lowers the exit pillar.