

- This level occupies the map slot MAP29. For other maps which occupy this slot, see Category:MAP29.
MAP29: Outpost Omega is the first secret level of Doom 64 in numerical order, and the second chronologically (the first, technically, being MAP32: Hectic). Should this level be undertaken right after MAP04: Holding Area, this is where the player will first come across Mancubi and Pain Elementals. The level also contains both the Unmaker and the first of the strange artifacts known as Demon Keys which upgrade it. The music for this level is the same as MAP05: Tech Center.
Start Level Message[]
The vast silence reminds you of the military morgue.
You knew the installation had a classified level.
The U.A.C. had some good reason to hide this place.
You wonder what it could be...
Walkthrough[]
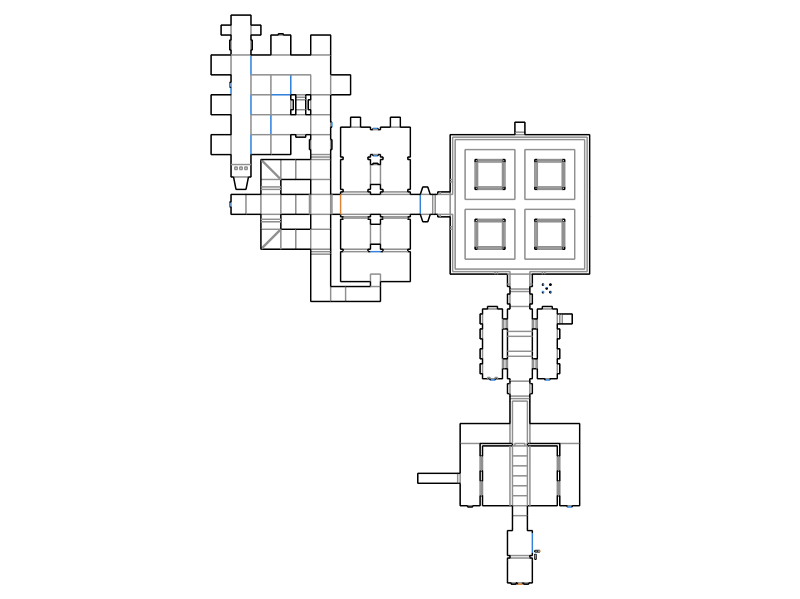
Map of MAP29
Clean the control rooms on both sides of the corridor from Zombiemen and Lost Souls. Press the switch in the room to the right to open the door to a room with four cages. When you get the rocket launcher in the middle of the room, a hell knight appears in each cage; you have to kill all of them to advance. (Don't forget to find the red key if you want to get the first Demon Key for the Unmaker; see the Secrets section below for more information).
Pass the next room with several monsters (Pain Elementals, Cacodemons, and Nightmare Imps). To the left, you can see where the blue key is stored. Go into the corridor, press the switch to open the doors, and walk up the staircase. Get the blue key behind the normal door and enter the storage area behind the blue door. Watch out for Imps and Hell Knights. Get the yellow key – and if you can find them, the Unmaker and the first Demon Key.
Go back to the room with the four cages. Get a Berserk pack and kill another set of Hell Knights. Return to the left control room, press the yellow switch to open the exit area with more monsters waiting. Press the left switch and watch a passage to the exit and more Lost Souls being constructed.
The Demon Key[]
After getting the red key, the Demon Key and the Unmaker can be obtained in the tall multi-chambered room which also houses the yellow key. You traverse the room by leaping from available platforms or dropping down levels to reach the bottom. There are teleporters at the bottom which will send you back up to start over, so you can explore as much as you need.
After obtaining the yellow key, teleport back to the start of the room and drop to the left again. There is a switch in a room to your right, guarded by an Imp or Hell Knight. Get a bullet weapon ready and run there, passing two chasms (jumping helps a lot here, you should have completed MAP32: Hectic before). Hit the switch and a platform will temporarily lower back the way you came. Jump back to the lowered platform quickly and ride it up. This will reveal a switch on the opposite wall, next to the teleport target, which can be shot to be activated.
That switch will permanently lower a platform you jumped over twice. From there, facing the switch you pressed, the left wall is a secret that lowers when activated, revealing the Unmaker. After you have picked up the Unmaker, shoot the switch which is visible from across the Unmaker's platform. Then head back to the first shootable switch and strike it again to further permanently lower the platform, which will reveal the red key door. Behind the red key door is the first Demon Key.
Secrets[]
- In the control room on the right from the starting corridor, the frame of the fourth computer panel is low enough to step on. This is a door to a hidden area which is opened by using the third computer panel in the other control room.
- The panel on the right-hand side of the door frame leading to the room with four cages acts as a switch. This opens a niche on the other side of that room, which holds the red key; this is required to get the Demon Key later (see above).
- Passing the room with cages of broken wire-mesh fences, where you can see the blue key from to the left, enter the corridor that leads to a switch. Halfway inside, a windowed wall lowers which has an armor inside.
- This window frame has a raised switch. Pressing it lowers the opposite window frame with a Super Shotgun.
- In the room behind the blue door, drop down to the left, press the computer monitor to the left, and run down further to the left to grab a supercharge while the bars are briefly gone.
- In the room behind the blue door, there is a Blue Armor that you can see perched on a ledge if you fall to the right from where the door is. To get this armor, you need to lower a wall segment with a shootable switch, as described below in "The Demon Key" section. After lowering the wall the first time (before getting the Unmaker) you will be able to walk on top of the wall segment like a platform, allowing you to jump the gap and grab the armor.
- When the exit room became accessible after pressing the left switch, the right switch can be pressed now, revealing a corridor with powerups.
Statistics[]
Map data[]
| Things | 161 |
| Vertices | 834 |
| Linedefs | 1106 |
| Sidedefs | 1478 |
| Sectors | 228 |
Things[]
| Monsters | BG and BIO | IOD | WMD |
|---|---|---|---|
| Zombiemen | 6 | 0 | 0 |
| Shotgun guys | 6 | 13 | 14 |
| Imps | 22 | 13 | 17 |
| Nightmare Imps | 2 | 4 | 6 |
| Demons | 2 | 4 | 6 |
| Lost Souls | 10 | 15 | 20 |
| Cacodemons | 5 | 4 | 2 |
| Hell Knights | 0 | 10 | 3 |
| Pain Elementals | 2 | 3 | 5 |
| Mancubi | 0 | 0 | 8 |
Bugs[]
- When using the port Doom 64 EX, it will not say you have collected 100% of all secrets even if all secrets have been picked up.