(→External links: Ian Albert's top-view) |
m (→External links) |
||
| Line 143: | Line 143: | ||
==External links== |
==External links== |
||
* [http://www.doom2.net/~compet-n/database/cn.cgi?map:udoom:37 E3M7 demos from the Compet-n database] |
* [http://www.doom2.net/~compet-n/database/cn.cgi?map:udoom:37 E3M7 demos from the Compet-n database] |
||
| − | * [http://ian-albert.com/misc/ |
+ | * [http://ian-albert.com/misc/doommaps.php Top-down perspective view of all Doom levels] by Ian Albert |
[[Category:Levels by name|Limbo (Doom)]] |
[[Category:Levels by name|Limbo (Doom)]] |
||
Revision as of 20:26, 12 October 2008
Template:Inferno
- This level occupies the map slot E3M7. For other maps which occupy this slot, see Category:E3M7.
E3M7: Limbo is the seventh map of Inferno in Doom. It is referred to as Gate to Limbo on the intermission screen. It uses the music track "Waltz of the Demons." The name probably comes from Dante's Divine Comedy, where Limbo is described as the inner circle of Hell. The par time is 2:45.
Overview
Strategy
Walkthrough
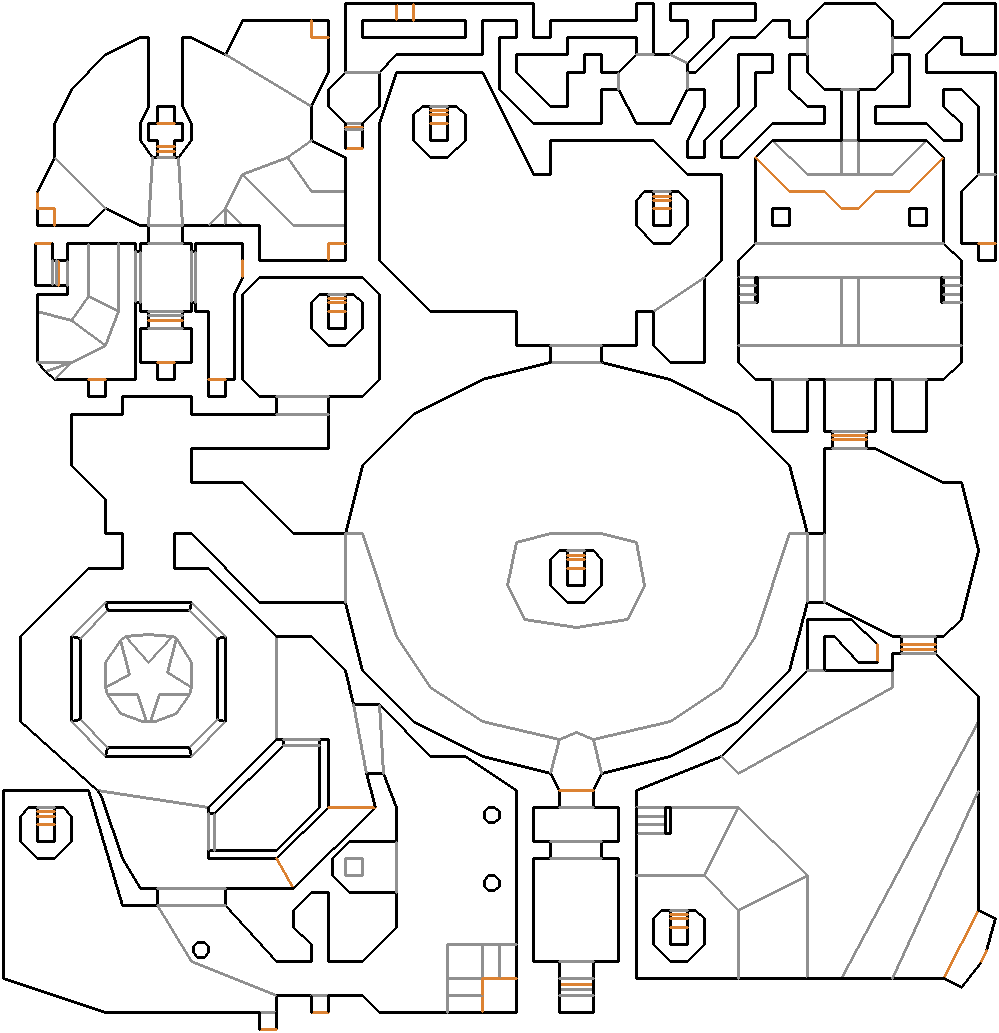
Map of E3M7
- First head to retrieve the blue skull key. To obtain it, head north and then west along the the semicircle platform surrounding a large circle of blood in the large room. When there is a fork in the path, head left and then south, all the way to the bottom southeast corner of that area where the blue skull key is resting on a small platform surrounded by blood.
- Next head back to the large circle room with blood and the "semicircle path," this time heading east to a room with two doors that require a blue key. The door on the south leads to a secret which requires the red skull key, while the door on the north leads to the underground blood maze which holds the red skull key near its end.
- Head this way and fall down the hole which takes you the first "rest stop" of the blood maze. There are two of these "rest stops" along the maze and each holds serveral radiation suits to protect you while you search the labyrinth. The first rest stop has two directions, west and east. The east leads to a secret area, while the west leads to the red skull key at its end.
- Take the west route to lead to eventually lead to another "rest stop." Then continue along the labyrinth to head towards the red skull key. When you reach a path to a "warp" along the way, DO NOT GET IN. Take the alternate path beside it and that will lead you to the room with the red skull key. If you were to get into that warp, you will teleport to the area where you recieved the blue skull key and will have to make your way all the way back here again. However, once you recieve the red skull key and have opened the door behind it and activated the switch, this is your only option.
- The warp will lead you back to the general area where the blue skull key was originally. You may activate the switches around the walls to open secret rooms in the area, of which one contains a star-shaped blood pool with a "supercharge" in the middle of it.
- It's time to get the yellow key. So, to do this head back to the large circular blood room in the middle of the map and get ready to head across the harmful blood. Contrary to what you might be thinking, you are not supposed to head to the door in the center of that particular circular room, but instead are supposed to head to the room directly north of that one (which contains even more blood to cross). This room has a small section in the bottom right corner which houses a radiation suit to cross, should you need one. Head to the pillar with a warp inside it in the upper left corner of that room. The warp teleports you to the area where the stage exit is. It also has a switch which you must activate to get the yellow key later. Head back in the warp and when you teleport back to the room with the blood all over the ground, enter the right most pillar with the warp inside to warp back to that same room you were awhile ago. This time, however, the yellow key is accessible to you now that the land has been raised. Grab it and return to the warp.
- Now you must head back to the main circular blood room and head to the west where you will then head south to the southwestern-most corner of the map. This is yet another blood filled room with a warp inside another pillar at its end. Run across the blood to this warp.
- It teleports you to a room where you must activate a switch, but not much else. Activate this switch to create a land mass for you to cross in the adjacent room. Head back in the warp.
- Return to the large circular blood room and now you may enter the warp in the middle of the room. This leads you to the adjacent room mentioned previously, but now has a land bridge for you to cross. Cross the bridge to a room requiring the yellow skull key. Inside, activate the switch. This creates a land bridge to the EXIT door, so that you may go through. Head back to the warp and from the large circular room, go west.
- At the first fork in the road on the west route, head north and then follow the path to yet another blood filled room. In the northeast corner of the room is a pillar with a warp inside. Go inside it.
- You will be teleported to the last stretch of the level. Use the yellow skull key to open the door and head straight forward to the EXIT door.
Secrets
- In the southwestern corner of the map is a pool of blood with a switch in it. Flipping this switch opens the large octagonal structure in the area to the north. Inside the structure is a pentagram with a soul sphere on it that counts as a secret.
- Directly to the southeast of the aforementioned pentagram structure is a vaguely hexagonal green marble structure. Walk around the back of this structure and two of its walls will open, revealing a secret area.
- In the northeastern corner of the map is a maze of blood-filled tunnels. From its start, head right, right, left, then right. You'll end up at a secret platform with a BFG.
- After flipping the switch next to the red skull key in the blood maze, return to the central area after taking one of the teleporters in the maze. Go through the southern of the two blue doors in the east. In a nearby alcove is a switch; press it to lower a wall back outside. Flip a second switch behind the newly lowered wall to raise a bridge to the "teleport tube" in the southeastern corner of this room. Go through that teleport to be taken to a secret area.
Bugs
A set of 4 shotgun shells (Thing 62) and an energy cell (Thing 123) have no flags set for any of the difficulty classes, so they do not actually appear in the level.
Speedrunning
Routes and tricks
Records
The Compet-N records for the map are:
| Run | Time | Player | Date | File | Notes |
|---|---|---|---|---|---|
| UV speed | 00:57 | Drew "stx-Vile" DeVore | 2002-10-06 | Template:Competnftp | |
| NM speed | 01:03 | Adam Hegyi | 2000-01-28 | Template:Competnftp | |
| UV max | 02:09 | Radek Pecka | 2001-01-28 | Template:Competnftp | |
| NM100S | 01:15 | Adam Hegyi | 2000-08-18 | Template:Competnftp | |
| UV -fast | 02:25 | Radek Pecka | 2001-12-06 | Template:Competnftp | |
| UV -respawn | 01:45 | Radek Pecka | 2000-09-20 | Template:Competnftp | |
| UV Tyson | 04:31 | Xit Vono | 2003-05-17 | Template:Competnftp | |
| UV pacifist | 00:57 | Drew "stx-Vile" DeVore | 2002-10-06 | Template:Competnftp |
Statistics
Map data
| Things | 154 |
| Vertices | 884 |
| Linedefs | 982 |
| Sidedefs | 1247 |
| Sectors | 166 |
Things
| Monsters | ITYTD and HNTR | HMP | UV and NM |
|---|---|---|---|
| Sergeants | 5 | 6 | 9 |
| Demons | 6 | 14 | 17 |
| Barons of Hell | 0 | 1 | 1 |
| Troopers | 0 | 2 | 2 |
| Cacodemons | 4 | 9 | 9 |
| Lost Souls | 6 | 4 | 9 |
| Powerups | ITYTD and HNTR | HMP | UV and NM |
| Backpacks | 1 | 1 | 1 |
| Stim packs | 4 | 4 | 2 |
| Medikits | 13 | 13 | 12 |
| Soul spheres | 1 | 1 | 1 |
| Health bonuses | 1 | 1 | 1 |
| Armor bonuses | 6 | 6 | 6 |
| Green armors | 2 | 2 | 0 |
| Blue armors | 1 | 1 | 1 |
| Radiation suits | 11 | 10 | 10 |
| Weapons | ITYTD and HNTR | HMP | UV and NM |
| Rocket launchers | 1 | 1 | 1 |
| Plasma guns | 1 | 1 | 1 |
| BFG 9000s | 1 | 1 | 1 |
| Ammunition | ITYTD and HNTR | HMP | UV and NM |
| Ammo clips | 3 | 3 | 2 |
| Shells | 6 | 5 | 2 |
| Rockets | 2 | 2 | 2 |
| Rocket boxes | 2 | 2 | 1 |
| Energy cells | 11 | 11 | 11 |
| Ammo boxes | 1 | 1 | 1 |
| Shell boxes | 5 | 3 | 3 |
| Keys | ITYTD and HNTR | HMP | UV and NM |
| Red skulls | 1 | 1 | 1 |
| Yellow skulls | 1 | 1 | 1 |
| Blue skulls | 1 | 1 | 1 |