No edit summary Tag: sourceedit |
m (Removing POV edit on how hard the editor thinks the level is.) Tag: rte-source |
||
| Line 3: | Line 3: | ||
'''E3M3: Pandemonium''' is the third map of [[Inferno]] in [[Doom]]. It was designed by [[Tom Hall]] and [[Sandy Petersen]]. It uses the music "Deep Into The Code". ''Pandæmonium'' is the name of the capital of hell and the palace of Satan in [[Wikipedia:John Milton|John Milton]]'s epic poem [[Wikipedia:Paradise Lost|Paradise Lost]]. The [[par time]] is 1:30. |
'''E3M3: Pandemonium''' is the third map of [[Inferno]] in [[Doom]]. It was designed by [[Tom Hall]] and [[Sandy Petersen]]. It uses the music "Deep Into The Code". ''Pandæmonium'' is the name of the capital of hell and the palace of Satan in [[Wikipedia:John Milton|John Milton]]'s epic poem [[Wikipedia:Paradise Lost|Paradise Lost]]. The [[par time]] is 1:30. |
||
| − | |||
| − | ''Difficulty: Medium'' |
||
==Overview== |
==Overview== |
||
Revision as of 22:34, 2 June 2017
Template:Inferno
- This level occupies the map slot E3M3. For other maps which occupy this slot, see Category:E3M3.
E3M3: Pandemonium is the third map of Inferno in Doom. It was designed by Tom Hall and Sandy Petersen. It uses the music "Deep Into The Code". Pandæmonium is the name of the capital of hell and the palace of Satan in John Milton's epic poem Paradise Lost. The par time is 1:30.
Overview
Strategy
Walkthrough
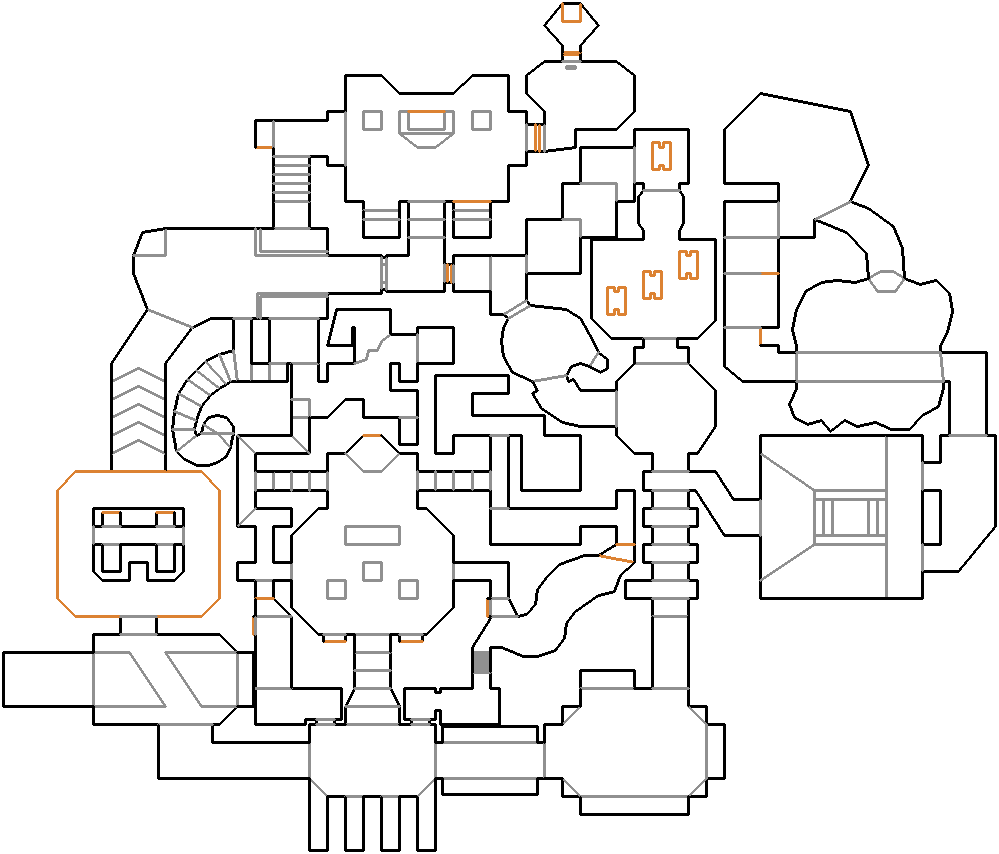
Map of E3M3
1. You start in the center of the most southern area. Walk straight up the stairs to enter a wooden room with a switch in the end and two stairs on the sides (close to the switch). The switch lowers the pedestal inside the room with a shotgun on top.
2. Take the right stairs (looking towards the switch) and enter a red bloody roof. Turn right and right and walk forward. Take right again once you got the option of left and right. You be lowered be a elevator and enter a spacier and pinker corridor.
3. Walk forward. You will see one elevator more, but choose to go down the metallic stairs and you will find the blue key. Go back the same way you came back to the start.
4. This time take the western road and pass a room with green toxic and a room with moving walls. Go up the stairs in the next room and pass it and to a wooden door far away.
5. To the left of the door (looking at it), there is an area with the blue door to the right. Inside there is the exit.
Secrets
- From the start, hang a right, then turn left into a hall with several lion-faced walls. Between the last two on the right is a dark hidden hallway leading to a secret area.
- In secret #1, cross the bridge and follow the path to the end. Flip the switch to raise the sunken floor. The next room counts as a secret also. Alternatively, run across the red nukage to the berserk pack, and enter the room behind it.
- At the end of the lion-faced hall is a circular room where the path splits off in two; follow the left one and drop into the slime pool. Hidden around the right corner is a chaingun.
- Once you've reached the cement-walled room in the northwest (with two balconies overlooking it, one of which is fenced in), follow the narrow hall next to the fenced-in balcony. Go up the stairs to the left; the balcony itself counts as a secret. A nearby blood/lava pool contains a soul sphere and a BFG9000, the first one in the game.
- In the outdoor area with the blue door at the northern end of the map, there is a raised platform in the center of the room resembling an altar. Walk around to the back and step on the brown floor. A wall across the way and to the right will open up. Inside is a computer area map.
- Similar to secret #5, but on the opposite side of the entrance to the area. This wall must be opened manually, however.
Bugs
- Two energy cells (Things 19 and 20) have no flags set for any of the difficulty classes, so they do not actually appear in the level.
- In Doom v1.1, flipping the switch inside the sunken floor also raises the floor. If you then flip the switch to the south, the floor will then try to move up into and through the ceiling. Later versions of Doom fix this bug.
- Thing 19 is placed outside of any sector. As it has no flags set for any difficulty classes, this has no effect on the game.
Speedrunning
Routes and tricks
Records
The Compet-N records for the map are:
| Run | Time | Player | Date | File | Notes |
|---|---|---|---|---|---|
| UV speed | 00:22 | Marijo "Sedlo" Sedlic | 2004-03-20 | Template:Competnftp | |
| NM speed | 00:27 | Adam Williamson | 1999-10-21 | Template:Competnftp | |
| UV max | 02:18 | Radek Pecka | 2002-03-21 | Template:Competnftp | |
| NM100S | 01:11 | Radek Pecka | 2003-07-02 | Template:Competnftp | |
| UV -fast | 02:29 | Radek Pecka | 2000-11-19 | Template:Competnftp | |
| UV -respawn | 02:14 | Radek Pecka | 2000-10-20 | Template:Competnftp | |
| UV Tyson | 02:25 | Xit Vono | 2003-04-07 | Template:Competnftp | |
| UV pacifist | 00:22 | Marijo "Sedlo" Sedlic | 2004-03-20 | Template:Competnftp |
Statistics
Map data
| Things | 209 |
| Vertices | 905 |
| Linedefs | 1102 |
| Sidedefs | 1394 |
| Sectors | 192 |
Things
| Monsters | ITYTD and HNTR | HMP | UV and NM |
|---|---|---|---|
| Sergeants | 1 | 1 | 1 |
| Spectres | 0 | 1 | 4 |
| Imps | 15 | 27 | 34 |
| Demons | 4 | 11 | 14 |
| Barons of Hell | 0 | 1 | 2 |
| Cacodemons | 1 | 3 | 2 |
| Lost Souls | 4 | 7 | 14 |
| Powerups | ITYTD and HNTR | HMP | UV and NM |
| Backpacks | 1 | 1 | 1 |
| Stim packs | 13 | 14 | 14 |
| Medikits | 14 | 12 | 11 |
| Soul spheres | 1 | 1 | 1 |
| Armor bonuses | 3 | 3 | 3 |
| Green armors | 1 | 1 | 1 |
| Blue armors | 2 | 2 | 2 |
| Invulnerabilities | 1 | 1 | 1 |
| Berserks | 1 | 1 | 1 |
| Automaps | 1 | 1 | 1 |
| Weapons | ITYTD and HNTR | HMP | UV and NM |
| Shotguns | 2 | 1 | 1 |
| Chainguns | 1 | 1 | 1 |
| Rocket launchers | 1 | 1 | 1 |
| BFG 9000s | 1 | 1 | 1 |
| Ammunition | ITYTD and HNTR | HMP | UV and NM |
| Bulk Cells | 1 | 1 | 1 |
| Ammo clips | 11 | 11 | 11 |
| Shells | 11 | 11 | 11 |
| Rockets | 2 | 3 | 2 |
| Energy cells | 2 | 2 | 2 |
| Ammo boxes | 4 | 4 | 4 |
| Shell boxes | 4 | 4 | 4 |
| Keys | ITYTD and HNTR | HMP | UV and NM |
| Blue skulls | 1 | 1 | 1 |
Inspiration and development
Early versions of this level appeared as E1M9 of Doom 0.4 and E1M5 of Doom 0.5.
Trivia
- Collecting the Soul Sphere located in the lava pit within the center of the map is a prime spot to show the rare Ouch face.
- The track in this level is based off of "Behind the Crooked Cross" by Slayer.
- This map was originally started by Tom Hall and was designed to be a laboratory, as described in the Doom Bible. This is the reason why there are "windows" at the start of the level, for they were intended to be guard posts at first.
- First map to include the BFG9000.