- This level occupies the map slot E2M2. For other maps which occupy this slot, see Category:E2M2.
- This level occupies the map slot MAP10. For other maps which occupy this slot, see Category:MAP10.
E2M2: Containment Area (MAP10 in PSX/Saturn/Jaguar/3DO/GBA/32X) is the second map of The Shores of Hell in Doom. It was designed by Tom Hall and Sandy Petersen, and uses the music track "The Demons from Adrian's Pen". The par time is 1:30.
This level is known for the large "warehouse" area in the north, which was inspired by a similar warehouse in the finale of the 1981 adventure film Raiders of the Lost Ark.[1] The warehouse is predominantly a maze of crates, designed to give a sense of space without overtaxing Doom's engine. The "crate maze" subsequently became a cliché of Doom level design.
The open layout is highly unusual for a stock map and, when the player first fires a weapon, inevitably results in his being charged by Imps from all directions (there are several sound-blocking linedefs in the room, but they have negligible effect, due to the numerous "air gaps" between the boxes and the fact that a sound must cross two such lines in order to be suppressed [1]).
The map is also unusual, as Player 2 starts in a different location than Player 1 in co-operative mode. There are also no Former Human (zombie) enemies, despite these being common in most of The Shores of Hell levels. Players who explore the maze systematically, will find a fair number of stimpacks and medikits included as well.
Walkthrough[]
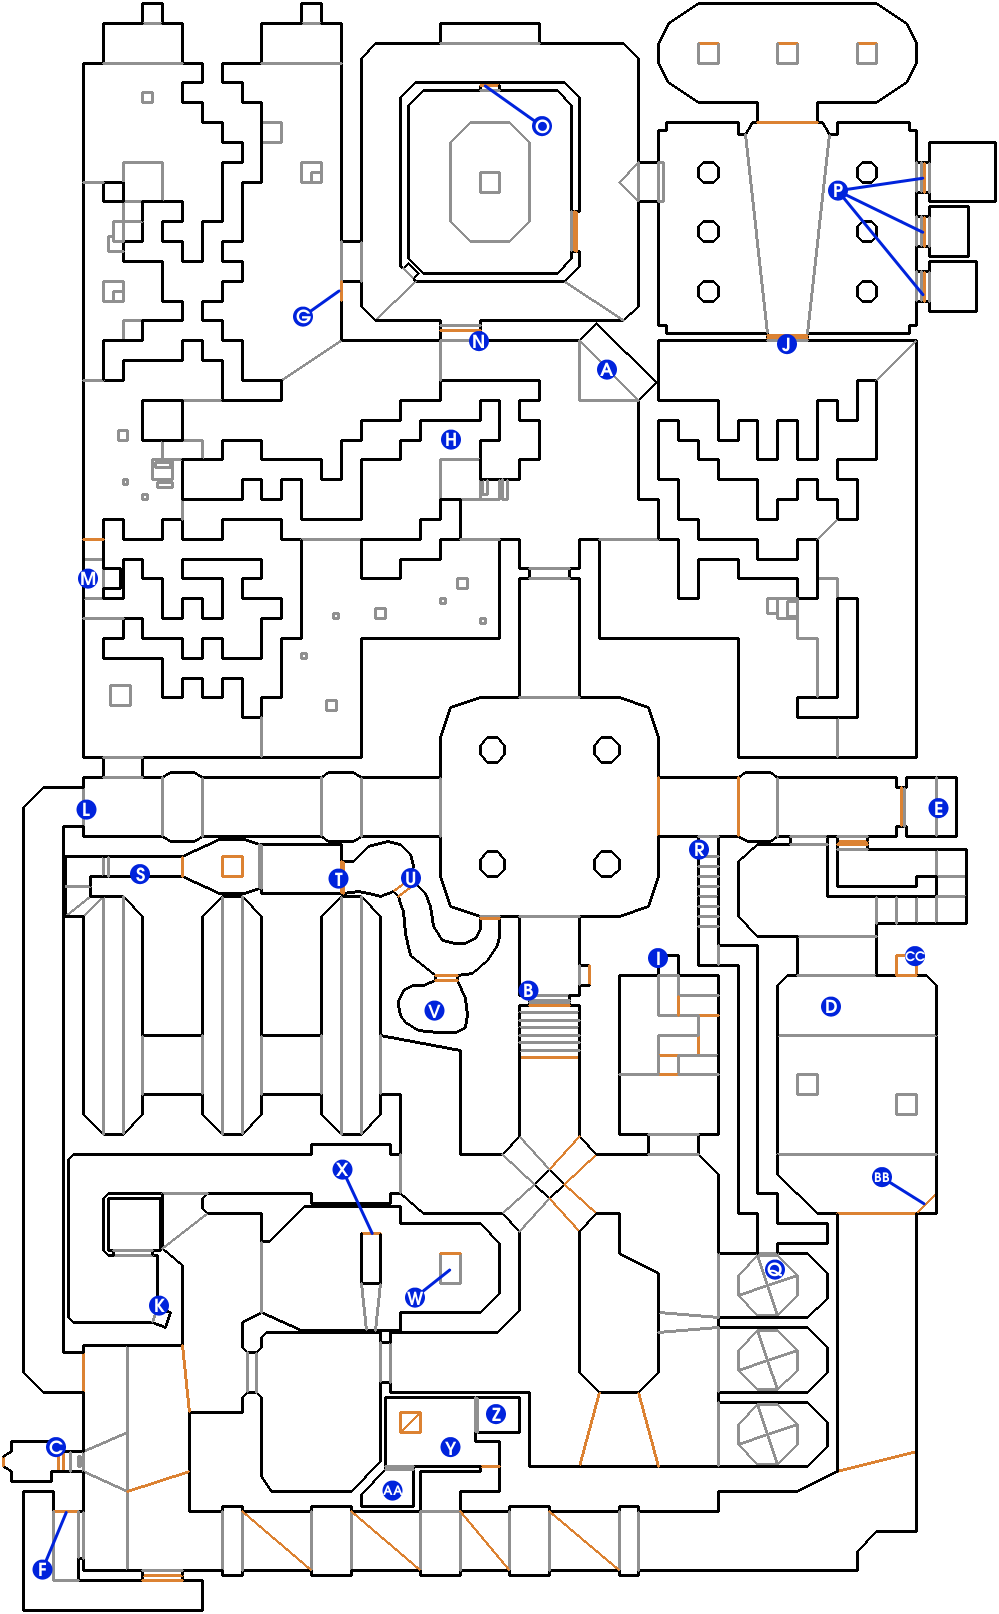
Map of E2M2
- Letters in italics refer to marked spots on the map. Sector numbers in boldface are secrets which count toward the end-of-level tally.
Essentials[]
Follow the wall on your left to the south, then east, until you come to the berserk pack (A). Go south through a rusty metal opening into a green marble hall. Continue south to a metal door (B). Open the door using the switch on the left, then walk through to raise the stairs.
Continue south and take the first right. Go west and take the first left. Follow this hallway as far south as it goes; you will pass the exit door (C), inaccessible across nukage on your right, and come to the red door. Turn left to see a series of five crushers.
Dash through the crushers and continue around until you find the blue keycard (D). Follow the passageway beyond, go down the stairs, and open the blue door. Another blue door will appear immediately on your right, behind which is the red keycard (E).
Return to the red door and go through. Click the switch at the end of the hallway (F) to raise a bridge to the exit door.
Other points of interest[]
Just to the right of the start point is an alcove containing a green armor; atop a nearby crate, out of reach, is a box of shells (I'm too young to die and Hey, not too rough) or a shotgun (Hurt me plenty, Ultra-Violence, and Nightmare!). This crate can be lowered into the floor by following the east wall, past the window, and pulling the switch at the corner (G).
There is a box of bullets in the extreme northwest corner of the level.
The central pile of crates includes a cul-de-sac (H) which conceals a shell box. On HMP and higher, it is guarded by three Imps.
After ascending the rising stairs, if the player makes a hairpin turn to the left, they will see the yellow key (I) on the other side of a blood pool. If the player steps in the correct places, a hidden walkway will rise in five separate sections, allowing the key to be taken without injury. This path is indicated by a trail of blue circles on the ceiling, which unfortunately are sometimes just out of view even in fullscreen mode, so if you are uncertain, it may be wise to step back to get your bearings after each platform. Note that, due to the way Doom handles "rising floor" linedefs, any platform triggered out of sequence (by falling into the blood) will retain the red texture and will still inflict damage.
In the northeast corner of the crate maze is a yellow door (J). If you walk through, you will see a squarish room with columns, and a backpack just beyond. The backpack is really on a metal pedestal which rises out of reach as you approach it, but by running forward or straferunning you can normally get there in time (watch out for the Imp hiding behind the doorframe on each side, if you play on UV or NM). If you miss, you have to lower the pedestal the hard way: see secrets #3, #4, and #5 below.
After ascending the rising stairs, if the player turns right down the passage but then continues straight ahead, he will eventually find a shelf with a blue armor (K). This is guarded by three Imps.
At the exit, if you fall into the south end of the slime channel after hitting the switch, you cannot get out. Otherwise, you can run northward to the other end of the channel, which connects to the green marble room (L). There may be a radiation suit to hand (HMP), or indeed two radiation suits (ITYTD and HNTR), or there may be a Lost Soul waiting near the upper corner of the passage (UV and NM).
This is one of few levels in Doom where the co-op start points are not all in close proximity to one another; players 2 and 4 begin separated from players 1 and 3.
Secrets[]
- From the start point, work your way over to the western wall of the map. Turn south and a long brown crate ahead (M) will lower as you approach. This reveals a compartment with two boxes of shells (sector 236).
- In the north region of the map is a square concrete corridor, accessible through a door (N) just to the east of the shotgun switch. This corridor surrounds a central chamber which requires the yellow key to enter. Inside is a chaingun on a pillar (sector 176), which can be lowered by pressing the switch (O) on the north wall. (Note that if you fall into the slime before pressing the switch, you cannot get out.)
- In the columned room with the backpack, approach the backpack to make three metal pedestals rise, then walk behind them and turn around to see three switches. Each switch opens one of the metal doors (P) on the east wall of the main room, and passing through any door will lower all three pedestals. The right-hand switch opens the left-hand door, revealing a rocket box (sector 146), which is guarded by three Imps (ITYTD and HNTR) or five Imps (HMP, UV, and NM).
- The left-hand switch (see secret #3 above) opens the central door, revealing a rocket launcher (sector 160).
- The central switch (see secret #3 above) opens the right-hand door, revealing a bullet box (sector 164). This is guarded by two Demons and a Lost Soul (ITYTD and HNTR), or two Demons and two Lost Souls (HMP, UV, and NM).
- Southeast of the yellow key are three sets of small lifts which perpetually rise and lower. The northernmost of these (Q) conceals a small tunnel (sector 60) containing a shell box and a number of health potions. If the player goes to the far end of this tunnel, he is dropped back into the green marble hall (R).
- After ascending the rising stairs, if the player makes a hairpin turn to the right, they will approach three long rooms with flashing blue lights on the floors and ceilings. The lights are actually damaging floors, but since they are recessed, you can normally protect yourself simply by running or straferunning across each gap. Go all the way west to the farthest room, turn north, and follow the brown passageway (S) to a backpack. The passageway will close behind you as you approach the backpack, but reopen after 30 seconds. (sector 128)
- When you pick up the backpack in secret #7, a trap will open in front of you. At the far wall of this trap, the right-hand panel (T) is a secret door (indicated by a gray technical texture as opposed to the greenish one on the left). Open this panel to reveal a round gray room (sector 137) containing two Imps (ITYTD, HNTR, and HMP) and, only on UV and NM, a Demon.
- The back right-hand corner of secret #8 also contains a door (U), indicated by a raised texture, which leads to a curving gray passage. The far end of this passage provides a shortcut back to the green marble hall. Along the south wall of the curve is a secret door, indicated by a grayish texture. Open it to reveal a medikit, a rocket box, and a computer map (V). (sector 140)
- On your way from the rising stairs to the red door, you will pass a large brown technical alcove on your left. Near the back of the alcove is a technical pillar (sector 45) with a plasma gun on top (W). This can be lowered in one of two ways:
- Hit the switch (X) on the north side of the STAR pillar nearby. (This only works once, and temporarily, so make sure there are no monsters in your way.)
- If the technical pillar rises with you on it, you are not trapped: the switch to the north will lower it again permanently. Due to a limitation of the game engine, however, you can easily press this switch from the floor in the first place, which makes the gun much easier to pick up.
- Of the five crushers along the south edge of the level, the middle one can also be exited to the north, into a darkened passage (Y) which leads to a chainsaw. Taking the chainsaw will turn on the lights and open two traps full of Lost Souls (Z, AA). If you don't cross the chainsaw pedestal's northeast to southwest diagonal, the traps won't be triggered. (sector 26)
- In the blue key room, there is a small lighted triangle in the southeast corner (BB). Stand in this triangular area to lower a hidden lift on the other side of the slime (CC), which holds a soul sphere. (This only works once, so move fast! If the lift rises with you on it, you are not trapped: the button on the south wall lowers it again permanently.) (sector 109)
Note that opening secret #3, #4, or #5 by itself and entering the chamber (thereby lowering the three metal pedestals) does not preclude collecting the other secrets. Simply click in the air as though the switches were still visible.
Bugs[]
One barrel (Thing 174) and four "hanging leg" decorations (Things 251, 252, 253, and 254) have no flags set for any of the three difficulty classes, so they do not actually appear in the level.
Linedefs 947 and 1596 have their upper textures on the wrong side. Each of these results in a Hall of Mirrors effect; the former is hard to see because the difference in ceiling heights is small and the ceiling texture is the same on both affected sectors, but the latter is very obvious if you walk below it slowly. Similarly, linedef 1494 has its upper texture on the wrong side, which has no effect on normal play because the switch sector is too thin to enter.
The following actions can trigger the blockmap bug:
- Attacking the first Imp (Thing 24) from the north.
- Turning to shoot at pursuing monsters as you approach the yellow key.
- Using your fist near the chaingun switch.
- Attacking the Imp guarding the plasma gun switch (Thing 120) from the north.
A few one-sided linedefs (738, 739, 740, 741, 916, 917, 918, 919, 920, 921, 922, 923, 924, 925, 926, 927, 933, and 1499) do not have their "impassable" flag set.
Looking southward from the northeast corner of the square concrete corridor may reveal a slime trail (see screen shot below).
There are 9 known anomalies in this level's REJECT table.
One of the blue doors' textures is lower unpegged, so texture does not move with the door.
Demo files[]
- No monsters, 100% secrets walkthrough (file info)
- 100% kills, items, and secrets on ITYTD (file info)
- 100% kills, items, and secrets on HNTR (file info)
- 100% kills, items, and secrets on HMP (file info)
- 100% kills, items, and secrets on UV (file info)
Video[]
 - E2M2 Containment Area 4K 60FPS (20 KB)")
Areas / screenshots[]
")
")
")
")
")
")
")
")
")
")
")
")
")
")
")
Speedrunning[]
Routes and tricks[]
There are two ways to complete this level without picking up any of the keys:
- It is possible to click the switch that raises the exit bridge from outside the room, while standing in the nukage canal below the window, and then to mount the bridge as it rises. This is generally believed to be the optimal route [2] [3], and is used by Compet-N players in the UV speed, NM speed, and UV pacifist categories. Simon Widlake credits it to an episode run by Steffen Winterfeldt [4] (indeed, contemporary readme files occasionally refer to it as "cheating"! [5]). The discovery also seemed to end a debate over whether or not it was better to return to the red door through the crushers. [6] [7] There is some evidence that it is faster to approach the slime passage through the center of the green marble room than by passing secret #1 [8], unless one also treats the lowering crate as a door, bouncing off and then charging across the threshold at the earliest instant permitted.
- It is possible to straferun across the nukage canal to the exit door. This is slower than the above, because you must wait for the stairs to rise before leaving the green marble hall. Compet-N officially credits the trick to Daniel Lindgren [9], although it has also been attributed to Kai-Uwe Humpert and Sven "Dasa" Huth. [10] In a max run, even if you use this method to avoid waiting for the exit bridge, you must still take the red key so that you can reach the two Imps guarding the switch.
The accepted route in the UV max style is:
- Pull the switch, run to the berserk pack, kill the first Imp, then pick up the shotgun.
- Work your way counterclockwise around the edge of the crate maze, including secret #1, until you reach the north entrance to the green marble hall. Kill any pursuing monsters while the stairs are rising, go to the yellow key, and collect secret #6.
- Grab the plasma gun and clear the surrounding rooms.
- Clear secrets #7, #8, and #9.
- Jump through the gap between crates on the east side of the maze, wallrun to the yellow door, pick up the rocket launcher and start using it.
- Collect the chaingun, using rockets on the Demons if you have any left (and you think you can avoid roasting yourself).
- Proceed to the blue key and the red key.
The key step is the third one, which is a detour (those rooms must be entered again on the way to the blue key), but saves time overall because the plasma gun does so much damage. The current UV -fast world record also used the above route (detouring to the blue armor before picking up the plasma gun), although the community consensus there is less clear. [11]
Anders Johnsen noticed at some point that the berserk fist was more efficient than the shotgun, and started favoring it in the crate maze [12] [13]; that approach is still widely used, although even Anders doesn't punch quite as often when there are fast monsters. [14] [15]
The rocket launcher room can be optimized by killing the second Imp before opening the last door, thereby keeping that group of monsters dormant a bit longer (which makes them easier targets and also reduces your chances of being cornered in secret #4). At one time, it was considered too risky to use the rocket launcher here, so the plasma gun was substituted. This of course made for longer demos, as the chaingun had to be used more often, but it also gave rise to a tradition of "celebrating" the soul sphere by immediately firing a rocket into the Spectre at point-blank range. [16] [17]
A player with excellent timing can SR40 through the first three crushers to the chainsaw area without stopping. [18] If he then ignores the Lost Souls completely, the other two crushers can be handled similarly.
Wallrunning has also been used just before picking up the blue key [19] and in secret #6 [20]. Leaving secret #6 via the staircase is a good idea in any style, even if your next stop is secret #10, because it takes a while for the small lift to lower and then rise again.
In the NM100S style, the following sequence is recommended:
- Pay no attention to the shotgun (pausing to aim only makes you a slower target).
- Collect the yellow key and the health in secret #6.
- Pick up the plasma gun and the soul sphere (ignore everyone in secret #11, which makes straferunning through the crushers even faster).
- Get the green armor in the southeast corner of the crate maze, move through the rocket launcher area, then heal yourself with the berserk pack.
- Get the chaingun and collect secret #1.
- Collect secrets #7, #8, and #9.
- Jump across to the exit door.
Many players appear to avoid becoming surrounded in the plasma gun room by weaving through it in a figure-8 pattern, though it is far from clear how much luck is involved. [21] [22] More deterministic are three small tricks used by the current record holder:
- opening the door to the chaingun area on the first pass, to save time later;
- opening secret #5 sooner by crossing the pedestal as it rises, then spinning around to press the button on the way down, being careful not to fire until you must;
- clearing only enough space at the second backpack to open secret #8. [23]
Because the secret sectors are scattered throughout the level, the UV -respawn player can make few major route changes. Most of the optimization comes from ignoring Demons and Spectres, who simply take longer to kill than Imps; this reasoning can be seen even in the earliest Compet-N submissions. [24] Modern recordings clear the rocket launcher room and the chaingun room as soon as the yellow key is obtained, which presumably avoids later congestion in the crate maze (by not returning to it after everyone has respawned) and in the plasma gun area (which is left alone for a while longer). Most players fire a few rockets before crossing to the exit door, just to be on the safe side.
In the UV Tyson style, the power of one's attacks is the same no matter which weapons are gathered first; this has led expert players to switch the order of the rocket launcher and chaingun areas as compared to UV max, to reduce backtracking. Xit Vono credits Radek Pecka with the innovation [25], although Anders Johnsen appears to have used the same idea somewhat earlier. [26] In the Compet-N database, the chainsaw not only goes unused, it is never even picked up.
It has been argued that opening secret #4 is counterproductive in Tyson runs, because its main effect is to give the monsters an additional avenue of retreat. [27] Some Compet-N entries clear the cul-de-sac in the crate maze with a "projectile barrel frag", punching the first barrel far enough away that it destroys the barrels behind it. (This is unreliable, however, since the recoil of the first barrel depends on how much damage it takes.)
Current records[]
The Compet-N records for the map are:
| Run | Time | Player | Date | File | Notes |
|---|---|---|---|---|---|
| UV speed | 00:14 | Marijo "Sedlo" Sedlic | 2000-05-12 | e2m2-014.zip | |
| NM speed | 00:14 | Juho "ocelot" Ruohonen | 2001-04-19 | n2m2-014.zip | |
| UV max | 03:16 | Radek Pecka | 2003-06-19 | e2m2-316.zip | |
| NM100S | 01:58 | Xit Vono | 2003-03-16 | n2s2-158.zip | |
| UV -fast | 03:27 | Radek Pecka | 2003-06-21 | f2m2-327.zip | |
| UV -respawn | 02:59 | Radek Pecka | 2001-12-04 | r2m2-259.zip | |
| UV Tyson | 03:25 | Radek Pecka | 2003-06-07 | t2m2-325.zip | |
| UV pacifist | 00:14 | Marijo "Sedlo" Sedlic | 2000-05-12 | e2m2-014.zip |
Statistics[]
Map data[]
| Things | 311 |
| Vertexes | 1352 |
| Linedefs | 1610 |
| Sidedefs | 2076 |
| Sectors | 245 |
Things[]
| Monsters | ITYTD and HNTR | HMP | UV and NM |
|---|---|---|---|
| Demons | 7 | 11 | 19 |
| Imps | 40 | 64 | 82 |
| Lost Souls | 5 | 11 | 12 |
| Spectres | 0 | 0 | 2 |
| Powerups | ITYTD and HNTR | HMP | UV and NM |
| Armor bonuses | 8 | 8 | 8 |
| Backpacks | 2 | 2 | 2 |
| Berserk packs | 1 | 1 | 1 |
| Blue armors | 1 | 1 | 1 |
| Computer maps | 1 | 1 | 1 |
| Green armors | 4 | 4 | 4 |
| Health bonuses | 37 | 37 | 37 |
| Medikits | 10 | 10 | 10 |
| Radiation suits | 2 | 1 | 0 |
| Soul spheres | 1 | 1 | 1 |
| Stimpacks | 30 | 30 | 29 |
| Weapons | ITYTD and HNTR | HMP | UV and NM |
| Chainsaws | 1 | 1 | 1 |
| Shotguns | 1 | 1 | 1 |
| Chainguns | 1 | 1 | 1 |
| Rocket launchers | 1 | 1 | 1 |
| Plasma rifles | 1 | 1 | 1 |
| Ammunition | ITYTD and HNTR | HMP | UV and NM |
| Ammo clips | 16 | 15 | 13 |
| Bullet boxes | 4 | 4 | 4 |
| Shells | 15 | 15 | 15 |
| Shell boxes | 5 | 4 | 4 |
| Rockets | 2 | 2 | 2 |
| Rocket boxes | 2 | 2 | 2 |
| Bulk cells | 1 | 1 | 1 |
| Keys | ITYTD and HNTR | HMP | UV and NM |
| Blue cards | 1 | 1 | 1 |
| Red cards | 1 | 1 | 1 |
| Yellow cards | 1 | 1 | 1 |
| Barrels | ITYTD and HNTR | HMP | UV and NM |
| Exploding barrels | 3 | 3 | 3 |
Inspiration and development[]
Early versions of this level appeared as the second level of Doom 0.4, Doom 0.5, and the Doom press release beta.
Trivia[]
- This is the first level in Doom not to include any former humans, though unlike earlier levels it also has no enemies tougher than Demons and Spectres.
- The music for this level is inspired by the tracks "The Call of Ktulu" by Metallica, and "Mr. Doctor" by Devil Doll (minute 3:12).
- The memorable crate maze created by Tom Hall served as inspiration for the crates in LucasArts' Star Wars: Jedi Knight and they were put into the LucasArts game as a homage. Hall considers the original map his favorite Doom map, and has commented negatively on the later changes made to it, such as the addition of the "shell secret" in the mentioned crate maze, which breaks the area layout by creating an unplanned shortcut for the player. The other shortcuts in the crate maze, while arguably being enhancements for multiplayer, he sees as equally "game breaking".
- In The Ultimate Doom, it's featured in the second demo in the rotation, revealing one of the secrets in the demo.