DoomMastermind1985 (talk | contribs) |
m (clean up) |
||
| (35 intermediate revisions by 19 users not shown) | |||
| Line 1: | Line 1: | ||
{{map|slot=E1M8}} |
{{map|slot=E1M8}} |
||
| + | {{map|slot=MAP08}} |
||
| ⚫ | |||
| + | {{map|slot=E1M7}} |
||
| ⚫ | '''E1M8: Phobos Anomaly''' is the eighth and final map of [[Knee-Deep in the Dead]] in [[Doom]], featuring a [[boss]] battle with two [[Baron of hell|barons of hell]] (which are often named ''bruiser brothers''). It was designed by [[Sandy Petersen]] and [[Tom Hall]] and uses the [[Doom music|music]] track |
||
| + | {{Infobox Map |
||
| + | |title = E1M8: Phobos Anomaly |
||
| + | |image = |
||
| + | |game =[[Doom]] |
||
| ⚫ | |||
| + | |level = |
||
| + | |map_number = 8 |
||
| + | |entry_from =[[E1M7: Computer Station (Doom)|Computer Station]] |
||
| + | |exits_to = Episode End<br>[[E2M1: Deimos Anomaly (Doom)|Deimos Anomaly]] |
||
| + | }} |
||
| ⚫ | '''E1M8: Phobos Anomaly (MAP08 in [[Sony PlayStation|PSX]]/[[Sega Saturn|Saturn]]/[[Atari Jaguar|Jaguar]]/[[3DO]]/[[Game Boy Advance|GBA]]/[[Sega 32X|32X]], E1M7 in [[Super NES|SNES]])''' is the eighth and final map of [[Knee-Deep in the Dead]] in [[Doom]], featuring a [[boss]] battle with two [[Baron of hell|barons of hell]] (which are often named ''bruiser brothers''). It was designed by [[Sandy Petersen]] and [[Tom Hall]] and uses the [[Doom music|music]] track "Sign Of Evil". |
||
| ⚫ | |||
| − | == Walkthrough == |
||
| − | |||
| ⚫ | |||
: Letters in ''italics'' refer to marked spots on the map. [[Sector]] numbers in '''boldface''' are [[secrets]] which count toward the [[Intermission screen|end-of-level tally]] (if your [[source port]] displays one). |
: Letters in ''italics'' refer to marked spots on the map. [[Sector]] numbers in '''boldface''' are [[secrets]] which count toward the [[Intermission screen|end-of-level tally]] (if your [[source port]] displays one). |
||
| − | == |
+ | ==Walkthrough== |
From the start point ''(A)'', walk forward and click the switch to lower the brick wall. Jump down into the oval room, then take the staircase to your left (north) and proceed through the gray door, down the central hallway to a square button ''(B)''. This button lowers an elevator which leads to a large star-shaped room, at the center of which are two rectangular, tomb-like structures ''(C)''. |
From the start point ''(A)'', walk forward and click the switch to lower the brick wall. Jump down into the oval room, then take the staircase to your left (north) and proceed through the gray door, down the central hallway to a square button ''(B)''. This button lowers an elevator which leads to a large star-shaped room, at the center of which are two rectangular, tomb-like structures ''(C)''. |
||
| − | As you leave the red alcove the two structures will open, each revealing a [[baron of hell]]. |
+ | As you leave the red alcove the two structures will open, each revealing a [[baron of hell]]. On Ultra-Violence and Nightmare! there are also ten [[spectre]]s here, two in each corner of the star; these are difficult to see because the room is fairly dark and has a speckled [[flat|floor texture]]. To progress, the Barons must be slain. |
This is easiest if you have a [[rocket launcher]] from a previous level, although you should watch for spectres cutting in front of you and subjecting you to [[blast damage]]. Otherwise, note that the [[chaingun]] has a higher rate of [[damage]] than the [[shotgun]], which gives the monsters less time to corner you. If you run low on [[ammunition]], the corners of the star contain four [[Box of bullets|boxes of bullets]] and a [[Box of shotgun shells|box of shells]] (as well as a shotgun, two [[medikit]]s, a [[stimpack]], and a [[partial invisibility]] artifact). Each "tomb" also contains a box of bullets. |
This is easiest if you have a [[rocket launcher]] from a previous level, although you should watch for spectres cutting in front of you and subjecting you to [[blast damage]]. Otherwise, note that the [[chaingun]] has a higher rate of [[damage]] than the [[shotgun]], which gives the monsters less time to corner you. If you run low on [[ammunition]], the corners of the star contain four [[Box of bullets|boxes of bullets]] and a [[Box of shotgun shells|box of shells]] (as well as a shotgun, two [[medikit]]s, a [[stimpack]], and a [[partial invisibility]] artifact). Each "tomb" also contains a box of bullets. |
||
| Line 17: | Line 26: | ||
Also, you can lure any of the spectres in between you and any of the two barons when they combat with you, that way you can distract the barons as they make their attack. This way, when the barons' projectiles hit the spectres, the spectres will turn towards the barons and attack them, which will get the barons to attack the spectres and help you defeat them. |
Also, you can lure any of the spectres in between you and any of the two barons when they combat with you, that way you can distract the barons as they make their attack. This way, when the barons' projectiles hit the spectres, the spectres will turn towards the barons and attack them, which will get the barons to attack the spectres and help you defeat them. |
||
| − | When both barons have died, the walls of the star will slowly lower, revealing a huge courtyard outside. At the north end of this is a marble-textured [[Teleporter|teleporter pad]] on a gray platform ''(D)'', which is invisible on the [[automap]]. Pull the switch at the base ''(E)'' to raise its stairs, and ascend to the teleporter. This deposits you in a pitch-dark, small and inescapable room with a pack of monsters around you and a [[damaging floor]] under your feet ''(F)''. As soon as your [[health]] drops to 10% or lower, the level ends. |
+ | When both barons have died, the walls of the star will slowly lower, revealing a huge courtyard outside. At the north end of this is a marble-textured [[Teleporter|teleporter pad]] on a gray platform ''(D)'', which is invisible on the [[automap]]. Pull the switch at the base ''(E)'' to raise its stairs, and ascend to the teleporter. This deposits you in a pitch-dark, small and inescapable room with a pack of monsters around you and a [[damaging floor]] under your feet ''(F)''. As soon as your [[health]] drops to 10% or lower, the level ends. Due to a lack of the Chapter system, the [[Atari Jaguar]], [[Sega 32X]], [[PlayStation]], [[3DO]], and [[Saturn]] ports don't have this room; Instead they have a whole new exit room, with a switch-born raising staircase, a few extra zombies (on higher difficulty levels), and a teleporter exit. |
===Other points of interest=== |
===Other points of interest=== |
||
| Line 30: | Line 39: | ||
Demons and spectres who outlive the barons may enter the outer courtyard by stepping onto the star-shaped wall as it lowers, especially with [[Command line arguments|fast monsters]]. Watch out for these while waiting for the stairs to rise. |
Demons and spectres who outlive the barons may enter the outer courtyard by stepping onto the star-shaped wall as it lowers, especially with [[Command line arguments|fast monsters]]. Watch out for these while waiting for the stairs to rise. |
||
| − | On each [[skill level]], the last room contains six [[shotgun guy]]s, five [[imp]]s, and four demons. Although these can very occasionally be defeated using a rocket launcher {{competnftp|doom/max/ep1-3853.zip}} {{competnftp|doom/max/ep1-3328.zip}}, or in ITYTD using the chaingun (because all player damage is halved), the room essentially functions as a "special effect" whereby 100% kills is sacrificed in favor of plot development. As a result, a kill percentage as low as 28% (ITYTD and HNTR), 44% (HMP), or 63% (UV) can be considered maximal. In a real game, of course, the number will be somewhat higher due to [[infighting]], unless the player is nearly dead before he teleports. |
+ | On each [[skill level]], the last room contains six [[shotgun guy]]s, five [[imp]]s, and four demons. Although these can very occasionally be defeated using a rocket launcher {{External Link|site=competnftp|file_path=doom/max/ep1-3853.zip}} {{External Link|site=competnftp|file_path=doom/max/ep1-3328.zip}}, or in ITYTD using the chaingun (because all player damage is halved), the room essentially functions as a "special effect" whereby 100% kills is sacrificed in favor of plot development. As a result, a kill percentage as low as 28% (ITYTD and HNTR), 44% (HMP), or 63% (UV) can be considered maximal. In a real game, of course, the number will be somewhat higher due to [[infighting]], unless the player is nearly dead before he teleports. |
===Secrets=== |
===Secrets=== |
||
| Line 37: | Line 46: | ||
====Non-official==== |
====Non-official==== |
||
| − | # ''[Added in [[Versions_of_Doom_and_Doom_II#v1.666|v1.666]]]'' |
+ | # ''[Added in [[Versions_of_Doom_and_Doom_II#v1.666|v1.666]]]'' Inside the eastern "tomb", there is a secret compartment on the east wall. Opening it reveals a switch ''(H)'', which re-activates the elevator at the south end of the room, allowing the player to return to earlier sections of the level. This compartment is not needed for 100% secrets. |
===Bugs=== |
===Bugs=== |
||
| − | The [[Flawed collision detection|blockmap bug]] can be triggered by attacks directed |
+ | The [[Flawed collision detection|blockmap bug]] can be triggered by attacks directed: |
| − | |||
* north-south in the star room near the star's axis of symmetry; |
* north-south in the star room near the star's axis of symmetry; |
||
* eastward out of the western point of the star; |
* eastward out of the western point of the star; |
||
* along the central corridor. |
* along the central corridor. |
||
| − | After the walls of the star have been lowered, examination of its inner corners may reveal a handful of [[slime trails]] (see |
+ | After the walls of the star have been lowered, examination of its inner corners may reveal a handful of [[slime trails]] (see screenshots below). |
There are 2 known [[Blind spots in Doom reject tables|anomalies]] in this level's [[REJECT|REJECT table]]. |
There are 2 known [[Blind spots in Doom reject tables|anomalies]] in this level's [[REJECT|REJECT table]]. |
||
===Demo files=== |
===Demo files=== |
||
| − | * [ |
+ | * [[Media:E1m8wik1.lmp|80% kills, 100% items, and 100% secrets on ITYTD]] ([[:File:e1m8wik1.lmp|file info]]) |
| − | * [ |
+ | * [[Media:E1m8wik2.lmp|80% kills, 100% items, and 100% secrets on HNTR]] ([[:File:e1m8wik2.lmp|file info]]) |
| − | * [ |
+ | * [[Media:E1m8wik3.lmp|85% kills, 100% items, and 100% secrets on HMP]] ([[:File:e1m8wik3.lmp|file info]]) |
| − | * [ |
+ | * [[Media:E1m8wik4.lmp|82% kills, 100% items, and 100% secrets on UV]] ([[:File:e1m8wik4.lmp|file info]]) |
| + | ==Video== |
||
| ⚫ | |||
| + | <gallery widths="500" position="center" hideaddbutton="true" spacing="small" bordersize="medium" captionalign="center"> |
||
| + | File:Doom (1993) - E1M8 Phobos Anomaly 4K 60FPS |
||
| + | </gallery> |
||
| + | |||
| ⚫ | |||
<gallery> |
<gallery> |
||
Image:E1M8 oval room.png|Start point |
Image:E1M8 oval room.png|Start point |
||
| Line 76: | Line 89: | ||
</gallery> |
</gallery> |
||
| − | == |
+ | ==Speedrunning== |
| − | |||
===Routes and tricks=== |
===Routes and tricks=== |
||
| − | In a straight speedrun, the most efficient strategy is to incite [[infighting]] between a |
+ | In a straight speedrun, the most efficient strategy is to incite [[infighting]] between a Baron and a Spectre, then use the chaingun on the Baron. The Baron fires fewer plasma bolts because it is being bitten, yet refuses to face the Spectre because it is being shot, so he continues to take damage at an increased rate (with [[Command line arguments|fast monsters]] parameter activated, the Spectre attacks so frequently that the baron can hardly move). A few players instead advocate taking cover in one of the "tombs", possibly using the hidden compartment to sidestep incoming plasma, though luck plays a far more significant role in that case. {{External Link|site=competnftp|file_path=doom/speed/e1m8-050.zip}} {{External Link|site=competnftp|file_path=doom/max/e1m8-046.zip}} |
The shotguns on this map are generally ignored, simply because the chaingun does damage more rapidly and is more readily replenished in the star room. |
The shotguns on this map are generally ignored, simply because the chaingun does damage more rapidly and is more readily replenished in the star room. |
||
| Line 85: | Line 97: | ||
[[Wallrunning]] is commonly used in the passage leading to the star room. |
[[Wallrunning]] is commonly used in the passage leading to the star room. |
||
| − | For [[NM speed]], it is important to shoot at the pursuing demons after pressing the elevator button, or at least lunge briefly into their [[melee]] range, so that no demon can cause several seconds' delay by becoming [[Monsters stuck in doortracks, walls or hanging off lifts|caught on the edge of the platform]]. |
+ | For [[NM speed]], it is important to shoot at the pursuing demons after pressing the elevator button, or at least lunge briefly into their [[melee]] range, so that no demon can cause several seconds' delay by becoming [[Monsters stuck in doortracks, walls or hanging off lifts|caught on the edge of the platform]]. Some [[pacifist]] recordings simply weave back and forth on the platform, so that the Demons do not approach in a straight line. |
| − | In the [[NM100S]] style, you must kill the demons in the oval room in order to avoid being surrounded as you collect the [[Secrets|secret]]. |
+ | In the [[NM100S]] style, you must kill the demons in the oval room in order to avoid being surrounded as you collect the [[Secrets|secret]]. [[Jochen "Angus" Schneidau]] has introduced two innovations which turn the demons' increased speed against them: |
| − | * Destroy half of the barrels by firing at the nearest one, then run to the east end of the room and shoot the others from the lift. {{competnftp|doom/nm100s/n1s8-104.zip}} |
+ | * Destroy half of the barrels by firing at the nearest one, then run to the east end of the room and shoot the others from the lift. {{External Link|site=competnftp|file_path=doom/nm100s/n1s8-104.zip}} |
| − | * As the first barrel starts to explode, charge forward along the south wall, so that the demons migrate in the same direction as the chain reaction (severely injuring yourself in the process). {{competnftp|doom/nm100s/n1s8-059.zip}} |
+ | * As the first barrel starts to explode, charge forward along the south wall, so that the demons migrate in the same direction as the chain reaction (severely injuring yourself in the process). {{External Link|site=competnftp|file_path=doom/nm100s/n1s8-059.zip}} |
| − | The whole issue can of course be circumvented in an episode run by using rockets. {{competnftp|doom/movie/e1ns1506.zip}} |
+ | The whole issue can of course be circumvented in an episode run by using rockets. {{External Link|site=competnftp|file_path=doom/movie/e1ns1506.zip}} |
| − | In every category save pacifist, the fastest [[Compet-N]] runs purposely take a lot of damage in the star room, which speeds up the exit area. |
+ | In every category save pacifist, the fastest [[Compet-N]] runs purposely take a lot of damage in the star room, which speeds up the exit area. Extensive trial and error actually allowed the current [[UV speed]] record holder to leave the level instantly. {{External Link|site=competnftp|file_path=doom/max/e1m8-046.zip}} |
| − | By [[straferun]]ning, it is possible to jump directly from the star room to the top of the [[teleporter]] structure, bypassing the delay while the stairs rise. |
+ | By [[straferun]]ning, it is possible to jump directly from the star room to the top of the [[teleporter]] structure, bypassing the delay while the stairs rise. The player must jump just as the top of the lowering wall meets the level of the red floor, in effect extending it out further. This trick is credited to Matthias Belz. {{External Link|site=competnftp|file_path=doom/speed/e1m8-112.zip}} {{External Link|site=competnftp|file_path=doom/speed/e1m8-059.zip}} |
| − | When recording in a maxkills style, most players thin out the crowd of spectres immediately with [[barrel frag]]s, by hiding in the northwest corner of the star until they gather nearby. |
+ | When recording in a maxkills style, most players thin out the crowd of spectres immediately with [[barrel frag]]s, by hiding in the northwest corner of the star until they gather nearby. This tactic can also help in NM, and sometimes even in UV speed, to gain maneuvering space and discourage later ambushes (in an episode run, it also helps protect you from your own rockets).{{External Link|site=competnftp|file_path=doom/movie/e1ns1547.zip}}) |
| − | Due to the low damage rate of the [[pistol]], [[Tyson]] runs are sped up considerably when one or both barons are wounded by [[Blast damage|exploding barrels]]. |
+ | Due to the low damage rate of the [[pistol]], [[Tyson]] runs are sped up considerably when one or both barons are wounded by [[Blast damage|exploding barrels]]. The current record holder combined this with infighting between the barons (carefully luring one baron in amongst the barrels while the other baron shoots at them), which was pioneered by [[Patrick Martin]]'s initial Compet-N submission. {{External Link|site=competnftp|file_path=doom/tyson/t1m8-440.zip}} |
Pacifist runs begin by encouraging infighting between the barons as above, then use the hidden switch to bring in demons on the elevator until they eventually kill the remaining baron. |
Pacifist runs begin by encouraging infighting between the barons as above, then use the hidden switch to bring in demons on the elevator until they eventually kill the remaining baron. |
||
| − | When the player is positioned at one of the two southern points of the star room, the spectres cannot get close enough to attack. |
+ | When the player is positioned at one of the two southern points of the star room, the spectres cannot get close enough to attack. This can be exploited in any category to encourage infighting, but it is especially useful in Tyson and pacifist recordings: if the player detours to the southwest corner on his way to the barrels, the barons are far more likely to leave their platform promptly. |
| − | In Compet-N episode runs, this map is always played very differently from its single-level counterparts, and from the other levels in the movie. |
+ | In Compet-N episode runs, this map is always played very differently from its single-level counterparts, and from the other levels in the movie. Because the judges do not take elapsed time into account, survival is essentially the only goal; nearly all of the above tricks are discarded as being too aggressive. |
===Current records=== |
===Current records=== |
||
The [[Compet-N]] records for the map are: |
The [[Compet-N]] records for the map are: |
||
| + | {| class="WikiaTable" |
||
| − | {| {{prettytable}} |
||
| − | !Run |
+ | !Run!!Time!!Player!!Date!!File!!Notes |
|- |
|- |
||
| − | |[[UV speed]]||00:46||[[Marijo "Sedlo" Sedlic]]||2004-04-08||{{competnftp|doom/speed/e1m8-046.zip|e1m8-046.zip}}|| |
+ | |[[UV speed]]||00:46||[[Marijo "Sedlo" Sedlic]]||2004-04-08||{{External Link|site=competnftp|file_path=doom/speed/e1m8-046.zip|text=e1m8-046.zip}}|| |
|- |
|- |
||
| − | |[[NM speed]]||00:49||[[Adam Hegyi]]||2001-06-20||{{competnftp|doom/nmare/n1m8-049.zip|n1m8-049.zip}}|| |
+ | |[[NM speed]]||00:49||[[Adam Hegyi]]||2001-06-20||{{External Link|site=competnftp|file_path=doom/nmare/n1m8-049.zip|text=n1m8-049.zip}}|| |
|- |
|- |
||
| − | |[[UV max]]||01:10||[[Adam Hegyi]]||1998-03-07||{{competnftp|doom/max/e1m8-110.zip|e1m8-110.zip}}|| |
+ | |[[UV max]]||01:10||[[Adam Hegyi]]||1998-03-07||{{External Link|site=competnftp|file_path=doom/max/e1m8-110.zip|text=e1m8-110.zip}}|| |
|- |
|- |
||
| − | |[[NM100S]]||00:59||[[Jochen "Angus" Schneidau]]||2003-10-28||{{competnftp|doom/nm100s/n1s8-059.zip|n1s8-059.zip}}|| |
+ | |[[NM100S]]||00:59||[[Jochen "Angus" Schneidau]]||2003-10-28||{{External Link|site=competnftp|file_path=doom/nm100s/n1s8-059.zip|text=n1s8-059.zip}}|| |
|- |
|- |
||
| − | |[[UV -fast]]||01:04||[[Jochen "Angus" Schneidau]]||2003-12-07||{{competnftp|doom/fast/f1m8-104.zip|f1m8-104.zip}}|| |
+ | |[[UV -fast]]||01:04||[[Jochen "Angus" Schneidau]]||2003-12-07||{{External Link|site=competnftp|file_path=doom/fast/f1m8-104.zip|text=f1m8-104.zip}}|| |
|- |
|- |
||
|[[UV -respawn]]|| || || || ||<sup>1</sup> |
|[[UV -respawn]]|| || || || ||<sup>1</sup> |
||
|- |
|- |
||
| − | |[[UV Tyson]]||01:38||[[Oyvind Stenhaug]]||2002-04-08||{{competnftp|doom/tyson/t1m8-138.zip|t1m8-138.zip}}|| |
+ | |[[UV Tyson]]||01:38||[[Oyvind Stenhaug]]||2002-04-08||{{External Link|site=competnftp|file_path=doom/tyson/t1m8-138.zip|text=t1m8-138.zip}}|| |
|- |
|- |
||
| − | |[[UV pacifist]]||02:29||[[Oyvind Stenhaug]]||2002-05-13||{{competnftp|doom/pacifist/p1m8-229.zip|p1m8-229.zip}}|| |
+ | |[[UV pacifist]]||02:29||[[Oyvind Stenhaug]]||2002-05-13||{{External Link|site=competnftp|file_path=doom/pacifist/p1m8-229.zip|text=p1m8-229.zip}}|| |
|} |
|} |
||
# Compet-N does not maintain a UV -respawn competition for this level; the reasons for this are unclear. [http://www.doom2.net/~compet-n/index.cgi?action=rules] |
# Compet-N does not maintain a UV -respawn competition for this level; the reasons for this are unclear. [http://www.doom2.net/~compet-n/index.cgi?action=rules] |
||
| − | == |
+ | ==Statistics== |
| − | |||
| − | == Statistics == |
||
===Map data=== |
===Map data=== |
||
| + | {| class="WikiaTable" |
||
| − | {| {{prettytable}} |
||
|[[Things]]||126 |
|[[Things]]||126 |
||
|- |
|- |
||
| Line 148: | Line 158: | ||
===Things=== |
===Things=== |
||
| + | {| class="WikiaTable" |
||
| − | {| {{prettytable}} |
||
| − | ![[Monsters]] |
+ | ![[Monsters]]!![[ITYTD]] and [[HNTR]]!![[HMP]]!![[UV]] and [[NM]] |
|- |
|- |
||
|[[Baron of Hell|Barons of hell]]||2||2||2 |
|[[Baron of Hell|Barons of hell]]||2||2||2 |
||
| Line 161: | Line 171: | ||
|[[Spectre]]s||0||0||10 |
|[[Spectre]]s||0||0||10 |
||
|- |
|- |
||
| − | ![[Powerup]]s |
+ | ![[Powerup]]s!!ITYTD and HNTR!!HMP!!UV and NM |
|- |
|- |
||
|[[Armor]]||1||1||1 |
|[[Armor]]||1||1||1 |
||
| Line 175: | Line 185: | ||
|[[Supercharge]]s||1||1||1 |
|[[Supercharge]]s||1||1||1 |
||
|- |
|- |
||
| − | ![[Weapons]] |
+ | ![[Weapons]]!!ITYTD and HNTR!!HMP!!UV and NM |
|- |
|- |
||
|[[Shotgun]]s||2||2||2 |
|[[Shotgun]]s||2||2||2 |
||
| Line 181: | Line 191: | ||
|[[Chaingun]]s||1||1||1 |
|[[Chaingun]]s||1||1||1 |
||
|- |
|- |
||
| − | ![[Ammo|Ammunition]] |
+ | ![[Ammo|Ammunition]]!!ITYTD and HNTR!!HMP!!UV and NM |
|- |
|- |
||
|[[Box of bullets|Boxes of bullets]]||12||11||11 |
|[[Box of bullets|Boxes of bullets]]||12||11||11 |
||
|- |
|- |
||
|[[Box of shotgun shells|Boxes of shotgun shells]]||4||4||4 |
|[[Box of shotgun shells|Boxes of shotgun shells]]||4||4||4 |
||
| + | |- |
||
| + | ![[Barrel]]s!!ITYTD and HNTR!!HMP!!UV and NM |
||
| + | |- |
||
| + | |[[Exploding barrel]]s||28||28||28 |
||
|} |
|} |
||
| − | == |
+ | ==Technical information== |
| ⚫ | Having the walls lower when the last [[boss]] has been killed is a special effect built into the [[Doom engine]]. The [[sector]](s) to be lowered are given the special [[tag]] of [[Tag 666|666]]. Because the level uses this effect, and there is no other way around the walls, it is impossible to complete the level in <tt>-nomonsters</tt> mode (except by [[Doom cheat codes|cheating]]). |
||
| ⚫ | The damaging floor in the last room is a special sector [[Sector#Sector types|type]] (11), [[Damaging floor#Technical information|more specialized]] than the usual damaging floors. It ends the level when [[health]] is sufficiently depleted. To stack the odds further, the [[player]] is confined to the center of the room by [[Linedef#Linedef Flags|impassable linedefs]], so that he cannot set his back against a corner. |
||
| ⚫ | Having the walls lower when the last [[boss]] has been killed is a special effect built into the [[Doom engine]]. The [[sector]](s) to be lowered are given the special [[tag]] of [[Tag 666|666]]. |
||
| − | |||
| ⚫ | The damaging floor in the last room is a special sector [[Sector#Sector types|type]] (11), [[Damaging floor#Technical information|more specialized]] than the usual damaging floors. It ends the level when [[health]] is sufficiently depleted. |
||
A [[par time]] of 30 seconds is defined in the [[Doom source code|source code]] (g_game.c), but is never actually displayed, even in [[source port]]s which generate [[intermission screen]]s for E1M8. |
A [[par time]] of 30 seconds is defined in the [[Doom source code|source code]] (g_game.c), but is never actually displayed, even in [[source port]]s which generate [[intermission screen]]s for E1M8. |
||
| − | == |
+ | ==Inspiration and development== |
| − | |||
An early version of this level appeared as E1M12 of [[Doom v0.5]]. |
An early version of this level appeared as E1M12 of [[Doom v0.5]]. |
||
The level's layout resembles [[Wikipedia:Liberty Island|Liberty Island]] in [[Wikipedia:New York|New York]], although it is not clear whether this is intentional. |
The level's layout resembles [[Wikipedia:Liberty Island|Liberty Island]] in [[Wikipedia:New York|New York]], although it is not clear whether this is intentional. |
||
| + | ==Trivia== |
||
| − | There is a much closer resemblance to the RAF symbol (Rote Armee Fraktion = [http://en.wikipedia.org/wiki/Red_Army_Faction Red Army Faction]), Germany's most prominent left-wing militant group founded in the 1970's. |
||
| + | The music for this level is inspired by the track "[[Wikipedia:Starless|Starless]]" by [[Wikipedia:King Crimson|King Crimson]]. |
||
| − | |||
| ⚫ | |||
| − | |||
| ⚫ | |||
| ⚫ | |||
| ⚫ | |||
| ⚫ | |||
| ⚫ | |||
* [http://www.doom2.net/~compet-n/database/cn.cgi?map:udoom:18 E1M8 demos from the Compet-n database] |
* [http://www.doom2.net/~compet-n/database/cn.cgi?map:udoom:18 E1M8 demos from the Compet-n database] |
||
* [http://ian-albert.com/misc/doommaps.php Top-down perspective view of all Doom levels] by Ian Albert |
* [http://ian-albert.com/misc/doommaps.php Top-down perspective view of all Doom levels] by Ian Albert |
||
| + | * [https://www.youtube.com/watch?v=kohWh387IZ4 E1M8 Video Walkthrough with John Romero] |
||
[[Category:Sandy Petersen levels]] |
[[Category:Sandy Petersen levels]] |
||
[[Category:Tom Hall levels]] |
[[Category:Tom Hall levels]] |
||
[[Category:Levels by name|Phobos Anomaly (Doom)]] |
[[Category:Levels by name|Phobos Anomaly (Doom)]] |
||
| + | [[Category:Doom levels]] |
||
Revision as of 04:09, 23 March 2020
- This level occupies the map slot E1M8. For other maps which occupy this slot, see Category:E1M8.
- This level occupies the map slot MAP08. For other maps which occupy this slot, see Category:MAP08.
- This level occupies the map slot E1M7. For other maps which occupy this slot, see Category:E1M7.
E1M8: Phobos Anomaly (MAP08 in PSX/Saturn/Jaguar/3DO/GBA/32X, E1M7 in SNES) is the eighth and final map of Knee-Deep in the Dead in Doom, featuring a boss battle with two barons of hell (which are often named bruiser brothers). It was designed by Sandy Petersen and Tom Hall and uses the music track "Sign Of Evil".
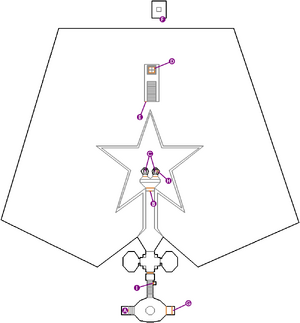
Map of E1M8
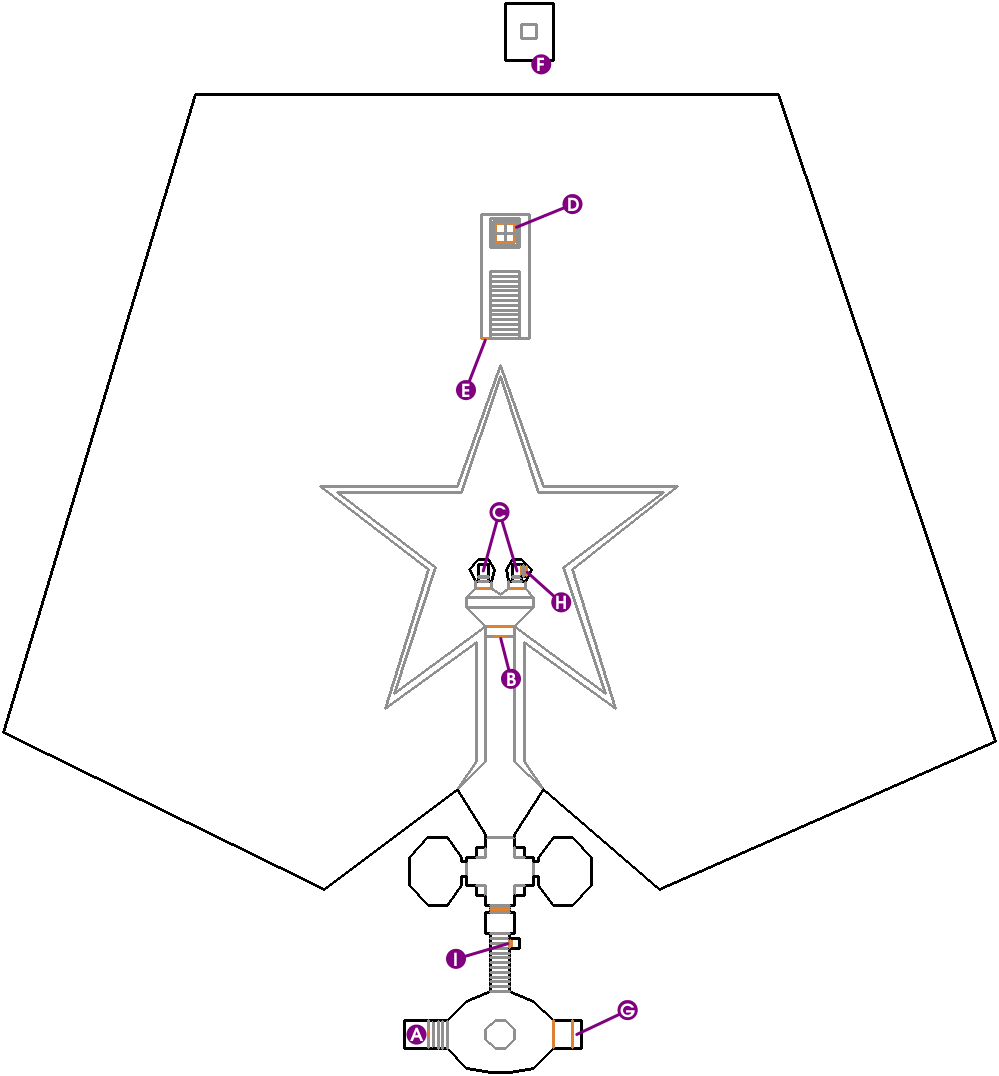
- Letters in italics refer to marked spots on the map. Sector numbers in boldface are secrets which count toward the end-of-level tally (if your source port displays one).
Walkthrough
From the start point (A), walk forward and click the switch to lower the brick wall. Jump down into the oval room, then take the staircase to your left (north) and proceed through the gray door, down the central hallway to a square button (B). This button lowers an elevator which leads to a large star-shaped room, at the center of which are two rectangular, tomb-like structures (C).
As you leave the red alcove the two structures will open, each revealing a baron of hell. On Ultra-Violence and Nightmare! there are also ten spectres here, two in each corner of the star; these are difficult to see because the room is fairly dark and has a speckled floor texture. To progress, the Barons must be slain.
This is easiest if you have a rocket launcher from a previous level, although you should watch for spectres cutting in front of you and subjecting you to blast damage. Otherwise, note that the chaingun has a higher rate of damage than the shotgun, which gives the monsters less time to corner you. If you run low on ammunition, the corners of the star contain four boxes of bullets and a box of shells (as well as a shotgun, two medikits, a stimpack, and a partial invisibility artifact). Each "tomb" also contains a box of bullets.
Also, you can lure any of the spectres in between you and any of the two barons when they combat with you, that way you can distract the barons as they make their attack. This way, when the barons' projectiles hit the spectres, the spectres will turn towards the barons and attack them, which will get the barons to attack the spectres and help you defeat them.
When both barons have died, the walls of the star will slowly lower, revealing a huge courtyard outside. At the north end of this is a marble-textured teleporter pad on a gray platform (D), which is invisible on the automap. Pull the switch at the base (E) to raise its stairs, and ascend to the teleporter. This deposits you in a pitch-dark, small and inescapable room with a pack of monsters around you and a damaging floor under your feet (F). As soon as your health drops to 10% or lower, the level ends. Due to a lack of the Chapter system, the Atari Jaguar, Sega 32X, PlayStation, 3DO, and Saturn ports don't have this room; Instead they have a whole new exit room, with a switch-born raising staircase, a few extra zombies (on higher difficulty levels), and a teleporter exit.
Other points of interest
The oval room contains a number of barrels, which surround four demons (I'm too young to die and Hey, not too rough) or eight demons (Hurt me plenty), or twelve demons (UV and NM). It is possible to clear the entire room with barrel frags, though usually at least one or two demons will survive. For a single chain reaction which destroys every barrel, aim at the leftmost or rightmost barrel you can see, not at the barrel closest to the start point.
At the eastern end of the oval room, you can ride a slow-moving lift up to a ledge (G) containing a computer area map, a box of bullets, and ten stimpacks. If you exit the lift while it is fully lowered, however, it will rise without you, blocking the ledge permanently.
Just past the gray door, there are dark rooms on both sides of the hallway. In the right (east) room is a chaingun with several boxes of bullets; to the left (west) is a shotgun with several boxes of shells.
Once you jump down into the outer courtyard, you cannot return to earlier sections of the level.
Demons and spectres who outlive the barons may enter the outer courtyard by stepping onto the star-shaped wall as it lowers, especially with fast monsters. Watch out for these while waiting for the stairs to rise.
On each skill level, the last room contains six shotgun guys, five imps, and four demons. Although these can very occasionally be defeated using a rocket launcher [1] [2], or in ITYTD using the chaingun (because all player damage is halved), the room essentially functions as a "special effect" whereby 100% kills is sacrificed in favor of plot development. As a result, a kill percentage as low as 28% (ITYTD and HNTR), 44% (HMP), or 63% (UV) can be considered maximal. In a real game, of course, the number will be somewhat higher due to infighting, unless the player is nearly dead before he teleports.
Secrets
Official
- Near the bottom of the staircase leading to the gray door, there is a secret compartment on the east wall, indicated by a greenish texture (I). Open this to reveal a supercharge. (sector 59)
Non-official
- [Added in v1.666] Inside the eastern "tomb", there is a secret compartment on the east wall. Opening it reveals a switch (H), which re-activates the elevator at the south end of the room, allowing the player to return to earlier sections of the level. This compartment is not needed for 100% secrets.
Bugs
The blockmap bug can be triggered by attacks directed:
- north-south in the star room near the star's axis of symmetry;
- eastward out of the western point of the star;
- along the central corridor.
After the walls of the star have been lowered, examination of its inner corners may reveal a handful of slime trails (see screenshots below).
There are 2 known anomalies in this level's REJECT table.
Demo files
- 80% kills, 100% items, and 100% secrets on ITYTD (file info)
- 80% kills, 100% items, and 100% secrets on HNTR (file info)
- 85% kills, 100% items, and 100% secrets on HMP (file info)
- 82% kills, 100% items, and 100% secrets on UV (file info)
Video
 - E1M8 Phobos Anomaly 4K 60FPS (15 KB)")
Areas / screenshots
")
")
")
")
")
")
Slime trails
")
")
")
")
")
")
Speedrunning
Routes and tricks
In a straight speedrun, the most efficient strategy is to incite infighting between a Baron and a Spectre, then use the chaingun on the Baron. The Baron fires fewer plasma bolts because it is being bitten, yet refuses to face the Spectre because it is being shot, so he continues to take damage at an increased rate (with fast monsters parameter activated, the Spectre attacks so frequently that the baron can hardly move). A few players instead advocate taking cover in one of the "tombs", possibly using the hidden compartment to sidestep incoming plasma, though luck plays a far more significant role in that case. [3] [4]
The shotguns on this map are generally ignored, simply because the chaingun does damage more rapidly and is more readily replenished in the star room.
Wallrunning is commonly used in the passage leading to the star room.
For NM speed, it is important to shoot at the pursuing demons after pressing the elevator button, or at least lunge briefly into their melee range, so that no demon can cause several seconds' delay by becoming caught on the edge of the platform. Some pacifist recordings simply weave back and forth on the platform, so that the Demons do not approach in a straight line.
In the NM100S style, you must kill the demons in the oval room in order to avoid being surrounded as you collect the secret. Jochen "Angus" Schneidau has introduced two innovations which turn the demons' increased speed against them:
- Destroy half of the barrels by firing at the nearest one, then run to the east end of the room and shoot the others from the lift. [5]
- As the first barrel starts to explode, charge forward along the south wall, so that the demons migrate in the same direction as the chain reaction (severely injuring yourself in the process). [6]
The whole issue can of course be circumvented in an episode run by using rockets. [7]
In every category save pacifist, the fastest Compet-N runs purposely take a lot of damage in the star room, which speeds up the exit area. Extensive trial and error actually allowed the current UV speed record holder to leave the level instantly. [8]
By straferunning, it is possible to jump directly from the star room to the top of the teleporter structure, bypassing the delay while the stairs rise. The player must jump just as the top of the lowering wall meets the level of the red floor, in effect extending it out further. This trick is credited to Matthias Belz. [9] [10]
When recording in a maxkills style, most players thin out the crowd of spectres immediately with barrel frags, by hiding in the northwest corner of the star until they gather nearby. This tactic can also help in NM, and sometimes even in UV speed, to gain maneuvering space and discourage later ambushes (in an episode run, it also helps protect you from your own rockets).[11])
Due to the low damage rate of the pistol, Tyson runs are sped up considerably when one or both barons are wounded by exploding barrels. The current record holder combined this with infighting between the barons (carefully luring one baron in amongst the barrels while the other baron shoots at them), which was pioneered by Patrick Martin's initial Compet-N submission. [12]
Pacifist runs begin by encouraging infighting between the barons as above, then use the hidden switch to bring in demons on the elevator until they eventually kill the remaining baron.
When the player is positioned at one of the two southern points of the star room, the spectres cannot get close enough to attack. This can be exploited in any category to encourage infighting, but it is especially useful in Tyson and pacifist recordings: if the player detours to the southwest corner on his way to the barrels, the barons are far more likely to leave their platform promptly.
In Compet-N episode runs, this map is always played very differently from its single-level counterparts, and from the other levels in the movie. Because the judges do not take elapsed time into account, survival is essentially the only goal; nearly all of the above tricks are discarded as being too aggressive.
Current records
The Compet-N records for the map are:
| Run | Time | Player | Date | File | Notes |
|---|---|---|---|---|---|
| UV speed | 00:46 | Marijo "Sedlo" Sedlic | 2004-04-08 | e1m8-046.zip | |
| NM speed | 00:49 | Adam Hegyi | 2001-06-20 | n1m8-049.zip | |
| UV max | 01:10 | Adam Hegyi | 1998-03-07 | e1m8-110.zip | |
| NM100S | 00:59 | Jochen "Angus" Schneidau | 2003-10-28 | n1s8-059.zip | |
| UV -fast | 01:04 | Jochen "Angus" Schneidau | 2003-12-07 | f1m8-104.zip | |
| UV -respawn | 1 | ||||
| UV Tyson | 01:38 | Oyvind Stenhaug | 2002-04-08 | t1m8-138.zip | |
| UV pacifist | 02:29 | Oyvind Stenhaug | 2002-05-13 | p1m8-229.zip |
- Compet-N does not maintain a UV -respawn competition for this level; the reasons for this are unclear. [13]
Statistics
Map data
| Things | 126 |
| Vertexes | 264 |
| Linedefs | 333 |
| Sidedefs | 511 |
| Sectors | 74 |
Things
| Monsters | ITYTD and HNTR | HMP | UV and NM |
|---|---|---|---|
| Barons of hell | 2 | 2 | 2 |
| Demons | 8 | 14 | 18 |
| Imps | 5 | 5 | 5 |
| Shotgun guys | 6 | 6 | 6 |
| Spectres | 0 | 0 | 10 |
| Powerups | ITYTD and HNTR | HMP | UV and NM |
| Armor | 1 | 1 | 1 |
| Computer area maps | 1 | 1 | 1 |
| Partial invisibilities | 1 | 1 | 1 |
| Medikits | 3 | 3 | 3 |
| Stimpacks | 11 | 11 | 11 |
| Supercharges | 1 | 1 | 1 |
| Weapons | ITYTD and HNTR | HMP | UV and NM |
| Shotguns | 2 | 2 | 2 |
| Chainguns | 1 | 1 | 1 |
| Ammunition | ITYTD and HNTR | HMP | UV and NM |
| Boxes of bullets | 12 | 11 | 11 |
| Boxes of shotgun shells | 4 | 4 | 4 |
| Barrels | ITYTD and HNTR | HMP | UV and NM |
| Exploding barrels | 28 | 28 | 28 |
Technical information
Having the walls lower when the last boss has been killed is a special effect built into the Doom engine. The sector(s) to be lowered are given the special tag of 666. Because the level uses this effect, and there is no other way around the walls, it is impossible to complete the level in -nomonsters mode (except by cheating).
The damaging floor in the last room is a special sector type (11), more specialized than the usual damaging floors. It ends the level when health is sufficiently depleted. To stack the odds further, the player is confined to the center of the room by impassable linedefs, so that he cannot set his back against a corner.
A par time of 30 seconds is defined in the source code (g_game.c), but is never actually displayed, even in source ports which generate intermission screens for E1M8.
Inspiration and development
An early version of this level appeared as E1M12 of Doom v0.5.
The level's layout resembles Liberty Island in New York, although it is not clear whether this is intentional.
Trivia
The music for this level is inspired by the track "Starless" by King Crimson.
Other appearances
This level appears in Quake II, another game by ID, but as a downloadable map. The bosses are monsters called Tanks. It also appears as an unlockable level in the 2016 game, Doom.